Object [global] {
DTRACE_NET_SERVER_CONNECTION: [Function],
DTRACE_NET_STREAM_END: [Function],
DTRACE_HTTP_SERVER_REQUEST: [Function],
DTRACE_HTTP_SERVER_RESPONSE: [Function],
DTRACE_HTTP_CLIENT_REQUEST: [Function],
DTRACE_HTTP_CLIENT_RESPONSE: [Function],
COUNTER_NET_SERVER_CONNECTION: [Function],
COUNTER_NET_SERVER_CONNECTION_CLOSE: [Function],
COUNTER_HTTP_SERVER_REQUEST: [Function],
COUNTER_HTTP_SERVER_RESPONSE: [Function],
COUNTER_HTTP_CLIENT_REQUEST: [Function],
COUNTER_HTTP_CLIENT_RESPONSE: [Function],
global: [Circular],
process:
process {
title: 'Jupyter Learning',
version: 'v10.13.0',
versions:
{ http_parser: '2.8.0',
node: '10.13.0',
v8: '6.8.275.32-node.36',
uv: '1.23.2',
zlib: '1.2.11',
ares: '1.14.0',
modules: '64',
nghttp2: '1.34.0',
napi: '3',
openssl: '1.1.0i',
icu: '62.1',
unicode: '11.0',
cldr: '33.1',
tz: '2018e' },
arch: 'x64',
platform: 'win32',
release:
{ name: 'node',
lts: 'Dubnium',
sourceUrl:
'https://nodejs.org/download/release/v10.13.0/node-v10.13.0.tar.gz',
headersUrl:
'https://nodejs.org/download/release/v10.13.0/node-v10.13.0-headers.tar.gz',
libUrl:
'https://nodejs.org/download/release/v10.13.0/win-x64/node.lib' },
argv: [ 'C:\\ProgramData\\Anaconda3\\node.exe' ],
execArgv:
[ '--eval',
'(function() {\n/*\n * BSD 3-Clause License\n *\n * Copyright (c) 2018, Nicolas Riesco and others as credited in the AUTHORS file\n * All rights reserved.\n *\n * Redistribution and use in source and binary forms, with or without\n * modification, are permitted provided that the following conditions are met:\n *\n * 1. Redistributions of source code must retain the above copyright notice,\n * this list of conditions and the following disclaimer.\n *\n * 2. Redistributions in binary form must reproduce the above copyright notice,\n * this list of conditions and the following disclaimer in the documentation\n * and/or other materials provided with the distribution.\n *\n * 3. Neither the name of the copyright holder nor the names of its contributors\n * may be used to endorse or promote products derived from this software without\n * specific prior written permission.\n *\n * THIS SOFTWARE IS PROVIDED BY THE COPYRIGHT HOLDERS AND CONTRIBUTORS "AS IS"\n * AND ANY EXPRESS OR IMPLIED WARRANTIES, INCLUDING, BUT NOT LIMITED TO, THE\n * IMPLIED WARRANTIES OF MERCHANTABILITY AND FITNESS FOR A PARTICULAR PURPOSE\n * ARE DISCLAIMED. IN NO EVENT SHALL THE COPYRIGHT HOLDER OR CONTRIBUTORS BE\n * LIABLE FOR ANY DIRECT, INDIRECT, INCIDENTAL, SPECIAL, EXEMPLARY, OR\n * CONSEQUENTIAL DAMAGES (INCLUDING, BUT NOT LIMITED TO, PROCUREMENT OF\n * SUBSTITUTE GOODS OR SERVICES; LOSS OF USE, DATA, OR PROFITS; OR BUSINESS\n * INTERRUPTION) HOWEVER CAUSED AND ON ANY THEORY OF LIABILITY, WHETHER IN\n * CONTRACT, STRICT LIABILITY, OR TORT (INCLUDING NEGLIGENCE OR OTHERWISE)\n * ARISING IN ANY WAY OUT OF THE USE OF THIS SOFTWARE, EVEN IF ADVISED OF THE\n * POSSIBILITY OF SUCH DAMAGE.\n *\n */\n\n/* eslint-disable no-unused-vars */\nvar console = require("console");\nvar stream = require("stream");\nvar util = require("util");\nvar vm = require("vm");\n/* eslint-enable no-unused-vars */\n\n/*\n * BSD 3-Clause License\n *\n * Copyright (c) 2015, Nicolas Riesco and others as credited in the AUTHORS file\n * All rights reserved.\n *\n * Redistribution and use in source and binary forms, with or without\n * modification, are permitted provided that the following conditions are met:\n *\n * 1. Redistributions of source code must retain the above copyright notice,\n * this list of conditions and the following disclaimer.\n *\n * 2. Redistributions in binary form must reproduce the above copyright notice,\n * this list of conditions and the following disclaimer in the documentation\n * and/or other materials provided with the distribution.\n *\n * 3. Neither the name of the copyright holder nor the names of its contributors\n * may be used to endorse or promote products derived from this software without\n * specific prior written permission.\n *\n * THIS SOFTWARE IS PROVIDED BY THE COPYRIGHT HOLDERS AND CONTRIBUTORS "AS IS"\n * AND ANY EXPRESS OR IMPLIED WARRANTIES, INCLUDING, BUT NOT LIMITED TO, THE\n * IMPLIED WARRANTIES OF MERCHANTABILITY AND FITNESS FOR A PARTICULAR PURPOSE\n * ARE DISCLAIMED. IN NO EVENT SHALL THE COPYRIGHT HOLDER OR CONTRIBUTORS BE\n * LIABLE FOR ANY DIRECT, INDIRECT, INCIDENTAL, SPECIAL, EXEMPLARY, OR\n * CONSEQUENTIAL DAMAGES (INCLUDING, BUT NOT LIMITED TO, PROCUREMENT OF\n * SUBSTITUTE GOODS OR SERVICES; LOSS OF USE, DATA, OR PROFITS; OR BUSINESS\n * INTERRUPTION) HOWEVER CAUSED AND ON ANY THEORY OF LIABILITY, WHETHER IN\n * CONTRACT, STRICT LIABILITY, OR TORT (INCLUDING NEGLIGENCE OR OTHERWISE)\n * ARISING IN ANY WAY OUT OF THE USE OF THIS SOFTWARE, EVEN IF ADVISED OF THE\n * POSSIBILITY OF SUCH DAMAGE.\n *\n */\n\n/* global console */\n/* global stream */\n/* global util */\n\n/* global log */\n/* global Display */\n\nfunction Stdout(id, opt) {\n stream.Transform.call(this, opt);\n\n this._id = id;\n}\n\nStdout.prototype = Object.create(stream.Transform.prototype);\n\nStdout.prototype._transform = function(data, encoding, callback) {\n var response = {\n id: this._id,\n stdout: data.toString(),\n };\n log("STDOUT:", response);\n process.send(response);\n this.push(data);\n callback();\n};\n\nfunction Stderr(id, opt) {\n stream.Transform.call(this, opt);\n\n this._id = id;\n}\n\nStderr.prototype = Object.create(stream.Transform.prototype);\n\nStderr.prototype._transform = function(data, encoding, callback) {\n var response = {\n id: this._id,\n stderr: data.toString(),\n };\n log("STDERR:", response);\n process.send(response);\n this.push(data);\n callback();\n};\n\nfunction Context(requester, id) {\n this.requester = requester;\n this.id = id;\n\n this.stdout = new Stdout(this.id);\n this.stderr = new Stderr(this.id);\n this.console = new console.Console(this.stdout, this.stderr);\n\n this._capturedStdout = null;\n this._capturedStderr = null;\n this._capturedConsole = null;\n\n this._async = false;\n this._done = false;\n\n // `$$` provides an interface for users to access the execution context\n this.$$ = Object.create(null);\n\n this.$$.async = (function async(value) {\n this._async = (arguments.length === 0) ? true : !!value;\n return this._async;\n }).bind(this);\n\n this.$$.done = (function done(result) {\n this.send((arguments.length === 0) ? {\n end: true,\n } : {\n mime: toMime(result),\n end: true,\n });\n }).bind(this);\n\n this.$$.sendResult = resolvePromise.call(this,\n function sendResult(result, keepAlive) {\n if (keepAlive) this.$$.async();\n\n this.send({\n mime: toMime(result),\n end: !keepAlive,\n });\n }\n );\n\n this.$$.sendError = resolvePromise.call(this,\n function sendError(error, keepAlive) {\n if (keepAlive) this.$$.async();\n\n this.send({\n error: formatError(error),\n end: !keepAlive,\n });\n }\n );\n\n this.$$.mime = resolvePromise.call(this,\n function sendMime(mimeBundle, keepAlive) {\n if (keepAlive) this.$$.async();\n\n this.send({\n mime: mimeBundle,\n end: !keepAlive,\n });\n }\n );\n\n this.$$.text = resolvePromise.call(this,\n function sendText(text, keepAlive) {\n if (keepAlive) this.$$.async();\n\n this.send({\n mime: {\n "text/plain": text,\n },\n end: !keepAlive,\n });\n }\n );\n\n this.$$.html = resolvePromise.call(this,\n function sendHtml(html, keepAlive) {\n if (keepAlive) this.$$.async();\n\n this.send({\n mime: {\n "text/html": html,\n },\n end: !keepAlive,\n });\n }\n );\n\n this.$$.svg = resolvePromise.call(this,\n function sendSvg(svg, keepAlive) {\n if (keepAlive) this.$$.async();\n\n this.send({\n mime: {\n "image/svg+xml": svg,\n },\n end: !keepAlive,\n });\n }\n );\n\n this.$$.png = resolvePromise.call(this,\n function sendPng(png, keepAlive) {\n if (keepAlive) this.$$.async();\n\n this.send({\n mime: {\n "image/png": png,\n },\n end: !keepAlive,\n });\n }\n );\n\n this.$$.jpeg = resolvePromise.call(this,\n function sendJpeg(jpeg, keepAlive) {\n if (keepAlive) this.$$.async();\n\n this.send({\n mime: {\n "image/jpeg": jpeg,\n },\n end: !keepAlive,\n });\n }\n );\n\n this.$$.json = resolvePromise.call(this,\n function sendJson(json, keepAlive) {\n if (keepAlive) this.$$.async();\n\n this.send({\n mime: {\n "application/json": json,\n },\n end: !keepAlive,\n });\n }\n );\n\n this.$$.input = (function input(options, callback) {\n this.$$.async();\n\n var inputRequest = {\n input: options,\n };\n\n var inputCallback;\n if (typeof callback === "function") {\n inputCallback = function inputCallback(error, reply) {\n callback(error, reply.input);\n };\n }\n\n var promise = this.requester.send(this, inputRequest, inputCallback);\n if (promise) {\n return promise.then(function(reply) { return reply.input; });\n }\n }).bind(this);\n\n this.$$.display = (function createDisplay(id) {\n return (arguments.length === 0) ?\n new Display(this.id) :\n new Display(this.id, id);\n }).bind(this);\n\n this.$$.clear = (function clear(options) {\n this.send({\n request: {\n clear: options || {},\n },\n });\n }).bind(this);\n\n function isPromise(output) {\n if (!global.Promise || typeof global.Promise !== "function") {\n return false;\n }\n return output instanceof global.Promise;\n }\n\n function resolvePromise(outputHandler) {\n return function(output, keepAlive) {\n if (isPromise(output)) {\n this.$$.async();\n\n output.then(function(resolvedOutput) {\n outputHandler.call(this, resolvedOutput, keepAlive);\n }.bind(this)).catch(function(error) {\n this.send({\n error: formatError(error),\n end: true,\n });\n }.bind(this));\n\n return;\n }\n\n outputHandler.apply(this, arguments);\n }.bind(this);\n }\n}\n\nContext.prototype.send = function send(message) {\n message.id = this.id;\n\n if (this._done) {\n log("SEND: DROPPED:", message);\n return;\n }\n\n if (message.end) {\n this._done = true;\n this._async = false;\n }\n\n log("SEND:", message);\n\n process.send(message);\n};\n\nContext.prototype.captureGlobalContext = function captureGlobalContext() {\n this._capturedStdout = process.stdout;\n this._capturedStderr = process.stderr;\n this._capturedConsole = console;\n\n this.stdout.pipe(this._capturedStdout);\n this.stderr.pipe(this._capturedStderr);\n this.console.Console = this._capturedConsole.Console;\n\n delete process.stdout;\n process.stdout = this.stdout;\n\n delete process.stderr;\n process.stderr = this.stderr;\n\n delete global.console;\n global.console = this.console;\n\n delete global.$$;\n global.$$ = this.$$;\n\n if (typeof global.$$mimer$$ !== "function") {\n global.$$mimer$$ = defaultMimer;\n }\n\n delete global.$$mime$$;\n Object.defineProperty(global, "$$mime$$", {\n set: this.$$.mime,\n configurable: true,\n enumerable: false,\n });\n\n delete global.$$html$$;\n Object.defineProperty(global, "$$html$$", {\n set: this.$$.html,\n configurable: true,\n enumerable: false,\n });\n\n delete global.$$svg$$;\n Object.defineProperty(global, "$$svg$$", {\n set: this.$$.svg,\n configurable: true,\n enumerable: false,\n });\n\n delete global.$$png$$;\n Object.defineProperty(global, "$$png$$", {\n set: this.$$.png,\n configurable: true,\n enumerable: false,\n });\n\n delete global.$$jpeg$$;\n Object.defineProperty(global, "$$jpeg$$", {\n set: this.$$.jpeg,\n configurable: true,\n enumerable: false,\n });\n\n delete global.$$async$$;\n Object.defineProperty(global, "$$async$$", {\n get: (function() {\n return this._async;\n }).bind(this),\n set: (function(value) {\n this._async = !!value;\n }).bind(this),\n configurable: true,\n enumerable: false,\n });\n\n global.$$done$$ = this.$$.done.bind(this);\n\n if (!global.hasOwnProperty("$$defaultMimer$$")) {\n Object.defineProperty(global, "$$defaultMimer$$", {\n value: defaultMimer,\n configurable: false,\n writable: false,\n enumerable: false,\n });\n }\n};\n\nContext.prototype.releaseGlobalContext = function releaseGlobalContext() {\n if (process.stdout === this.stdout) {\n this.stdout.unpipe();\n\n delete process.stdout;\n process.stdout = this._capturedStdout;\n\n this._capturedStdout = null;\n }\n\n if (process.stderr === this.stderr) {\n this.stderr.unpipe();\n\n delete process.stderr;\n process.stderr = this._capturedStderr;\n\n this._capturedStderr = null;\n }\n\n if (global.console === this.console) {\n delete global.console;\n global.console = this._capturedConsole;\n\n this._capturedConsole = null;\n }\n};\n\nfunction formatError(error) {\n return {\n ename: (error && error.name) ?\n error.name : typeof error,\n evalue: (error && error.message) ?\n error.message : util.inspect(error),\n traceback: (error && error.stack) ?\n error.stack.split("\\n") : "",\n };\n}\n\nfunction toMime(result) {\n var mimer = (typeof global.$$mimer$$ === "function") ?\n global.$$mimer$$ :\n defaultMimer;\n return mimer(result);\n}\n\nfunction defaultMimer(result) { // eslint-disable-line complexity\n if (typeof result === "undefined") {\n return {\n "text/plain": "undefined"\n };\n }\n\n if (result === null) {\n return {\n "text/plain": "null"\n };\n }\n\n var mime;\n if (result._toMime) {\n try {\n mime = result._toMime();\n } catch (error) {}\n }\n if (typeof mime !== "object") {\n mime = {};\n }\n\n if (!("text/plain" in mime)) {\n try {\n mime["text/plain"] = util.inspect(result);\n } catch (error) {}\n }\n\n if (result._toHtml && !("text/html" in mime)) {\n try {\n mime["text/html"] = result._toHtml();\n } catch (error) {}\n }\n\n if (result._toSvg && !("image/svg+xml" in mime)) {\n try {\n mime["image/svg+xml"] = result._toSvg();\n } catch (error) {}\n }\n\n if (result._toPng && !("image/png" in mime)) {\n try {\n mime["image/png"] = result._toPng();\n } catch (error) {}\n }\n\n if (result._toJpeg && !("image/jpeg" in mime)) {\n try {\n mime["image/jpeg"] = result._toJpeg();\n } catch (error) {}\n }\n\n return mime;\n}\n\n/*\n * BSD 3-Clause License\n *\n * Copyright (c) 2017, Nicolas Riesco and others as credited in the AUTHORS file\n * All rights reserved.\n *\n * Redistribution and use in source and binary forms, with or without\n * modification, are permitted provided that the following conditions are met:\n *\n * 1. Redistributions of source code must retain the above copyright notice,\n * this list of conditions and the following disclaimer.\n *\n * 2. Redistributions in binary form must reproduce the above copyright notice,\n * this list of conditions and the following disclaimer in the documentation\n * and/or other materials provided with the distribution.\n *\n * 3. Neither the name of the copyright holder nor the names of its contributors\n * may be used to endorse or promote products derived from this software without\n * specific prior written permission.\n *\n * THIS SOFTWARE IS PROVIDED BY THE COPYRIGHT HOLDERS AND CONTRIBUTORS "AS IS"\n * AND ANY EXPRESS OR IMPLIED WARRANTIES, INCLUDING, BUT NOT LIMITED TO, THE\n * IMPLIED WARRANTIES OF MERCHANTABILITY AND FITNESS FOR A PARTICULAR PURPOSE\n * ARE DISCLAIMED. IN NO EVENT SHALL THE COPYRIGHT HOLDER OR CONTRIBUTORS BE\n * LIABLE FOR ANY DIRECT, INDIRECT, INCIDENTAL, SPECIAL, EXEMPLARY, OR\n * CONSEQUENTIAL DAMAGES (INCLUDING, BUT NOT LIMITED TO, PROCUREMENT OF\n * SUBSTITUTE GOODS OR SERVICES; LOSS OF USE, DATA, OR PROFITS; OR BUSINESS\n * INTERRUPTION) HOWEVER CAUSED AND ON ANY THEORY OF LIABILITY, WHETHER IN\n * CONTRACT, STRICT LIABILITY, OR TORT (INCLUDING NEGLIGENCE OR OTHERWISE)\n * ARISING IN ANY WAY OUT OF THE USE OF THIS SOFTWARE, EVEN IF ADVISED OF THE\n * POSSIBILITY OF SUCH DAMAGE.\n *\n */\n\nfunction Display(context_id, display_id) { // eslint-disable-line no-unused-vars\n var send;\n\n this.mime = function mime(mimeBundle) {\n send(mimeBundle);\n };\n\n this.text = function text(text) {\n send({"text/plain": text});\n };\n\n this.html = function html(html) {\n send({"text/html": html});\n };\n\n this.svg = function svg(svg) {\n send({"image/svg+xml": svg});\n };\n\n this.png = function png(png) {\n send({"image/png": png});\n };\n\n this.jpeg = function jpeg(jpeg) {\n send({"image/jpeg": jpeg});\n };\n\n this.json = function json(json) {\n send({"application/json": json});\n };\n\n this.close = function close() {\n process.send({\n id: context_id,\n display: {\n close: display_id,\n },\n });\n };\n\n if (arguments.length < 2) {\n // case: without a display_id\n send = function send(mime) {\n process.send({\n id: context_id,\n display: {\n mime: mime,\n },\n });\n };\n } else {\n // case: with a display_id\n send = function send(mime) {\n process.send({\n id: context_id,\n display: {\n display_id: display_id,\n mime: mime,\n },\n });\n };\n\n // open the display_id\n process.send({\n id: context_id,\n display: {\n open: display_id,\n },\n });\n }\n}\n\n/*\n * BSD 3-Clause License\n *\n * Copyright (c) 2017, Nicolas Riesco and others as credited in the AUTHORS file\n * All rights reserved.\n *\n * Redistribution and use in source and binary forms, with or without\n * modification, are permitted provided that the following conditions are met:\n *\n * 1. Redistributions of source code must retain the above copyright notice,\n * this list of conditions and the following disclaimer.\n *\n * 2. Redistributions in binary form must reproduce the above copyright notice,\n * this list of conditions and the following disclaimer in the documentation\n * and/or other materials provided with the distribution.\n *\n * 3. Neither the name of the copyright holder nor the names of its contributors\n * may be used to endorse or promote products derived from this software without\n * specific prior written permission.\n *\n * THIS SOFTWARE IS PROVIDED BY THE COPYRIGHT HOLDERS AND CONTRIBUTORS "AS IS"\n * AND ANY EXPRESS OR IMPLIED WARRANTIES, INCLUDING, BUT NOT LIMITED TO, THE\n * IMPLIED WARRANTIES OF MERCHANTABILITY AND FITNESS FOR A PARTICULAR PURPOSE\n * ARE DISCLAIMED. IN NO EVENT SHALL THE COPYRIGHT HOLDER OR CONTRIBUTORS BE\n * LIABLE FOR ANY DIRECT, INDIRECT, INCIDENTAL, SPECIAL, EXEMPLARY, OR\n * CONSEQUENTIAL DAMAGES (INCLUDING, BUT NOT LIMITED TO, PROCUREMENT OF\n * SUBSTITUTE GOODS OR SERVICES; LOSS OF USE, DATA, OR PROFITS; OR BUSINESS\n * INTERRUPTION) HOWEVER CAUSED AND ON ANY THEORY OF LIABILITY, WHETHER IN\n * CONTRACT, STRICT LIABILITY, OR TORT (INCLUDING NEGLIGENCE OR OTHERWISE)\n * ARISING IN ANY WAY OUT OF THE USE OF THIS SOFTWARE, EVEN IF ADVISED OF THE\n * POSSIBILITY OF SUCH DAMAGE.\n *\n */\n\n/* global Promise */\n\nfunction Requester() {\n // id for next request\n this.id = 0;\n\n // callback associated with a request (indexed by id)\n this.callbacks = {};\n\n // the Promise resolve callback associated with a request (indexed by id)\n this.resolves = {};\n\n // the Promise reject callback associated with a request (indexed by id)\n this.rejects = {};\n\n // the string to be returned to a request (indexed by id)\n this.responses = {};\n}\n\n// send a request\nRequester.prototype.send = function send(context, request, callback) {\n var id = this.id++;\n\n if (callback) {\n this.callbacks[id] = callback;\n }\n\n var promise;\n if (global.Promise) {\n promise = new Promise(function(resolve, reject) {\n if (!this.responses.hasOwnProperty(id)) {\n this.resolves[id] = resolve;\n this.rejects[id] = reject;\n return;\n }\n\n var response = this.responses[id];\n delete this.responses[id];\n resolve(response);\n }.bind(this));\n }\n\n request.id = id;\n\n context.send({\n request: request,\n });\n\n return promise;\n};\n\n// pass reply to the callbacks associated with a request\nRequester.prototype.receive = function receive(id, reply) {\n var callback = this.callbacks[id];\n if (callback) {\n delete this.callbacks[id];\n callback(null, reply);\n }\n\n var resolve = this.resolves[id];\n if (resolve) {\n delete this.resolves[id];\n delete this.rejects[id];\n resolve(reply);\n }\n};\n\n/*\n * BSD 3-Clause License\n *\n * Copyright (c) 2015, Nicolas Riesco and others as credited in the AUTHORS file\n * All rights reserved.\n *\n * Redistribution and use in source and binary forms, with or without\n * modification, are permitted provided that the following conditions are met:\n *\n * 1. Redistributions of source code must retain the above copyright notice,\n * this list of conditions and the following disclaimer.\n *\n * 2. Redistributions in binary form must reproduce the above copyright notice,\n * this list of conditions and the following disclaimer in the documentation\n * and/or other materials provided with the distribution.\n *\n * 3. Neither the name of the copyright holder nor the names of its contributors\n * may be used to endorse or promote products derived from this software without\n * specific prior written permission.\n *\n * THIS SOFTWARE IS PROVIDED BY THE COPYRIGHT HOLDERS AND CONTRIBUTORS "AS IS"\n * AND ANY EXPRESS OR IMPLIED WARRANTIES, INCLUDING, BUT NOT LIMITED TO, THE\n * IMPLIED WARRANTIES OF MERCHANTABILITY AND FITNESS FOR A PARTICULAR PURPOSE\n * ARE DISCLAIMED. IN NO EVENT SHALL THE COPYRIGHT HOLDER OR CONTRIBUTORS BE\n * LIABLE FOR ANY DIRECT, INDIRECT, INCIDENTAL, SPECIAL, EXEMPLARY, OR\n * CONSEQUENTIAL DAMAGES (INCLUDING, BUT NOT LIMITED TO, PROCUREMENT OF\n * SUBSTITUTE GOODS OR SERVICES; LOSS OF USE, DATA, OR PROFITS; OR BUSINESS\n * INTERRUPTION) HOWEVER CAUSED AND ON ANY THEORY OF LIABILITY, WHETHER IN\n * CONTRACT, STRICT LIABILITY, OR TORT (INCLUDING NEGLIGENCE OR OTHERWISE)\n * ARISING IN ANY WAY OUT OF THE USE OF THIS SOFTWARE, EVEN IF ADVISED OF THE\n * POSSIBILITY OF SUCH DAMAGE.\n *\n */\n\n/* global util */\n/* global vm */\n\n/* global Context */\n/* global defaultMimer */\n/* global Requester */\n\n// Shared variables\nvar DEBUG = !!process.env.DEBUG;\nvar log;\nvar requester;\nvar initialContext;\n\n// Init IPC server\ninit();\n\nreturn;\n\nfunction init() {\n // Setup logger\n log = DEBUG ?\n function log() {\n process.send({\n log: "SERVER: " + util.format.apply(this, arguments),\n });\n } :\n function noop() {};\n\n // Create instance to send requests\n requester = new Requester();\n\n // Capture the initial context\n // (id left undefined to indicate this is the initial context)\n initialContext = new Context(requester);\n initialContext.captureGlobalContext();\n\n Object.defineProperty(global, "$$defaultMimer$$", {\n value: defaultMimer,\n configurable: false,\n writable: false,\n enumerable: false,\n });\n\n process.on("message", onMessage.bind(this));\n\n process.on("uncaughtException", onUncaughtException.bind(this));\n\n process.send({\n status: "online",\n });\n}\n\nfunction onUncaughtException(error) {\n log("UNCAUGHTEXCEPTION:", error.stack);\n process.send({\n stderr: error.stack.toString(),\n });\n}\n\nfunction onMessage(message) {\n log("RECEIVED:", message);\n\n var action = message[0];\n var code = message[1];\n var id = message[2];\n\n initialContext.releaseGlobalContext();\n var context = new Context(requester, id);\n context.captureGlobalContext();\n\n try {\n if (action === "getAllPropertyNames") {\n onNameRequest(code, context);\n } else if (action === "inspect") {\n onInspectRequest(code, context);\n } else if (action === "run") {\n onRunRequest(code, context);\n } else if (action === "reply") {\n onReply(message);\n } else {\n throw new Error("NEL: Unhandled action: " + action);\n }\n } catch (error) {\n context.$$.sendError(error);\n }\n\n context.releaseGlobalContext();\n initialContext.captureGlobalContext();\n initialContext._done = false;\n}\n\nfunction onReply(message) {\n var reply = message[1];\n var id = message[3];\n requester.receive(id, reply);\n}\n\nfunction onNameRequest(code, context) {\n var message = {\n id: context.id,\n names: getAllPropertyNames(run(code)),\n end: true,\n };\n context.send(message);\n}\n\nfunction onInspectRequest(code, context) {\n var message = {\n id: context.id,\n inspection: inspect(run(code)),\n end: true,\n };\n context.send(message);\n}\n\nfunction onRunRequest(code, context) {\n var result = run(code);\n\n // If a result has already been sent, do not send this result.\n if (context._done) {\n return;\n }\n\n // If the result is a Promise, send the result fulfilled by the promise\n if (isPromise(result)) {\n context.$$.sendResult(result);\n return;\n }\n\n // If async mode has been enabled (and the result is not a Promise),\n // do not send this result.\n if (context._async) {\n return;\n }\n\n // If no result has been sent yet and async mode has not been enabled,\n // send this result.\n context.$$.sendResult(result);\n\n return;\n\n function isPromise(output) {\n if (!global.Promise || typeof global.Promise !== "function") {\n return false;\n }\n return output instanceof global.Promise;\n }\n}\n\nfunction getAllPropertyNames(object) {\n var propertyList = [];\n\n if (object === undefined) {\n return [];\n }\n\n if (object === null) {\n return [];\n }\n\n var prototype;\n if (typeof object === "boolean") {\n prototype = Boolean.prototype;\n } else if (typeof object === "number") {\n prototype = Number.prototype;\n } else if (typeof object === "string") {\n prototype = String.prototype;\n } else {\n prototype = object;\n }\n\n var prototypeList = [prototype];\n\n function pushToPropertyList(e) {\n if (propertyList.indexOf(e) === -1) {\n propertyList.push(e);\n }\n }\n\n while (prototype) {\n var names = Object.getOwnPropertyNames(prototype).sort();\n names.forEach(pushToPropertyList);\n\n prototype = Object.getPrototypeOf(prototype);\n if (prototype === null) {\n break;\n }\n\n if (prototypeList.indexOf(prototype) === -1) {\n prototypeList.push(prototype);\n }\n }\n\n return propertyList;\n}\n\nfunction inspect(object) {\n if (object === undefined) {\n return {\n string: "undefined",\n type: "Undefined",\n };\n }\n\n if (object === null) {\n return {\n string: "null",\n type: "Null",\n };\n }\n\n if (typeof object === "boolean") {\n return {\n string: object ? "true" : "false",\n type: "Boolean",\n constructorList: ["Boolean", "Object"],\n };\n }\n\n if (typeof object === "number") {\n return {\n string: util.inspect(object),\n type: "Number",\n constructorList: ["Number", "Object"],\n };\n }\n\n if (typeof object === "string") {\n return {\n string: object,\n type: "String",\n constructorList: ["String", "Object"],\n length: object.length,\n };\n }\n\n if (typeof object === "function") {\n return {\n string: object.toString(),\n type: "Function",\n constructorList: ["Function", "Object"],\n length: object.length,\n };\n }\n\n var constructorList = getConstructorList(object);\n var result = {\n string: toString(object),\n type: constructorList[0] || "",\n constructorList: constructorList,\n };\n\n if ("length" in object) {\n result.length = object.length;\n }\n\n return result;\n\n function toString(object) {\n try {\n return util.inspect(object.valueOf());\n } catch (e) {\n return util.inspect(object);\n }\n }\n\n function getConstructorList(object) {\n var constructorList = [];\n\n for (\n var prototype = Object.getPrototypeOf(object);\n prototype && prototype.constructor;\n prototype = Object.getPrototypeOf(prototype)\n ) {\n constructorList.push(prototype.constructor.name);\n }\n\n return constructorList;\n }\n}\n\nfunction run(code) {\n return vm.runInThisContext(code);\n}\n\n})();' ],
env:
{ ALLUSERSPROFILE: 'C:\\ProgramData',
APPDATA: 'C:\\Users\\ruszk\\AppData\\Roaming',
COMMONPROGRAMFILES: 'C:\\Program Files\\Common Files',
'COMMONPROGRAMFILES(X86)': 'C:\\Program Files (x86)\\Common Files',
COMMONPROGRAMW6432: 'C:\\Program Files\\Common Files',
COMPUTERNAME: 'DESKTOP-KIU7VUB',
COMSPEC: 'C:\\Windows\\system32\\cmd.exe',
CONDA_PREFIX: 'C:\\ProgramData\\Anaconda3',
DRIVERDATA: 'C:\\Windows\\System32\\Drivers\\DriverData',
HOMEDRIVE: 'C:',
HOMEPATH: '\\Users\\ruszk',
IPY_INTERRUPT_EVENT: '1468',
JPY_INTERRUPT_EVENT: '1468',
JPY_PARENT_PID: '2172',
LOCALAPPDATA: 'C:\\Users\\ruszk\\AppData\\Local',
LOGONSERVER: '\\\\DESKTOP-KIU7VUB',
NUMBER_OF_PROCESSORS: '4',
ONEDRIVE: 'C:\\Users\\ruszk\\OneDrive',
ONEDRIVECONSUMER: 'C:\\Users\\ruszk\\OneDrive',
OS: 'Windows_NT',
PATH:
'C:\\ProgramData\\Anaconda3;C:\\ProgramData\\Anaconda3\\Library\\mingw-w64\\bin;C:\\ProgramData\\Anaconda3\\Library\\usr\\bin;C:\\ProgramData\\Anaconda3\\Library\\bin;C:\\ProgramData\\Anaconda3\\Scripts;C:\\Windows\\system32;C:\\Windows;C:\\Windows\\System32\\Wbem;C:\\Windows\\System32\\WindowsPowerShell\\v1.0\\;C:\\Windows\\System32\\OpenSSH\\;C:\\Program Files\\Git\\cmd;C:\\Program Files\\nodejs\\;C:\\Program Files\\Microsoft VS Code\\bin;C:\\Program Files\\PuTTY\\;C:\\Users\\ruszk\\AppData\\Local\\Microsoft\\WindowsApps;C:\\Users\\ruszk\\AppData\\Roaming\\npm',
PATHEXT: '.COM;.EXE;.BAT;.CMD;.VBS;.VBE;.JS;.JSE;.WSF;.WSH;.MSC',
PROCESSOR_ARCHITECTURE: 'AMD64',
PROCESSOR_IDENTIFIER: 'Intel64 Family 6 Model 69 Stepping 1, GenuineIntel',
PROCESSOR_LEVEL: '6',
PROCESSOR_REVISION: '4501',
PROGRAMDATA: 'C:\\ProgramData',
PROGRAMFILES: 'C:\\Program Files',
'PROGRAMFILES(X86)': 'C:\\Program Files (x86)',
PROGRAMW6432: 'C:\\Program Files',
PROMPT: '$P$G',
PSMODULEPATH:
'C:\\Program Files\\WindowsPowerShell\\Modules;C:\\Windows\\system32\\WindowsPowerShell\\v1.0\\Modules',
PUBLIC: 'C:\\Users\\Public',
SESSIONNAME: 'Console',
SYSTEMDRIVE: 'C:',
SYSTEMROOT: 'C:\\Windows',
TEMP: 'C:\\Users\\ruszk\\AppData\\Local\\Temp',
TMP: 'C:\\Users\\ruszk\\AppData\\Local\\Temp',
USERDOMAIN: 'DESKTOP-KIU7VUB',
USERDOMAIN_ROAMINGPROFILE: 'DESKTOP-KIU7VUB',
USERNAME: 'ruszk',
USERPROFILE: 'C:\\Users\\ruszk',
WINDIR: 'C:\\Windows' },
pid: 9828,
features:
{ debug: false,
uv: true,
ipv6: true,
tls_alpn: true,
tls_sni: true,
tls_ocsp: true,
tls: true },
ppid: 7208,
_eval:
'(function() {\n/*\n * BSD 3-Clause License\n *\n * Copyright (c) 2018, Nicolas Riesco and others as credited in the AUTHORS file\n * All rights reserved.\n *\n * Redistribution and use in source and binary forms, with or without\n * modification, are permitted provided that the following conditions are met:\n *\n * 1. Redistributions of source code must retain the above copyright notice,\n * this list of conditions and the following disclaimer.\n *\n * 2. Redistributions in binary form must reproduce the above copyright notice,\n * this list of conditions and the following disclaimer in the documentation\n * and/or other materials provided with the distribution.\n *\n * 3. Neither the name of the copyright holder nor the names of its contributors\n * may be used to endorse or promote products derived from this software without\n * specific prior written permission.\n *\n * THIS SOFTWARE IS PROVIDED BY THE COPYRIGHT HOLDERS AND CONTRIBUTORS "AS IS"\n * AND ANY EXPRESS OR IMPLIED WARRANTIES, INCLUDING, BUT NOT LIMITED TO, THE\n * IMPLIED WARRANTIES OF MERCHANTABILITY AND FITNESS FOR A PARTICULAR PURPOSE\n * ARE DISCLAIMED. IN NO EVENT SHALL THE COPYRIGHT HOLDER OR CONTRIBUTORS BE\n * LIABLE FOR ANY DIRECT, INDIRECT, INCIDENTAL, SPECIAL, EXEMPLARY, OR\n * CONSEQUENTIAL DAMAGES (INCLUDING, BUT NOT LIMITED TO, PROCUREMENT OF\n * SUBSTITUTE GOODS OR SERVICES; LOSS OF USE, DATA, OR PROFITS; OR BUSINESS\n * INTERRUPTION) HOWEVER CAUSED AND ON ANY THEORY OF LIABILITY, WHETHER IN\n * CONTRACT, STRICT LIABILITY, OR TORT (INCLUDING NEGLIGENCE OR OTHERWISE)\n * ARISING IN ANY WAY OUT OF THE USE OF THIS SOFTWARE, EVEN IF ADVISED OF THE\n * POSSIBILITY OF SUCH DAMAGE.\n *\n */\n\n/* eslint-disable no-unused-vars */\nvar console = require("console");\nvar stream = require("stream");\nvar util = require("util");\nvar vm = require("vm");\n/* eslint-enable no-unused-vars */\n\n/*\n * BSD 3-Clause License\n *\n * Copyright (c) 2015, Nicolas Riesco and others as credited in the AUTHORS file\n * All rights reserved.\n *\n * Redistribution and use in source and binary forms, with or without\n * modification, are permitted provided that the following conditions are met:\n *\n * 1. Redistributions of source code must retain the above copyright notice,\n * this list of conditions and the following disclaimer.\n *\n * 2. Redistributions in binary form must reproduce the above copyright notice,\n * this list of conditions and the following disclaimer in the documentation\n * and/or other materials provided with the distribution.\n *\n * 3. Neither the name of the copyright holder nor the names of its contributors\n * may be used to endorse or promote products derived from this software without\n * specific prior written permission.\n *\n * THIS SOFTWARE IS PROVIDED BY THE COPYRIGHT HOLDERS AND CONTRIBUTORS "AS IS"\n * AND ANY EXPRESS OR IMPLIED WARRANTIES, INCLUDING, BUT NOT LIMITED TO, THE\n * IMPLIED WARRANTIES OF MERCHANTABILITY AND FITNESS FOR A PARTICULAR PURPOSE\n * ARE DISCLAIMED. IN NO EVENT SHALL THE COPYRIGHT HOLDER OR CONTRIBUTORS BE\n * LIABLE FOR ANY DIRECT, INDIRECT, INCIDENTAL, SPECIAL, EXEMPLARY, OR\n * CONSEQUENTIAL DAMAGES (INCLUDING, BUT NOT LIMITED TO, PROCUREMENT OF\n * SUBSTITUTE GOODS OR SERVICES; LOSS OF USE, DATA, OR PROFITS; OR BUSINESS\n * INTERRUPTION) HOWEVER CAUSED AND ON ANY THEORY OF LIABILITY, WHETHER IN\n * CONTRACT, STRICT LIABILITY, OR TORT (INCLUDING NEGLIGENCE OR OTHERWISE)\n * ARISING IN ANY WAY OUT OF THE USE OF THIS SOFTWARE, EVEN IF ADVISED OF THE\n * POSSIBILITY OF SUCH DAMAGE.\n *\n */\n\n/* global console */\n/* global stream */\n/* global util */\n\n/* global log */\n/* global Display */\n\nfunction Stdout(id, opt) {\n stream.Transform.call(this, opt);\n\n this._id = id;\n}\n\nStdout.prototype = Object.create(stream.Transform.prototype);\n\nStdout.prototype._transform = function(data, encoding, callback) {\n var response = {\n id: this._id,\n stdout: data.toString(),\n };\n log("STDOUT:", response);\n process.send(response);\n this.push(data);\n callback();\n};\n\nfunction Stderr(id, opt) {\n stream.Transform.call(this, opt);\n\n this._id = id;\n}\n\nStderr.prototype = Object.create(stream.Transform.prototype);\n\nStderr.prototype._transform = function(data, encoding, callback) {\n var response = {\n id: this._id,\n stderr: data.toString(),\n };\n log("STDERR:", response);\n process.send(response);\n this.push(data);\n callback();\n};\n\nfunction Context(requester, id) {\n this.requester = requester;\n this.id = id;\n\n this.stdout = new Stdout(this.id);\n this.stderr = new Stderr(this.id);\n this.console = new console.Console(this.stdout, this.stderr);\n\n this._capturedStdout = null;\n this._capturedStderr = null;\n this._capturedConsole = null;\n\n this._async = false;\n this._done = false;\n\n // `$$` provides an interface for users to access the execution context\n this.$$ = Object.create(null);\n\n this.$$.async = (function async(value) {\n this._async = (arguments.length === 0) ? true : !!value;\n return this._async;\n }).bind(this);\n\n this.$$.done = (function done(result) {\n this.send((arguments.length === 0) ? {\n end: true,\n } : {\n mime: toMime(result),\n end: true,\n });\n }).bind(this);\n\n this.$$.sendResult = resolvePromise.call(this,\n function sendResult(result, keepAlive) {\n if (keepAlive) this.$$.async();\n\n this.send({\n mime: toMime(result),\n end: !keepAlive,\n });\n }\n );\n\n this.$$.sendError = resolvePromise.call(this,\n function sendError(error, keepAlive) {\n if (keepAlive) this.$$.async();\n\n this.send({\n error: formatError(error),\n end: !keepAlive,\n });\n }\n );\n\n this.$$.mime = resolvePromise.call(this,\n function sendMime(mimeBundle, keepAlive) {\n if (keepAlive) this.$$.async();\n\n this.send({\n mime: mimeBundle,\n end: !keepAlive,\n });\n }\n );\n\n this.$$.text = resolvePromise.call(this,\n function sendText(text, keepAlive) {\n if (keepAlive) this.$$.async();\n\n this.send({\n mime: {\n "text/plain": text,\n },\n end: !keepAlive,\n });\n }\n );\n\n this.$$.html = resolvePromise.call(this,\n function sendHtml(html, keepAlive) {\n if (keepAlive) this.$$.async();\n\n this.send({\n mime: {\n "text/html": html,\n },\n end: !keepAlive,\n });\n }\n );\n\n this.$$.svg = resolvePromise.call(this,\n function sendSvg(svg, keepAlive) {\n if (keepAlive) this.$$.async();\n\n this.send({\n mime: {\n "image/svg+xml": svg,\n },\n end: !keepAlive,\n });\n }\n );\n\n this.$$.png = resolvePromise.call(this,\n function sendPng(png, keepAlive) {\n if (keepAlive) this.$$.async();\n\n this.send({\n mime: {\n "image/png": png,\n },\n end: !keepAlive,\n });\n }\n );\n\n this.$$.jpeg = resolvePromise.call(this,\n function sendJpeg(jpeg, keepAlive) {\n if (keepAlive) this.$$.async();\n\n this.send({\n mime: {\n "image/jpeg": jpeg,\n },\n end: !keepAlive,\n });\n }\n );\n\n this.$$.json = resolvePromise.call(this,\n function sendJson(json, keepAlive) {\n if (keepAlive) this.$$.async();\n\n this.send({\n mime: {\n "application/json": json,\n },\n end: !keepAlive,\n });\n }\n );\n\n this.$$.input = (function input(options, callback) {\n this.$$.async();\n\n var inputRequest = {\n input: options,\n };\n\n var inputCallback;\n if (typeof callback === "function") {\n inputCallback = function inputCallback(error, reply) {\n callback(error, reply.input);\n };\n }\n\n var promise = this.requester.send(this, inputRequest, inputCallback);\n if (promise) {\n return promise.then(function(reply) { return reply.input; });\n }\n }).bind(this);\n\n this.$$.display = (function createDisplay(id) {\n return (arguments.length === 0) ?\n new Display(this.id) :\n new Display(this.id, id);\n }).bind(this);\n\n this.$$.clear = (function clear(options) {\n this.send({\n request: {\n clear: options || {},\n },\n });\n }).bind(this);\n\n function isPromise(output) {\n if (!global.Promise || typeof global.Promise !== "function") {\n return false;\n }\n return output instanceof global.Promise;\n }\n\n function resolvePromise(outputHandler) {\n return function(output, keepAlive) {\n if (isPromise(output)) {\n this.$$.async();\n\n output.then(function(resolvedOutput) {\n outputHandler.call(this, resolvedOutput, keepAlive);\n }.bind(this)).catch(function(error) {\n this.send({\n error: formatError(error),\n end: true,\n });\n }.bind(this));\n\n return;\n }\n\n outputHandler.apply(this, arguments);\n }.bind(this);\n }\n}\n\nContext.prototype.send = function send(message) {\n message.id = this.id;\n\n if (this._done) {\n log("SEND: DROPPED:", message);\n return;\n }\n\n if (message.end) {\n this._done = true;\n this._async = false;\n }\n\n log("SEND:", message);\n\n process.send(message);\n};\n\nContext.prototype.captureGlobalContext = function captureGlobalContext() {\n this._capturedStdout = process.stdout;\n this._capturedStderr = process.stderr;\n this._capturedConsole = console;\n\n this.stdout.pipe(this._capturedStdout);\n this.stderr.pipe(this._capturedStderr);\n this.console.Console = this._capturedConsole.Console;\n\n delete process.stdout;\n process.stdout = this.stdout;\n\n delete process.stderr;\n process.stderr = this.stderr;\n\n delete global.console;\n global.console = this.console;\n\n delete global.$$;\n global.$$ = this.$$;\n\n if (typeof global.$$mimer$$ !== "function") {\n global.$$mimer$$ = defaultMimer;\n }\n\n delete global.$$mime$$;\n Object.defineProperty(global, "$$mime$$", {\n set: this.$$.mime,\n configurable: true,\n enumerable: false,\n });\n\n delete global.$$html$$;\n Object.defineProperty(global, "$$html$$", {\n set: this.$$.html,\n configurable: true,\n enumerable: false,\n });\n\n delete global.$$svg$$;\n Object.defineProperty(global, "$$svg$$", {\n set: this.$$.svg,\n configurable: true,\n enumerable: false,\n });\n\n delete global.$$png$$;\n Object.defineProperty(global, "$$png$$", {\n set: this.$$.png,\n configurable: true,\n enumerable: false,\n });\n\n delete global.$$jpeg$$;\n Object.defineProperty(global, "$$jpeg$$", {\n set: this.$$.jpeg,\n configurable: true,\n enumerable: false,\n });\n\n delete global.$$async$$;\n Object.defineProperty(global, "$$async$$", {\n get: (function() {\n return this._async;\n }).bind(this),\n set: (function(value) {\n this._async = !!value;\n }).bind(this),\n configurable: true,\n enumerable: false,\n });\n\n global.$$done$$ = this.$$.done.bind(this);\n\n if (!global.hasOwnProperty("$$defaultMimer$$")) {\n Object.defineProperty(global, "$$defaultMimer$$", {\n value: defaultMimer,\n configurable: false,\n writable: false,\n enumerable: false,\n });\n }\n};\n\nContext.prototype.releaseGlobalContext = function releaseGlobalContext() {\n if (process.stdout === this.stdout) {\n this.stdout.unpipe();\n\n delete process.stdout;\n process.stdout = this._capturedStdout;\n\n this._capturedStdout = null;\n }\n\n if (process.stderr === this.stderr) {\n this.stderr.unpipe();\n\n delete process.stderr;\n process.stderr = this._capturedStderr;\n\n this._capturedStderr = null;\n }\n\n if (global.console === this.console) {\n delete global.console;\n global.console = this._capturedConsole;\n\n this._capturedConsole = null;\n }\n};\n\nfunction formatError(error) {\n return {\n ename: (error && error.name) ?\n error.name : typeof error,\n evalue: (error && error.message) ?\n error.message : util.inspect(error),\n traceback: (error && error.stack) ?\n error.stack.split("\\n") : "",\n };\n}\n\nfunction toMime(result) {\n var mimer = (typeof global.$$mimer$$ === "function") ?\n global.$$mimer$$ :\n defaultMimer;\n return mimer(result);\n}\n\nfunction defaultMimer(result) { // eslint-disable-line complexity\n if (typeof result === "undefined") {\n return {\n "text/plain": "undefined"\n };\n }\n\n if (result === null) {\n return {\n "text/plain": "null"\n };\n }\n\n var mime;\n if (result._toMime) {\n try {\n mime = result._toMime();\n } catch (error) {}\n }\n if (typeof mime !== "object") {\n mime = {};\n }\n\n if (!("text/plain" in mime)) {\n try {\n mime["text/plain"] = util.inspect(result);\n } catch (error) {}\n }\n\n if (result._toHtml && !("text/html" in mime)) {\n try {\n mime["text/html"] = result._toHtml();\n } catch (error) {}\n }\n\n if (result._toSvg && !("image/svg+xml" in mime)) {\n try {\n mime["image/svg+xml"] = result._toSvg();\n } catch (error) {}\n }\n\n if (result._toPng && !("image/png" in mime)) {\n try {\n mime["image/png"] = result._toPng();\n } catch (error) {}\n }\n\n if (result._toJpeg && !("image/jpeg" in mime)) {\n try {\n mime["image/jpeg"] = result._toJpeg();\n } catch (error) {}\n }\n\n return mime;\n}\n\n/*\n * BSD 3-Clause License\n *\n * Copyright (c) 2017, Nicolas Riesco and others as credited in the AUTHORS file\n * All rights reserved.\n *\n * Redistribution and use in source and binary forms, with or without\n * modification, are permitted provided that the following conditions are met:\n *\n * 1. Redistributions of source code must retain the above copyright notice,\n * this list of conditions and the following disclaimer.\n *\n * 2. Redistributions in binary form must reproduce the above copyright notice,\n * this list of conditions and the following disclaimer in the documentation\n * and/or other materials provided with the distribution.\n *\n * 3. Neither the name of the copyright holder nor the names of its contributors\n * may be used to endorse or promote products derived from this software without\n * specific prior written permission.\n *\n * THIS SOFTWARE IS PROVIDED BY THE COPYRIGHT HOLDERS AND CONTRIBUTORS "AS IS"\n * AND ANY EXPRESS OR IMPLIED WARRANTIES, INCLUDING, BUT NOT LIMITED TO, THE\n * IMPLIED WARRANTIES OF MERCHANTABILITY AND FITNESS FOR A PARTICULAR PURPOSE\n * ARE DISCLAIMED. IN NO EVENT SHALL THE COPYRIGHT HOLDER OR CONTRIBUTORS BE\n * LIABLE FOR ANY DIRECT, INDIRECT, INCIDENTAL, SPECIAL, EXEMPLARY, OR\n * CONSEQUENTIAL DAMAGES (INCLUDING, BUT NOT LIMITED TO, PROCUREMENT OF\n * SUBSTITUTE GOODS OR SERVICES; LOSS OF USE, DATA, OR PROFITS; OR BUSINESS\n * INTERRUPTION) HOWEVER CAUSED AND ON ANY THEORY OF LIABILITY, WHETHER IN\n * CONTRACT, STRICT LIABILITY, OR TORT (INCLUDING NEGLIGENCE OR OTHERWISE)\n * ARISING IN ANY WAY OUT OF THE USE OF THIS SOFTWARE, EVEN IF ADVISED OF THE\n * POSSIBILITY OF SUCH DAMAGE.\n *\n */\n\nfunction Display(context_id, display_id) { // eslint-disable-line no-unused-vars\n var send;\n\n this.mime = function mime(mimeBundle) {\n send(mimeBundle);\n };\n\n this.text = function text(text) {\n send({"text/plain": text});\n };\n\n this.html = function html(html) {\n send({"text/html": html});\n };\n\n this.svg = function svg(svg) {\n send({"image/svg+xml": svg});\n };\n\n this.png = function png(png) {\n send({"image/png": png});\n };\n\n this.jpeg = function jpeg(jpeg) {\n send({"image/jpeg": jpeg});\n };\n\n this.json = function json(json) {\n send({"application/json": json});\n };\n\n this.close = function close() {\n process.send({\n id: context_id,\n display: {\n close: display_id,\n },\n });\n };\n\n if (arguments.length < 2) {\n // case: without a display_id\n send = function send(mime) {\n process.send({\n id: context_id,\n display: {\n mime: mime,\n },\n });\n };\n } else {\n // case: with a display_id\n send = function send(mime) {\n process.send({\n id: context_id,\n display: {\n display_id: display_id,\n mime: mime,\n },\n });\n };\n\n // open the display_id\n process.send({\n id: context_id,\n display: {\n open: display_id,\n },\n });\n }\n}\n\n/*\n * BSD 3-Clause License\n *\n * Copyright (c) 2017, Nicolas Riesco and others as credited in the AUTHORS file\n * All rights reserved.\n *\n * Redistribution and use in source and binary forms, with or without\n * modification, are permitted provided that the following conditions are met:\n *\n * 1. Redistributions of source code must retain the above copyright notice,\n * this list of conditions and the following disclaimer.\n *\n * 2. Redistributions in binary form must reproduce the above copyright notice,\n * this list of conditions and the following disclaimer in the documentation\n * and/or other materials provided with the distribution.\n *\n * 3. Neither the name of the copyright holder nor the names of its contributors\n * may be used to endorse or promote products derived from this software without\n * specific prior written permission.\n *\n * THIS SOFTWARE IS PROVIDED BY THE COPYRIGHT HOLDERS AND CONTRIBUTORS "AS IS"\n * AND ANY EXPRESS OR IMPLIED WARRANTIES, INCLUDING, BUT NOT LIMITED TO, THE\n * IMPLIED WARRANTIES OF MERCHANTABILITY AND FITNESS FOR A PARTICULAR PURPOSE\n * ARE DISCLAIMED. IN NO EVENT SHALL THE COPYRIGHT HOLDER OR CONTRIBUTORS BE\n * LIABLE FOR ANY DIRECT, INDIRECT, INCIDENTAL, SPECIAL, EXEMPLARY, OR\n * CONSEQUENTIAL DAMAGES (INCLUDING, BUT NOT LIMITED TO, PROCUREMENT OF\n * SUBSTITUTE GOODS OR SERVICES; LOSS OF USE, DATA, OR PROFITS; OR BUSINESS\n * INTERRUPTION) HOWEVER CAUSED AND ON ANY THEORY OF LIABILITY, WHETHER IN\n * CONTRACT, STRICT LIABILITY, OR TORT (INCLUDING NEGLIGENCE OR OTHERWISE)\n * ARISING IN ANY WAY OUT OF THE USE OF THIS SOFTWARE, EVEN IF ADVISED OF THE\n * POSSIBILITY OF SUCH DAMAGE.\n *\n */\n\n/* global Promise */\n\nfunction Requester() {\n // id for next request\n this.id = 0;\n\n // callback associated with a request (indexed by id)\n this.callbacks = {};\n\n // the Promise resolve callback associated with a request (indexed by id)\n this.resolves = {};\n\n // the Promise reject callback associated with a request (indexed by id)\n this.rejects = {};\n\n // the string to be returned to a request (indexed by id)\n this.responses = {};\n}\n\n// send a request\nRequester.prototype.send = function send(context, request, callback) {\n var id = this.id++;\n\n if (callback) {\n this.callbacks[id] = callback;\n }\n\n var promise;\n if (global.Promise) {\n promise = new Promise(function(resolve, reject) {\n if (!this.responses.hasOwnProperty(id)) {\n this.resolves[id] = resolve;\n this.rejects[id] = reject;\n return;\n }\n\n var response = this.responses[id];\n delete this.responses[id];\n resolve(response);\n }.bind(this));\n }\n\n request.id = id;\n\n context.send({\n request: request,\n });\n\n return promise;\n};\n\n// pass reply to the callbacks associated with a request\nRequester.prototype.receive = function receive(id, reply) {\n var callback = this.callbacks[id];\n if (callback) {\n delete this.callbacks[id];\n callback(null, reply);\n }\n\n var resolve = this.resolves[id];\n if (resolve) {\n delete this.resolves[id];\n delete this.rejects[id];\n resolve(reply);\n }\n};\n\n/*\n * BSD 3-Clause License\n *\n * Copyright (c) 2015, Nicolas Riesco and others as credited in the AUTHORS file\n * All rights reserved.\n *\n * Redistribution and use in source and binary forms, with or without\n * modification, are permitted provided that the following conditions are met:\n *\n * 1. Redistributions of source code must retain the above copyright notice,\n * this list of conditions and the following disclaimer.\n *\n * 2. Redistributions in binary form must reproduce the above copyright notice,\n * this list of conditions and the following disclaimer in the documentation\n * and/or other materials provided with the distribution.\n *\n * 3. Neither the name of the copyright holder nor the names of its contributors\n * may be used to endorse or promote products derived from this software without\n * specific prior written permission.\n *\n * THIS SOFTWARE IS PROVIDED BY THE COPYRIGHT HOLDERS AND CONTRIBUTORS "AS IS"\n * AND ANY EXPRESS OR IMPLIED WARRANTIES, INCLUDING, BUT NOT LIMITED TO, THE\n * IMPLIED WARRANTIES OF MERCHANTABILITY AND FITNESS FOR A PARTICULAR PURPOSE\n * ARE DISCLAIMED. IN NO EVENT SHALL THE COPYRIGHT HOLDER OR CONTRIBUTORS BE\n * LIABLE FOR ANY DIRECT, INDIRECT, INCIDENTAL, SPECIAL, EXEMPLARY, OR\n * CONSEQUENTIAL DAMAGES (INCLUDING, BUT NOT LIMITED TO, PROCUREMENT OF\n * SUBSTITUTE GOODS OR SERVICES; LOSS OF USE, DATA, OR PROFITS; OR BUSINESS\n * INTERRUPTION) HOWEVER CAUSED AND ON ANY THEORY OF LIABILITY, WHETHER IN\n * CONTRACT, STRICT LIABILITY, OR TORT (INCLUDING NEGLIGENCE OR OTHERWISE)\n * ARISING IN ANY WAY OUT OF THE USE OF THIS SOFTWARE, EVEN IF ADVISED OF THE\n * POSSIBILITY OF SUCH DAMAGE.\n *\n */\n\n/* global util */\n/* global vm */\n\n/* global Context */\n/* global defaultMimer */\n/* global Requester */\n\n// Shared variables\nvar DEBUG = !!process.env.DEBUG;\nvar log;\nvar requester;\nvar initialContext;\n\n// Init IPC server\ninit();\n\nreturn;\n\nfunction init() {\n // Setup logger\n log = DEBUG ?\n function log() {\n process.send({\n log: "SERVER: " + util.format.apply(this, arguments),\n });\n } :\n function noop() {};\n\n // Create instance to send requests\n requester = new Requester();\n\n // Capture the initial context\n // (id left undefined to indicate this is the initial context)\n initialContext = new Context(requester);\n initialContext.captureGlobalContext();\n\n Object.defineProperty(global, "$$defaultMimer$$", {\n value: defaultMimer,\n configurable: false,\n writable: false,\n enumerable: false,\n });\n\n process.on("message", onMessage.bind(this));\n\n process.on("uncaughtException", onUncaughtException.bind(this));\n\n process.send({\n status: "online",\n });\n}\n\nfunction onUncaughtException(error) {\n log("UNCAUGHTEXCEPTION:", error.stack);\n process.send({\n stderr: error.stack.toString(),\n });\n}\n\nfunction onMessage(message) {\n log("RECEIVED:", message);\n\n var action = message[0];\n var code = message[1];\n var id = message[2];\n\n initialContext.releaseGlobalContext();\n var context = new Context(requester, id);\n context.captureGlobalContext();\n\n try {\n if (action === "getAllPropertyNames") {\n onNameRequest(code, context);\n } else if (action === "inspect") {\n onInspectRequest(code, context);\n } else if (action === "run") {\n onRunRequest(code, context);\n } else if (action === "reply") {\n onReply(message);\n } else {\n throw new Error("NEL: Unhandled action: " + action);\n }\n } catch (error) {\n context.$$.sendError(error);\n }\n\n context.releaseGlobalContext();\n initialContext.captureGlobalContext();\n initialContext._done = false;\n}\n\nfunction onReply(message) {\n var reply = message[1];\n var id = message[3];\n requester.receive(id, reply);\n}\n\nfunction onNameRequest(code, context) {\n var message = {\n id: context.id,\n names: getAllPropertyNames(run(code)),\n end: true,\n };\n context.send(message);\n}\n\nfunction onInspectRequest(code, context) {\n var message = {\n id: context.id,\n inspection: inspect(run(code)),\n end: true,\n };\n context.send(message);\n}\n\nfunction onRunRequest(code, context) {\n var result = run(code);\n\n // If a result has already been sent, do not send this result.\n if (context._done) {\n return;\n }\n\n // If the result is a Promise, send the result fulfilled by the promise\n if (isPromise(result)) {\n context.$$.sendResult(result);\n return;\n }\n\n // If async mode has been enabled (and the result is not a Promise),\n // do not send this result.\n if (context._async) {\n return;\n }\n\n // If no result has been sent yet and async mode has not been enabled,\n // send this result.\n context.$$.sendResult(result);\n\n return;\n\n function isPromise(output) {\n if (!global.Promise || typeof global.Promise !== "function") {\n return false;\n }\n return output instanceof global.Promise;\n }\n}\n\nfunction getAllPropertyNames(object) {\n var propertyList = [];\n\n if (object === undefined) {\n return [];\n }\n\n if (object === null) {\n return [];\n }\n\n var prototype;\n if (typeof object === "boolean") {\n prototype = Boolean.prototype;\n } else if (typeof object === "number") {\n prototype = Number.prototype;\n } else if (typeof object === "string") {\n prototype = String.prototype;\n } else {\n prototype = object;\n }\n\n var prototypeList = [prototype];\n\n function pushToPropertyList(e) {\n if (propertyList.indexOf(e) === -1) {\n propertyList.push(e);\n }\n }\n\n while (prototype) {\n var names = Object.getOwnPropertyNames(prototype).sort();\n names.forEach(pushToPropertyList);\n\n prototype = Object.getPrototypeOf(prototype);\n if (prototype === null) {\n break;\n }\n\n if (prototypeList.indexOf(prototype) === -1) {\n prototypeList.push(prototype);\n }\n }\n\n return propertyList;\n}\n\nfunction inspect(object) {\n if (object === undefined) {\n return {\n string: "undefined",\n type: "Undefined",\n };\n }\n\n if (object === null) {\n return {\n string: "null",\n type: "Null",\n };\n }\n\n if (typeof object === "boolean") {\n return {\n string: object ? "true" : "false",\n type: "Boolean",\n constructorList: ["Boolean", "Object"],\n };\n }\n\n if (typeof object === "number") {\n return {\n string: util.inspect(object),\n type: "Number",\n constructorList: ["Number", "Object"],\n };\n }\n\n if (typeof object === "string") {\n return {\n string: object,\n type: "String",\n constructorList: ["String", "Object"],\n length: object.length,\n };\n }\n\n if (typeof object === "function") {\n return {\n string: object.toString(),\n type: "Function",\n constructorList: ["Function", "Object"],\n length: object.length,\n };\n }\n\n var constructorList = getConstructorList(object);\n var result = {\n string: toString(object),\n type: constructorList[0] || "",\n constructorList: constructorList,\n };\n\n if ("length" in object) {\n result.length = object.length;\n }\n\n return result;\n\n function toString(object) {\n try {\n return util.inspect(object.valueOf());\n } catch (e) {\n return util.inspect(object);\n }\n }\n\n function getConstructorList(object) {\n var constructorList = [];\n\n for (\n var prototype = Object.getPrototypeOf(object);\n prototype && prototype.constructor;\n prototype = Object.getPrototypeOf(prototype)\n ) {\n constructorList.push(prototype.constructor.name);\n }\n\n return constructorList;\n }\n}\n\nfunction run(code) {\n return vm.runInThisContext(code);\n}\n\n})();',
execPath: 'C:\\ProgramData\\Anaconda3\\node.exe',
debugPort: 9229,
_debugProcess: [Function: _debugProcess],
_debugEnd: [Function: _debugEnd],
_startProfilerIdleNotifier: [Function: _startProfilerIdleNotifier],
_stopProfilerIdleNotifier: [Function: _stopProfilerIdleNotifier],
abort: [Function: abort],
chdir: [Function: chdir],
umask: [Function: umask],
_getActiveRequests: [Function: _getActiveRequests],
_getActiveHandles: [Function: _getActiveHandles],
_kill: [Function: _kill],
cwd: [Function: cwd],
dlopen: [Function: dlopen],
reallyExit: [Function: reallyExit],
uptime: [Function: uptime],
_rawDebug: [Function],
moduleLoadList:
[ 'Binding contextify',
'Internal Binding worker',
'NativeModule events',
'NativeModule internal/async_hooks',
'NativeModule internal/errors',
'Binding uv',
'Binding buffer',
'Binding async_wrap',
'Binding config',
'Binding icu',
'NativeModule util',
'NativeModule internal/util/inspect',
'Binding util',
'NativeModule internal/util',
'Binding constants',
'Internal Binding types',
'NativeModule internal/util/types',
'NativeModule internal/validators',
'NativeModule internal/encoding',
'NativeModule buffer',
'NativeModule internal/buffer',
'NativeModule internal/process/per_thread',
'NativeModule internal/process/main_thread_only',
'NativeModule internal/process/stdio',
'NativeModule assert',
'NativeModule internal/assert',
'NativeModule fs',
'NativeModule path',
'NativeModule internal/constants',
'Binding fs',
'NativeModule internal/fs/streams',
'NativeModule internal/fs/utils',
'NativeModule stream',
'NativeModule internal/streams/pipeline',
'NativeModule internal/streams/end-of-stream',
'NativeModule internal/streams/legacy',
'NativeModule _stream_readable',
'NativeModule internal/streams/buffer_list',
'NativeModule internal/streams/destroy',
'NativeModule internal/streams/state',
'NativeModule _stream_writable',
'NativeModule _stream_duplex',
'NativeModule _stream_transform',
'NativeModule _stream_passthrough',
'NativeModule internal/url',
'NativeModule internal/querystring',
'Binding url',
'NativeModule internal/process/warning',
'NativeModule internal/process/next_tick',
'NativeModule internal/process/promises',
'NativeModule internal/fixed_queue',
'Binding performance',
'Binding trace_events',
'NativeModule internal/inspector_async_hook',
'Binding inspector',
'Internal Binding options',
'NativeModule child_process',
'Binding pipe_wrap',
'NativeModule internal/child_process',
'NativeModule net',
'NativeModule internal/net',
'Binding tty_wrap',
'Binding stream_wrap',
'Binding tcp_wrap',
'NativeModule internal/stream_base_commons',
'NativeModule internal/timers',
'NativeModule dgram',
'NativeModule internal/dgram',
'Binding udp_wrap',
'Binding process_wrap',
'NativeModule internal/socket_list',
'Binding spawn_sync',
'Binding http_parser',
'NativeModule _http_common',
'NativeModule internal/freelist',
'NativeModule internal/http',
'NativeModule _http_incoming',
'NativeModule string_decoder',
'Internal Binding string_decoder',
'NativeModule timers',
'Binding timer_wrap',
'NativeModule internal/linkedlist',
'NativeModule internal/modules/cjs/loader',
'NativeModule vm',
'NativeModule internal/modules/cjs/helpers',
'NativeModule console',
'NativeModule internal/fs/sync_write_stream' ],
binding: [Function: binding],
_linkedBinding: [Function: _linkedBinding],
_events:
{ newListener: [Array],
removeListener: [Array],
warning: [Function],
internalMessage: [Function],
message: [Function: bound onMessage],
uncaughtException: [Function: bound onUncaughtException] },
_eventsCount: 6,
_maxListeners: undefined,
_fatalException: [Function],
domain: null,
_exiting: false,
assert: [Function: deprecated],
config: { target_defaults: [Object], variables: [Object] },
setUncaughtExceptionCaptureCallback: [Function],
hasUncaughtExceptionCaptureCallback: [Function],
emitWarning: [Function],
nextTick: [Function: nextTick],
_tickCallback: [Function: _tickCallback],
stdin: [Getter],
openStdin: [Function],
hrtime: { [Function: hrtime] bigint: [Function] },
cpuUsage: [Function: cpuUsage],
memoryUsage: [Function: memoryUsage],
exit: [Function],
kill: [Function],
channel:
Pipe {
buffering: false,
pendingHandle: null,
onread: [Function],
sockets: [Object] },
_channel: [Getter/Setter],
_handleQueue: null,
_pendingMessage: null,
send: [Function],
_send: [Function],
connected: true,
disconnect: [Function],
_disconnect: [Function],
argv0: 'C:\\ProgramData\\Anaconda3\\node.exe',
allowedNodeEnvironmentFlags: [Getter/Setter],
stdout:
Transform {
_readableState: [ReadableState],
readable: true,
_events: [Object],
_eventsCount: 3,
_maxListeners: undefined,
_writableState: [WritableState],
writable: true,
allowHalfOpen: true,
_transformState: [Object],
_id: 288 },
stderr:
Transform {
_readableState: [ReadableState],
readable: true,
_events: [Object],
_eventsCount: 3,
_maxListeners: undefined,
_writableState: [WritableState],
writable: true,
allowHalfOpen: true,
_transformState: [Object],
_id: 288 } },
Buffer:
{ [Function: Buffer]
poolSize: 8192,
from: [Function: from],
of: [Function: of],
alloc: [Function: alloc],
allocUnsafe: [Function: allocUnsafe],
allocUnsafeSlow: [Function: allocUnsafeSlow],
isBuffer: [Function: isBuffer],
compare: [Function: compare],
isEncoding: [Function: isEncoding],
concat: [Function: concat],
byteLength: [Function: byteLength],
[Symbol(kIsEncodingSymbol)]: [Function: isEncoding] },
clearImmediate: [Function: clearImmediate],
clearInterval: [Function: clearInterval],
clearTimeout: [Function: clearTimeout],
setImmediate:
{ [Function: setImmediate] [Symbol(util.promisify.custom)]: [Function] },
setInterval: [Function: setInterval],
setTimeout:
{ [Function: setTimeout] [Symbol(util.promisify.custom)]: [Function] },
__filename: '[eval]',
exports: {},
module:
Module {
id: '[eval]',
exports: {},
parent: undefined,
filename:
'C:\\Users\\ruszk\\Google Drive\\Learning\\JavaScript\\[eval]',
loaded: false,
children: [],
paths:
[ 'C:\\Users\\ruszk\\Google Drive\\Learning\\JavaScript\\node_modules',
'C:\\Users\\ruszk\\Google Drive\\Learning\\node_modules',
'C:\\Users\\ruszk\\Google Drive\\node_modules',
'C:\\Users\\ruszk\\node_modules',
'C:\\Users\\node_modules',
'C:\\node_modules' ] },
__dirname: '.',
require:
{ [Function: require]
resolve: { [Function: resolve] paths: [Function: paths] },
main: undefined,
extensions:
{ '.js': [Function], '.json': [Function], '.node': [Function] },
cache: {} },
'$$mimer$$': [Function: defaultMimer],
'$$done$$': [Function: bound bound done],
i: 3,
signedIn: null,
w: 4,
now: 2021-02-18T18:16:00.523Z,
today: 1613672160597,
tomorrow: 1613758560597,
todayDate: 2021-02-18T18:16:00.597Z,
tomorrowDate: 2021-02-19T18:16:00.597Z,
birthday: 1975-01-31T00:00:00.000Z,
str: 'This is a sample string',
re: /Sample/i,
greeting: 'Hello',
tip: 8,
totalAfterTax: 53.03,
opinion: 'This nanodegree is amazing',
showMessage: [Function: showMessage],
q: 0,
my_string: 'Udacity',
studentName: 'John',
haveEnrolledInCourse: true,
haveCompletedTheCourse: false,
a: [Function: a],
b: [Function: b],
weather: 'sunny',
isGoing: true,
color: 'green',
option: 3,
month: 12,
days: 31,
education: 'no high school diploma',
salary: 25636,
findDayOfWeek: [Function: findDayOfWeek],
start: 6,
x: 11,
out: 'Fizz',
add1: [Function: add1],
newNum: 5,
isThisWorking: [Function: isThisWorking],
test:
[ 112,
929,
11,
103,
199,
1000,
7,
1,
124,
37,
4,
19,
400,
3775,
299,
136,
209,
148,
169,
299,
106,
109,
20,
58,
139,
59,
103,
1,
139 ],
add: [Function: add],
divideByTwo: [Function: divideByTwo],
sum: 12,
average: 6,
sayHi: [Function: sayHi],
catSays: [Function: catSays],
helloCat: [Function: helloCat],
favoriteMovie: [Function: displayFavorite],
movies: [Function: movies],
TestTry: [Function: TestTry],
checkValue: [Function: checkValue],
traceIt: [Function: traceIt],
codedURL: 'difficult%20%26%24%25%40%23%20to%20transmit',
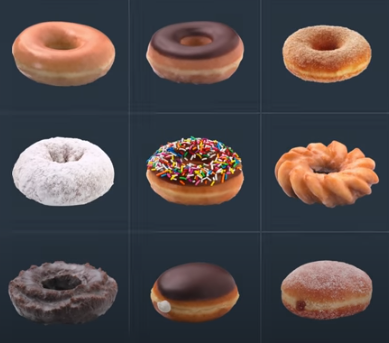
donuts:
[ 'JELLY DONUT HOLE',
  'CHOCOLATE DONUT HOLE',
'GLAZED DONUT HOLE' ],
mixedData: [ 'abcd', 1, true, undefined, null, 'all the things' ],
arraysInArrays:
[ [ 1, 2, 3 ],
[ 'Julia', 'James' ],
[ true, false, true, false ] ],
captain: 'Mal',
second: 'Zoe',
pilot: 'Wash',
companion: 'Inara',
mercenary: 'Jayne',
mechanic: 'Kaylee',
crew:
[ 'Inara',
'Jayne',
'Kaylee',
'Mal',
'Wash',
'Zoe',
'Simon',
'River',
'Book' ],
doctor: 'Simon',
sister:
{ name: 'Sarah',
age: 23,
parents: [ 'alice', 'andy' ],
siblings: [ 'julia' ],
favoriteColor: 'purple',
pets: true,
paintPicture: [Function: paintPicture] },
shepherd: 'Book',
rainbow: [ 'Red', 'Orange', 'Yellow', 'Green', 'Blue', 'Purple' ],
fruits:
[ 'apples', 'pears', 'cherries', 'bananas', 'peaches', 'oranges' ],
vegetables: [ 'carrots', 'peas', 'beans', 'lettuce' ],
words: [ 'cat', 'in', 'hat' ],
improvedDonuts:
[ 'JELLY DONUT HOLE-GLAZED DONUT HOLE donut',
  'CHOCOLATE DONUT HOLE-JELLY DONUT HOLE donut',
'GLAZED DONUT HOLE-CHOCOLATE DONUT HOLE donut' ],
donutBox:
[ [ 'glazed', 'chocolate glazed', 'cinnamon' ],
[ 'powdered', 'sprinkled', 'glazed cruller' ],
[ 'chocolate cruller', 'Boston creme', 'creme de leche' ] ],
row: 3,
column: 3,
numbers: [ 1, 2, 3 ],
tree: { type: 'oak', age: 120, isLeavesOn: false },
auto: { location: 'garage', ignition: 'off', fueled: true },
changeToEight: [Function: changeToEight],
setToBlue: [Function: setToBlue],
whoThis: [Function: whoThis],
trickyish: true,
person: 'Richard',
richardSaysHi: [Function: richardSaysHi],
alertThenReturn: [Function: alertThenReturn],
callAndAdd: [Function: callAndAdd],
returnsThree: [Function: returnsThree],
each: [Function: each],
isPositive: [Function: isPositive],
logIfOdd: [Function: logIfOdd],
length: [Function: length],
remember: [Function: remember],
myCounter: [Function: myCounter],
SoftwareDeveloper: [Function: SoftwareDeveloper],
favoriteLanguage: 'JavaScript',
name: 'David',
introduce: [Function],
console:
Console {
log: [Function: bound log],
debug: [Function: bound log],
info: [Function: bound log],
dirxml: [Function: bound log],
warn: [Function: bound warn],
error: [Function: bound warn],
dir: [Function: bound dir],
time: [Function: bound time],
timeEnd: [Function: bound timeEnd],
timeLog: [Function: bound timeLog],
trace: [Function: bound trace],
assert: [Function: bound assert],
clear: [Function: bound clear],
count: [Function: bound count],
countReset: [Function: bound countReset],
group: [Function: bound group],
groupCollapsed: [Function: bound group],
groupEnd: [Function: bound groupEnd],
table: [Function: bound ],
Console: [Function: Console],
[Symbol(counts)]: Map {},
[Symbol(kColorMode)]: 'auto' },
'$$':
{ async: [Function: bound async],
done: [Function: bound done],
sendResult: [Function: bound ],
sendError: [Function: bound ],
mime: [Function: bound ],
text: [Function: bound ],
html: [Function: bound ],
svg: [Function: bound ],
png: [Function: bound ],
jpeg: [Function: bound ],
json: [Function: bound ],
input: [Function: bound input],
display: [Function: bound createDisplay],
clear: [Function: bound clear] },
multiply: [Function: multiply],
window: [Circular] }
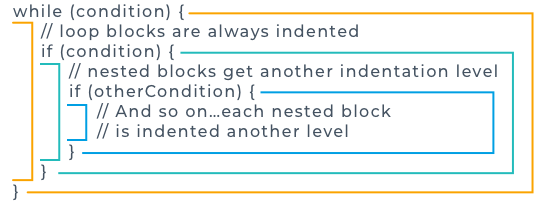


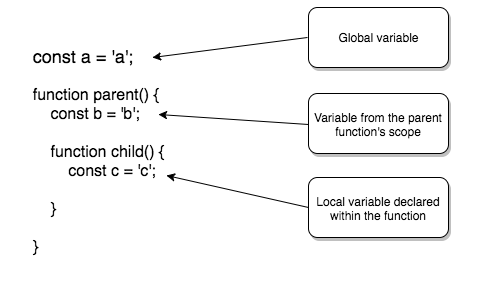
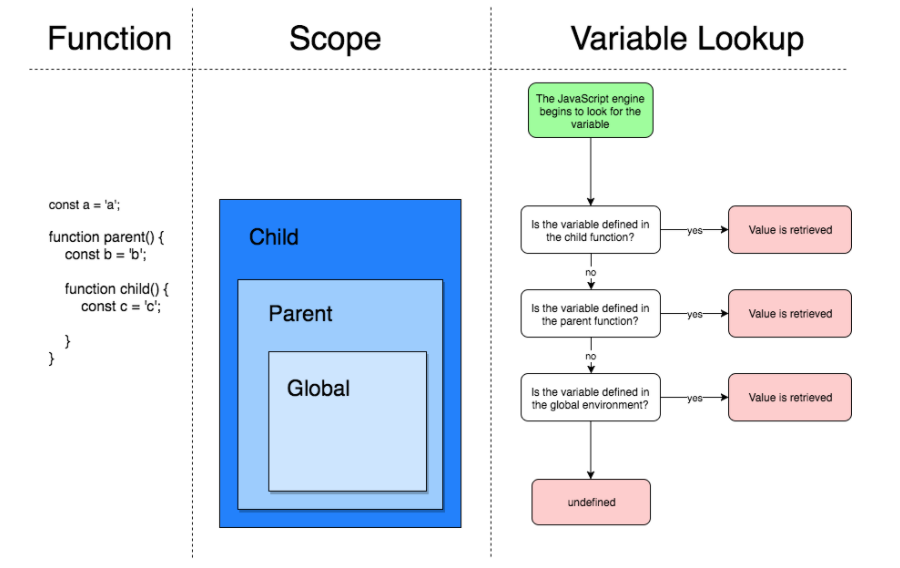
 Let us see an example of each type of scope: