These documents provide a relatively brief overview of the main features of Python. They are intended as a crash course for students that already have some idea of how to program in another language. Not every aspect of Python is covered and for the most part the contents simply provides lists of what can be done in this language with some brief examples.
This course is broken up into a number of chapters.
This is a tutorial style introduction to Python. For a quick reminder / summary of Python syntax the following Quick Reference Card may be useful. A longer and more detailed tutorial style introduction to python is available from the python site at: https://docs.python.org/3/tutorial/
Python is a modern, robust, high level programming language. It is very easy to pick up even if you are completely new to programming.
Python, similar to other languages like matlab or R, is interpreted hence runs slowly compared to C++, Fortran or Java. However writing programs in Python is very quick. Python has a very large collection of libraries for everything from scientific computing to web services. It caters for object oriented and functional programming with module system that allows large and complex applications to be developed in Python.
These lectures are using jupyter notebooks which mix Python code with documentation. The python notebooks can be run on a webserver or stand-alone on a computer.
To give an indication of what Python code looks like, here is a simple bit of code that defines a set $N=\{1,3,4,5,7\}$ and calculates the sum of the squared elements of this set: $\sum_{i\in N} i^2=100$
N={1,3,4,5,7,8}
print('The sum of ∑_i∈N i*i =',sum( i**2 for i in N ) )
The sum of ∑_i∈N i*i = 164
Python runs on windows, linux, mac and other environments. There are many python distributions available. However the recommended way to install python under Microsoft Windows or Linux is to use the Anaconda distribution available at [https://www.anaconda.com/distribution/]. If you are installing python from elsewhwer, make sure you get at least Python 3.6 version, not 2.7. The Anaconda distribution comes with the SciPy collection of scientific python tools as well as the iron python notebook. For developing python code without notebooks consider using spyder (also included with Anaconda) or your favourite IDE under windows, mac etc (e.g. Visual Studio Code which handles both plain python programs and notebooks)
To open a notebook with anaconda installed, from the terminal run:
ipython notebook
Open the notebook, and clear all the outputs:
Cell > All Output > Clear
Now you can understand each statement and learn interactively.
Notebooks contain a mixture of documentation and code cells. Use the menus or buttons at the top of the notebook to run each cell. To get you started:
File->Rename...
menu option.__text__
to make text bold, or $latex$
to include mathematical formulas in latex format). For more information see the Jupyter Markdown documentation or look at the Help->Markdown entry in the menu aboveKernel -> Restart & Run All
to restart the python interpreter and run all cells. This will ensure the interpreter is running exactly what you see in front of you in the right order, rather than remembering things from an earlier attempt.+
button or Insert
menu to add new cells anywhere. You can easily add additional cells to try things out as you read through this tutorial. A cell simply is the smallest collection of code that you can execute individually within the notebook.File -> Close & Halt
menu (or the Shutdown
button in the Running
tab of the Jupyter file browser) to stop the notebook running. By defaults notebooks will continue running even when you log off and close your web browser. This can be useful if you want to continue where you left off, but occasionally you need to do a cleanup to close some of these.This work is licensed under the Creative Commons Attribution 3.0 Unported License. To view a copy of this license, visit http://creativecommons.org/licenses/by/3.0/
This Introduction to Python is available from https://gitlab.erc.monash.edu.au/andrease/Python4Maths.git.
The original version was written by Rajath Kumar and is available at https://github.com/rajathkumarmp/Python-Lectures.
The notes have been significantly rewritten and updated for Python 3 and amended for use in Monash University mathematics courses by [Andreas Ernst](https://research.monash.edu/en/persons/andreas-ernst)
Python can be used like a calculator. Simply type in expressions to get them evaluated. The name REPL stands for Read-Eval-Print-Loop - an interactive, typically console-based, programming environment. Python has a built-in repl interpreter.
The basic rules for writing simple statments and expressions in Python are:
1+2
+3 #illegal continuation of the sum
(1+2
+ 3) # perfectly OK even with spaces
1 + \
2 + 3 # this is also OK
1 + 2 * 3
7
Python has extensive help built in. You can execute help()
for an overview or help(x)
for any library, object or type x
. Try using help("topics")
to get a list of help pages built into the help system.
help("topics")
Here is a list of available topics. Enter any topic name to get more help. ASSERTION DELETION LOOPING SHIFTING ASSIGNMENT DICTIONARIES MAPPINGMETHODS SLICINGS ATTRIBUTEMETHODS DICTIONARYLITERALS MAPPINGS SPECIALATTRIBUTES ATTRIBUTES DYNAMICFEATURES METHODS SPECIALIDENTIFIERS AUGMENTEDASSIGNMENT ELLIPSIS MODULES SPECIALMETHODS BASICMETHODS EXCEPTIONS NAMESPACES STRINGMETHODS BINARY EXECUTION NONE STRINGS BITWISE EXPRESSIONS NUMBERMETHODS SUBSCRIPTS BOOLEAN FLOAT NUMBERS TRACEBACKS CALLABLEMETHODS FORMATTING OBJECTS TRUTHVALUE CALLS FRAMEOBJECTS OPERATORS TUPLELITERALS CLASSES FRAMES PACKAGES TUPLES CODEOBJECTS FUNCTIONS POWER TYPEOBJECTS COMPARISON IDENTIFIERS PRECEDENCE TYPES COMPLEX IMPORTING PRIVATENAMES UNARY CONDITIONAL INTEGER RETURNING UNICODE CONTEXTMANAGERS LISTLITERALS SCOPING CONVERSIONS LISTS SEQUENCEMETHODS DEBUGGING LITERALS SEQUENCES
Keywords are reserved words in Python. That means they cannot be used as ordinary identifiers like a variable, function, method or class name. They have a specific meaning and purpose within Python and cannot be used for anything other than that purpose.
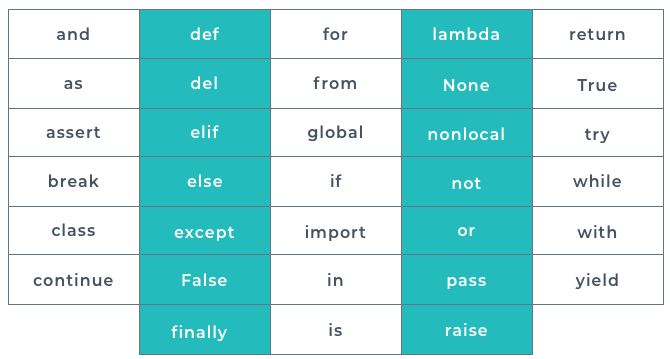
If using a keyword in a name cannot be avoided, then you can append a single trailing underscore. However, it is better to find a synonym for the keyword and use that instead.
Here is a piece of code that lists all reserved keywords:
import keyword
keyword.kwlist
print()
Statement¶We’ll cover functions in much more detail throughout the course, but for now, all we need to know about is the print()
function. The print()
function, as its name suggests, displays information on the screen. It is used in command line (or terminal) or scripts, which is what we'll be working with throughout this module. So, you're about to become very familiar with the print()
function! Print statements are instrumental in troubleshooting, especially when your code is giving an output you do not expect. By placing print statements throughout your code you can see what values are at each point in the same way you did with JavaScript's console.log()
. This helps debug the code by finding from where the unexpected result originates.
Developers spend a lot of time writing code. So much time in fact that revisiting a piece of code that was written a couple of weeks ago may have little to no meaning to that developer, let alone any other developers that may be working on that same project. Code can get quite busy, and it can get unwieldy when people try to read it, whether it’s someone else's or if you come back to your code at a later stage. We can use code commenting, which will allow us to write human-readable explanations to our code. Comments will be ignored by the Python interpreter, meaning that we can add in as many comments as we need, without affecting the speed or performance of the program.
We can write different types of comments.
# this is a one-line comment
"""
This is multi-line comment.
We can spread this across as many lines as we need to
and it won't impact our computer program at all!!!
"""
Generally speaking, single-line comments are used to explain individual pieces of code, whereas the multi-line comments are used to describe a function, method, class, or module. Ideally, we would use a multiline comment on every function, method, class, or module. The Python name for this is a docstring.
def add(a,b):
"""
Adds two numbers together
Returns the sum of parameter "a" and "b"
"""
result = a + b # add the two parameters and store in variable "result"
return result
You can retrieve an object's docstring with the __doc__
property
def factorial(n):
"""returns n!"""
return 1 if n < 2 else n * factorial(n-1)
factorial.__doc__
'returns n!'
The use of indentation to define a block of code makes it very clear to read. In other programming languages indentation is purely for readability, but in Python, it is vital to the correct running of the program. The PEP8 standard is four spaces for indentation level. Python 3 will error if you mix spaces and tabs.
The (recommended) maximum line length is 79 characters. This means that a line of code may have to be wrapped onto a continuation line. The continuation line indent cannot match the block indentation; otherwise, there will be an error. You can either add four further spaces to the continuation line indent or align with the opening delimiter on the preceding line.
This is easier to see than to explain so here are the official PEP8 suggestions.
# Correct:
# It is aligned with the opening delimiter, e.g. the opening parentheses.
foo = long_function_name(var_one, var_two,
var_three, var_four)
# Add four spaces (an extra level of indentation) to distinguish arguments from the rest.
def long_function_name(
var_one, var_two, var_three,
var_four):
print(var_one)
# Hanging indents should add a level.
foo = long_function_name(
var_one, var_two,
var_three, var_four)
No arguments are allowed on the first line where hanging indentation is used.
raise SystemExit()

Often when editing your code, you would like to stop the program at a specific point to see what state it is in at that time. Python gives an option of
raise SystemExit
to force it to stop at a particular point. SystemExit
, when raised, runs the exit()
function in Python. This means the code is exited safely. This is analogous to shutting down your desktop PC from the menu rather than switching off the power at the wall.
When learning Python, the most commonly seen error messages are syntax errors. These are also called parsing errors. The parser repeats the line where the error has been detected in the terminal. A caret
^
points to the earliest point in the line where the error occurs. The text after SyntaxError
may also suggest a fix. The filename and line number are printed, so it is easier to find in an extensive program.
In the runnable example, there is a syntax error. Can you identify what it is and how to fix it?
print 'Hello, World!'
---------------------------------------------------------------------------
File "<ipython-input-175-5fea38df3ff9>", line 1
print 'Hello, World!'
^
SyntaxError: Missing parentheses in call to 'print'. Did you mean print('Hello, World!')?
Logic errors are when the code gives a different output than you were expecting. These are the most difficult errors to fix. A computer does exactly what it is programmed to do. Therefore a logic error is a mistake or misunderstanding from the developer. If the syntax of the code is correct, then there will be no error posted in the terminal.
Common logic errors include using the wrong variable name, incorrectly indenting blocks, wrong number types, incorrect operator precedence, wrong Boolean value or an out-by-one error. With an incorrect variable name, you may get a hint from the linter as there is an unused variable or a spelling mistake may give a runtime error if the variable does not exist.
This is where neatly laying out your code to PEP8 standards helps the readability. Please don’t copy/paste large sections of code as it is easy to introduce an error.
The simplest way to debug your code is to use print
statements. Add print
statements throughout the code to ensure you are getting the results you intended. Another way is to visualise the execution of the code in a debugger tool.
Debugging is the process of identifying and fixing problems in computer software or hardware. In the context of this course, debugging will mean finding and fixing problems in your code. There are many ways to debug your code, tools that can help you do it, and every developer will have the debugging style that works for them. The important piece is that you know what debugging is and that you should always do it along the way when possible.
A typical debugging process might look like the following:
The process of debugging is an iterative one. When you identify a problem, it's best to try to start at the very beginning: the moment that the input occurs. Whether it's a human input or a programmatic input doesn't matter; what's important is starting at the very beginning and then stepping through the code line by line. Along the way you might verify that variables have the correct values, functions are returning the proper results and so on. In some cases, this will lead you down a rabbit hole and expose other bugs and sometimes even fundamental underlying issues in the application. While sometimes it can be frustrating, you must remember that computers treat everything literally, and the computer is never wrong. It will always do exactly what you told it to do, even if that means executing a poorly written function by another developer and giving you an incorrect result! To the computer, it did exactly what it was instructed to do. It's up to you to track down the incorrect instructions that you or someone else has unintentionally given it.
Good developers have a consistent, structured debugging process and a philosophy of asking questions and never assuming anything. You must understand that the computer will always do exactly what you tell it to do, in the most literal sense you can imagine. Sometimes this will throw you off and you will swear that you're not doing anything wrong, but let us assure you now that the computer is never wrong.
In general, you should have a philosophy of always asking yourself questions about your code whenever it does something unexpected. Some questions you should get in the habit of asking yourself are:
Speaking of questions, a huge part of solving problems when coding is asking others for help. Knowing how to ask good questions is important not only to get good answers but to maintaining a good reputation in the software development world. After all, no one wants to help someone who refuses to put in any effort to solve the problem themselves or ask a good question! When posting questions on forums, in Slack or Discord communities, or anywhere else, it's a good idea to always include the following:
If you're asking a higher level or more philosophical question, such as brainstorming ideas about how to accomplish a task, make sure you are also clearly defining the requirements you have. Instead of asking "How do I build a website?", ask "I've been searching for resources to learn how to build an E-commerce website and have come across X, Y, and Z. Which one of these would be the best to start with and are there any others that might also be useful?" The latter shows that you have put in some effort, explains the specific type of website you want to build and asks about specific resources that others may have used and had opinions on, as well as asking for additional resources.
A philosophy of asking questions about your code and knowing the proper terminology when searching for solutions will become vitally important. By doing this, you should get used to thinking in terms of how data is organized, what type of data it is (numbers, strings of text, true/false values, etc), and how the computer might be interpreting what you're instructing it to do. When asking questions, provide as much information as possible and treat your question as an opportunity to teach the reader about your code. After all, they've never seen a single line of it, and in trying to explain it to them, you just might solve your problem!
A name that is used to denote something or a value is called a variable. Variables are analogous to “boxes” that we can use to store, modify and reference values in a computer program.
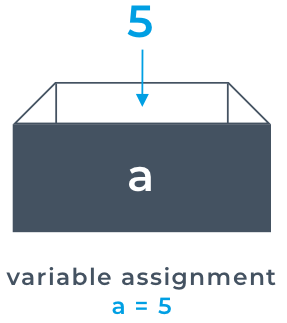
Fortunately, computers are much more than just fancy calculators. Computers have a hardware component called RAM (Random Access Memory). RAM is a storage medium for computers. Unlike a hard drive, RAM is volatile, so any data stored in RAM will be lost after the computer has been shut down. RAM is used to store any data that is used by a computer program when it is running (also known as “being executed”). Not only do variables allow us to persist data that we may need for our program in memory, but it also allows us to provide meaningful names for the data that we’re storing. A variable acts as a placeholder in memory for a piece of data. The value of the data is stored in that placeholder. We can then use the name of that variable as a reference to that location in memory.
Throughout an application, we can create as many variables as we need. However, there are a couple of rules that need to be followed when creating a variable. Variable names must start with a regular letter (not a number), and all further characters should be either letters or digits or underscores. There is an exception to this rule which is that instance variables should start with an underscore. Instance variables are defined within methods in a Class. This is something you will see in more advanced lessons.
Python comes with it’s standard for writing readable code called PEP8 (https://www.python.org/dev/peps/pep-0008/). This standard only acts as guidelines for how code should be written to make all code as readable to all Python developers. PEP8 recommends variable namimg conventions.
Python is quite forgiving when it comes to naming. However, there are suggested style rules that you should follow. Variable names should be lowercase. However Python will still work if you use capital letters in your variables. Variable names are case sensitive so take care not to write
my_var
as my_Var
as it will be considered as a different variable. If variable name includes multiple words, you should use underscores as separators.
Giving a variable a name that explains its purpose is encouraged. Where the meaning is obvious, you can use a single letter variable name. There is a convention where you prefix a global variable with an underscore if you are using it in a module imported into another module. There is no constant in Python unlike the const in JavaScript, so if you have a variable you do not want to be changed, then use capital letters to denote this. Generally, it is a bad idea to use lowercase L
, uppercase O
and uppercase I
for single-character names as they are easily confused by eye with other characters.
count = 0
first_name = Brian
greeting = "Hello, World!"
PI = 3.14159
In Python, there is no concept of variable declaration. A variable comes into existence when it is assigned a value. If you try and use a variable name before it has a value assigned then you will get an error.
In python, variables can be declared and values can be assigned to it as follows,
x = 2 # anything after a '#' is a comment
y = 5
xy = 'Hey'
print(x+y, xy) # not really necessary as the last value in a bit of code is displayed by default
7 Hey
first_number = 10
second_number = 5
[first_number + second_number, 10 + 5]
[15, 15]
Both sets of addition give the same result. As you have assigned the values of 10
and 5
to the variables, you can do the same arithmetic operations to the variables as with the integers 10
and 5
. Pieces of code that need to be evaluated are known as expressions. Both these expressions are evaluated to give the same output of 15.
It is possible to control the data type when declaring a variable by combining with the specific data type function. The first_number variable above will default to an integer. If you intended a floating-point number, then use.
first_number = float(10)
We know that when we declare a variable called my_number
and then print it out, it will print out the value stored in that variable. What happens when we declare a second variable called my_number
and print out the value?
my_number = 5
my_number = 10
print(my_number)
10
This time the output is 10
. This is called variable reassignment. We use the variable name of my_variable
to reference the value stored in that same memory location and update it accordingly. Then by the time that we pass the variable to the print
function the value of my_variable
has been updated to the value of 10
. Therefore we can re-assign values to a variable as we choose.
Multiple variables can be assigned with the same value.
x = y = 1
print(x,y)
1 1
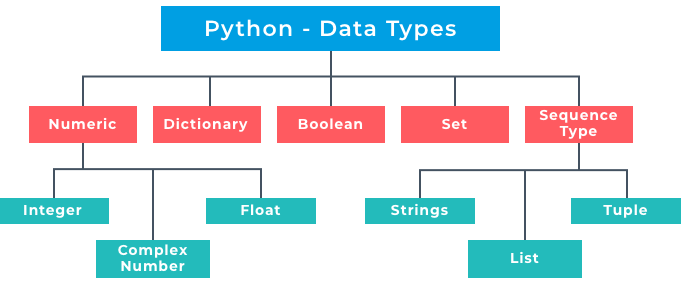
Python stores data in different types. A data type is an essential concept as different types can do different things. Perhaps the most basic data type in computing is boolean (
bool
) which has two built-in values of True
or False
. Text has the type of string (str
). There are several numeric types such as integer (int
), float and complex numbers. Any of these types can be stored in other data types. For example, you could hold a sequence in a list, type or range. You can also map data using the dictionary (dict
) type. This is analogous to an English dictionary where you can look up a word and get a derivation.
To ascertain the type of any object you can use the built-in type()
function. This function will give you the type. However, if you want to run a check on the type, you can use isinstance()
which will return True
or False
. In the example below both my_var
and 2
are integers so type()
will return <class 'int'>
and isinstance()
will return True
.
my_var = 2
[type(my_var), type(2), isinstance(my_var, int)]
[int, int, True]
There are three distinct numeric types: integers, floating-point, and complex numbers.
The number type you are probably most familiar with is the integer or whole number. These are all the whole numbers on a number scale, including 0
. In computer programming, however, an integer is called an int for short. The other type of numbers that Python offers is a floating-point number, or float for short. A float is a number that is followed by a decimal point. For example, a float might look like 12.74
, whereas an int might be just 12
or 13
, depending on whether you choose to round up or not!
The Python standard library includes the additional numeric types fractions.Fraction
, for rationals, and decimal.Decimal
for floating-point numbers with user-definable precision. You are quite likely to use decimal numbers as for example in cash transactions limited to 2 decimal places.
The constructors int()
, float()
can be used to produce numbers of a specific type.
The reason that we need to differentiate between the two different types of numbers is so that Python can inform the computer of how much memory will need to be allocated to store that value because int
s require more memory than float
s. Thankfully Python will mostly work within the confines of these two types of numbers; unlike other languages such as Java or C#, which have small int
s, long int
s, double
s and many more! Also, in a language like Java or C#, we would have to specify the type of variable that you wish to declare.
For example, if you wanted to declare an int
in C or Java you would write something like this:
int my_number = 42;
We don’t need to do this in Python. The reason for this is that Python is what we call a dynamically typed language. Therefore we don’t have to specify the type because Python will make that determination for us at runtime (while the program is running), meaning that we can focus on writing code instead of making sure we get all of our types correct! This is often referred to as duck-typing. The philosophy here is: If it quacks, treat it as duck, otherwise, handle it differently. For example, if we have a variable that contains a number that doesn’t have a decimal point, treat it as an int; otherwise, if it does have a decimal point, treat it as a float. A language that requires us to specify the type of variable that we wish to declare is called a statically typed language. Java and C# are examples of this, but we’re not going to cover those here.
Complex numbers are something you might hazily remember from school maths lessons, and we will not go into any further detail here. Complex numbers that can be created with the complex()
constructor, written as follows. Note that the brackets are required.
complex(1,2)
(1.0+2j) # the same number as above
(1+2j)
None
is a Python keyword that is used to define when there is no value at all for something. It is not the same a 0
or the boolean False
or an empty string. Those do have values of 0
, False
and ""
respectively. Instead, None
is a signal object used in Python to signify empty or no value here. As you saw earlier, a variable only comes into existence when you declare it. There are no empty variables in Python. Therefore if you have a variable, it has a value, and if you want to remove that value, you can reassign the variable to None
.
None
has the data type of NoneType
, which is a built-in data type just like int
or float
. You can not create new instances of None
or assign it a value as semantically; it only represents the absence of a value. None
is immutable.
How would you use None? Well, Python functions if you do not specify an explicit return statement will return None
. That way, Python guarantees that a function will always return something which makes for simplified programming.
def donothing():
b = 0
print(donothing())
None
As was mentioned in the first paragraph, None
can be used if you have a variable with a value and you wish to remove it. None
is a little like the concept of null/undefined
in JavaScript. They are both objects that can be used to signal when something has an absence of a value.
a = 1
a = None
print(a)
None
You can determine the data type of None
in the same way as you did in the previous unit. Also, you can use None
as part of a comparison. None
has no value so you cannot use the equality operators like ==
but you can use the identity operators like is not
.
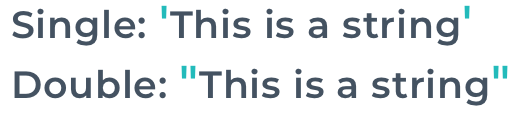
We now know how to create different types of variables using numbers, but we can store string literals too. We do this in the same way that we create a variable with a number. In Python, anything contained inside quotation marks is treated as a string. We can use double quotes
"
or single quotes '
. A string can be made up of any Unicode characters. Unicode characters contain 143859 characters from modern and historical scripts, including symbol sets.
'This is a string'
'This is a string'
"It's another string"
If you have a long piece of text on multiple lines, you can enclose it in three double quotes """
or three single quotes '''
as a multiline string.
"""Triple quotes (also with '''), allow strings to break over multiple lines.
Alternatively \n is a newline character (\t for tab, \\ is a single backslash)"""
"Triple quotes (also with '''), allow strings to break over multiple lines.\nAlternatively \n is a newline character (\t for tab, \\ is a single backslash)"
Using double and single quotes to denote a string allows the developer to take into account the use of quotes in written language grammar. If a string uses a single quote, then you can use double quotes to wrap the string and vice versa.
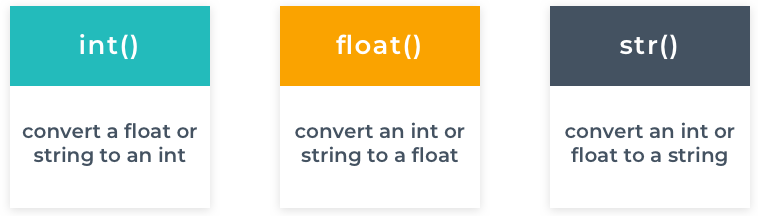
Python provides us with built-in functions to convert from one data type to another. For example,
int()
converts any data type to an integer and float()
converts and data type to a floating-point number. These functions are particularly useful with web development as anything coming from a frontend form, or a database will be a string. Therefore before doing any mathematical calculations, you will need to convert the string to a number of the appropriate type.
Some of the more common type conversions are in the table below.
Function | What it converts |
---|---|
int() | Converts to an integer |
float() | Converts to a floating-point number |
hex() | Converts a number to a hexadecimal string |
oct() | Converts a number to a octal string |
tuple() | Converts to a tuple |
set() | Converts to a set |
list() | Converts to a list |
dict() | Converts a tuple into a dictionary |
str() | Converts a number into a string |
You have already seen a few basic arithmetic operations used. Python has a similar syntax to JavaScript and other languages when it comes to arithmetic operations. In the image below, you can see the most commonly used arithmetic operators. We call these symbols operators, and on each side of the operator, we have operands.
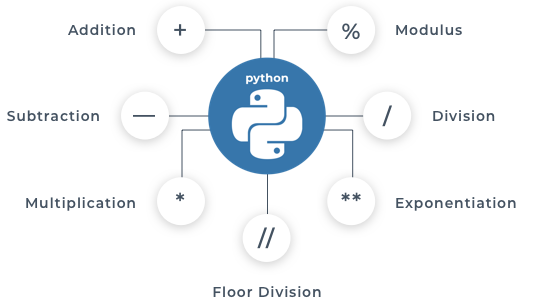
Operators perform operations on operands. For example,
6 * 7
. Here we are using the multiplication operator *
on the operands 6
and 7
.
You can also use the multiplication operator to repeat a string multiple times where one operand is the string, and the other is a number.
"Hello World! " * 5
'Hello World! Hello World! Hello World! Hello World! Hello World! '
The addition operator can be used to add (or join) strings together. This process is known as concatenation.
"Hello" + "World"
'HelloWorld'
Symbol | Task Performed |
---|---|
+ | Addition |
- | Subtraction |
/ | Division |
// | Integer division |
% | Modulus (remainder) |
* | Multiplication |
** | Exponentiation (power) |
As expected these operations generally promote to the most general type of any of the numbers involved i.e. int
-> float
-> complex
.
1+2.0
3.0
3-1
2
2 * (3+0j) * 1.0
(6+0j)
/
¶An important thing to note is that when we use the division operator, the result is always a float. Even if the division returns a whole number, it will be returned as a float.
[3/4, 4/2]
[0.75, 2.0]
**
¶Exponent means to the power of. 6 ** 7
would be 6
to the power of 7
, which is the same as writing 6 * 6 * 6 * 6 * 6 * 6 * 6
. Similarly, 2 ** 3
would result in 8
as 2
multiplied by 2
is 4
, and 4
multiplied again by 2
is 8
.
Python natively allows (nearly) infinite length integers,
11**300
2617010996188399907017032528972038342491649416953000260240805955827972056685382434497090341496787032585738884786745286700473999847280664191731008874811751310888591786111994678208920175143911761181424495660877950654145066969036252669735483098936884016471326487403792787648506879212630637101259246005701084327338001
while floating point numbers are double precision numbers (hence the OverflowError
):
11.0**300
---------------------------------------------------------------------------
OverflowError Traceback (most recent call last)
<ipython-input-17-b61ab01789ad> in <module>
----> 1 11.0**300
OverflowError: (34, 'Result too large')
%
¶The modulo operator divides the first number by the second and returns the remainder. If we have 5 / 5
, the answer will be 1
, but if we were to use 5 % 5
then the answer would be 0
Similarly, if we had 18 % 7
, the answer would be 4
because 7
goes into 18
twice (7 + 7 = 14)
with a remainder of 4
: (18 – 14 = 4)
A common use for the modulo operator is when we need to find out if numbers are odd or even. An even number is always divisible by 2
so % 2
will always return 0
for even and 1
for odd. The modulo is also used when working with time if we wanted to convert minutes into hours and minutes. For example, we know that there are 60
minutes in an hour, so if we wanted to figure out how many minutes are leftover once we convert 10900
minutes into hours, we would use 10900 % 60
. The modulo returns an integer.
15%10
5
//
¶In many languages (and older versions of python) 1/2 = 0
(truncated division). In Python 3 this behaviour is captured by a separate operator that rounds down: (ie a // b
$=\lfloor \frac{a}{b}\rfloor$)
1//2
0
If we recall the division operator returns a float
. What if we wanted to do some division that returns an integer instead? In that case, we would use the floor division operator. The floor division operator is // and it rounds the result down to the nearest whole number and returns it as an integer.
8 // 3
2
Remember to take into account operator precedence or the order of operations. These rules that govern which procedures to perform first in a given arithmetic expression have the acronym PEMDAS, which stands for parentheses, exponents, multiplication & division, addition & subtraction. You might also know this acronym as BIDMAS, BEDMAS or BODMAS, or by the common mnemonic Please Excuse My Dear Aunt Sally.
Have a look at the following example and see if you can figure out why it gives an incorrect result. This code is expected to return a value of 2.5 for the mean of 2 and 3.
x = 2
y = 3
z = x + y / 2
print(f'The mean of x and y is {z}')
The mean of x and y is 3.5
Often when dealing with numbers in a program, you are less concerned with the historical values than with the current ones. An example would be a running total. Rather than doing arithmetic and then assigning the result to a new variable, it is often better to update the existing one. Updating can be done by combining arithmetic and assignment operators.
The arithmetic operators can be combined with =
assignment to modify a variable value. We can use these operators for some shorthand operations.
The +=
is used to increment a variable by adding a value and reassigning the result to the variable. The same syntax is used for subtraction, multiplication, division, exponent, modulo and floor division.
For example:
x = 1
x += 2 # add 2 to x
print("x is",x)
x <<= 2 # left shift by 2 (equivalent to x *= 4)
print('x is',x)
x **= 2 # x := x^2
print('x is',x)
x is 3 x is 12 x is 144
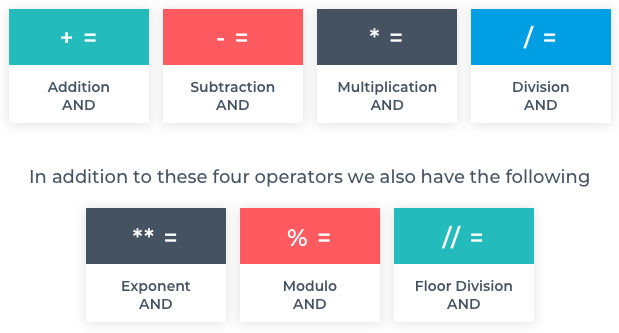
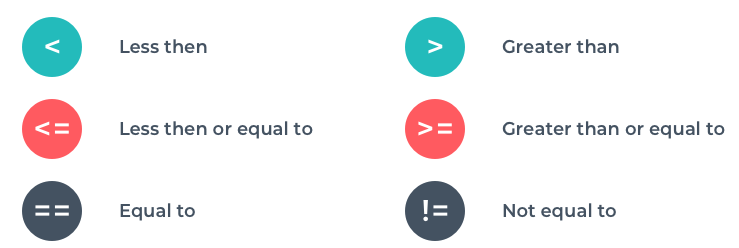
In coding, we often want to compare values. The most straightforward comparison is equality. In Python, as we have used
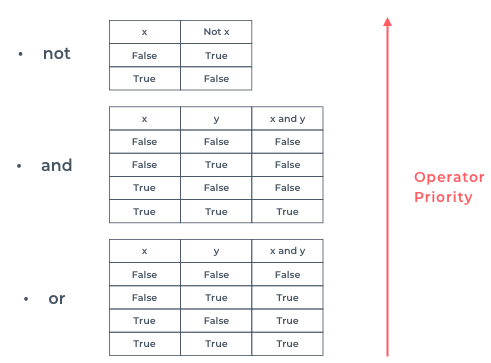
=
for assigning values ==
is used to check for equality. When comparing the values of objects, the type is not compared. For example, 2.0 == 2
is True
even though one is an int
and the other a float
as the value is two. When referring to value, it is not just numeric values that are considered. A string value can be compared lexicographically using the numerical Unicode code points. A sequence such as a list or a tuple can be compared, but in this case, the type is important. (1, 2)
is equal in value to (1, 2)
but not to [1, 2]
. When comparing value the output is True
or False
.
Symbol | Task Performed |
---|---|
== | True, if it is equal |
!= | True, if not equal to |
< | less than |
> | greater than |
<= | less than or equal to |
>= | greater than or equal to |
Note the difference between ==
(equality test) and =
(assignment)
As you can see from the image, you can check if something is not equal in value with the !=
operator. There is no equivalent not greater than as of course that is covered by less than or equal to.
If you compare the values of 2 ordered lists, then the first unequal element is the one that is compared.
[1,2,3] < [1,2,4]
compares as True and is the same comparison as 3 < 4
z = 2
z == 2
True
'a'<'A'
False
[1,2]<[1,2,3]
True
Comparisons can also be chained in the mathematically obvious way. The following will work as expected in Python (but not in other languages like C/C++):
0.5 < z <= 1
False
If you want to combine multiple comparisons, then you need logical operators. This is useful when you have to meet more than one comparison in a program. Logical operators apply to the Boolean values of True and False.
For the
and
operator, True
is returned if all statements are True
. For the or
operator, True
is returned if any statement is True
. For the not
operator, True
is reversed to False
.
In the same way that arithmetic operators have precedence, so do logical operators. not
will be evaluated first followed by and
then or
.
Operator | Meaning | \ | Symbol | Task Performed | |
---|---|---|---|---|---|
and |
Logical AND | | | & | Bitwise AND | |
or |
Logical OR | | | $\mid$ | Bitwise OR | |
not |
Not | | | ~ | Negate | |
| | ^ | Exclusive OR | |||
| | >> | Right shift | |||
| | << | Left shift |
a = 2 #binary: 10
b = 3 #binary: 11
print('a & b =',a & b,"=",bin(a&b))
print('a | b =',a | b,"=",bin(a|b))
print('a ^ b =',a ^ b,"=",bin(a^b))
print('b << a =',b<<a,"=",bin(b<<a))
a & b = 2 = 0b10 a | b = 3 = 0b11 a ^ b = 1 = 0b1 b << a = 12 = 0b1100
print( not (True and False), "==", not True or not False)
True == True
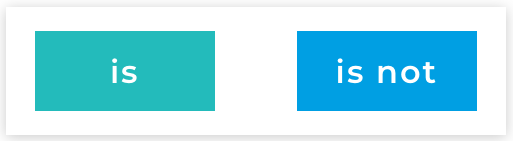
So far we have been checking if something is of equal value, type or
Boolean
. How do we check if something has a unique identity? For example, when we covered None
, we learned that it is unique. There is only one None
object in Python. Each object in Python does have a unique identifier. Not all equal values will have the same identifier.
Here we have created two variables and assigned the first to the second. If we check for value equality, then we will get True
as we would expect.
num = 1
num_two = num
num == num_two
True
But are both variables the same object? We can check that by using the id()
function. This will print out the unique identifier that in this case, will be the same for both variables. This identifier can be thought of as a locator to their place in the computer's memory.
[id(num), id(num_two)]
[140716920481568, 140716920481568]
To check for this identity, you can use the identity operator is
num is num_two
True
In the following example, we check the equality of 1
and True
. This resolves as True
as a Boolean
is represented as an integer 0
or 1
for False
or True
. However, if you check identity you will find it is False
, as although the value is the same, the identifiers are not.
num = 1
bool = True
[num == bool, num is bool]
[True, False]
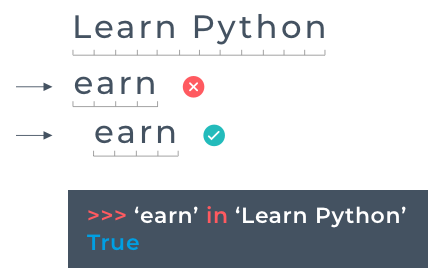
In coding, it is often useful to check whether a value exists within a sequence. The sequence can be a list or a range or a string. Just like in Javascript when you used the
includes
method, in Python, you can use the in
keyword to do this. The in
operator returns a Boolean
value (True
or False
). The operator is a shorthand for calling an object’s __contains__
method.
'Program' in 'Programming'
True
As with other operators, you can use the not
keyword to check for absence.
'sausage' not in ['spam', 'ham', 'egg']
True
The simplest way to use python is to type a single command or line of code into the python interactive shell. For example, if you type
1 + 1
into the shell and press return, then 2
will appear on the next line. This, of course, is useful to try out code but not if you want to create a programme. You can write your commands into a file in an editor and if you save it with a py suffix, then you can run all commands in the file using the python interpreter by typing
python3 myfirstprogram.py
if myfirstprogram
is what you've named your file. This is considered as writing a script. If you take it one step further and write reusable python code, then you have written a module. A module is a set of lines of code that have been written for a purpose with the don't repeat yourself (DRY) philosophy in mind.
def division(numerator, denominator):
result = numerator / denominator
return result
This is a very simple example of a function for carrying out division. If you saved this in a file named divide.py
then you could consider it a module. In Python, you can import modules into other modules much like you did in JavaScript. Therefore if you had another module where a division was required you could import the divide
module to prevent you having to repeat the code.
import divide
divide.division(4, 2)
Here we can use the division
function because we have imported the divide
module. This is a handy shortcut. The file and the module have the same name, but you just drop the .py
when referring to the module. If you have a collection of python modules in a single directory, you can refer to the directory as a package.
In addition, Python is well known for its libraries. A library is code that has been written to be used in many applications with some common functionality. If for example, you created modules that covered all arithmetic functions, then you could have a collection of all those modules as packages and refer to it as a library. Python comes with many built-in libraries to cover the most common use cases. A library can be imported into any application where you need the functionality. It avoids you having to "reinvent the wheel." As Python is open source, anyone can create a library if they have modules that answer a commonly found problem.
A framework is a collection of packages or modules that allows a developer to write web applications. The framework deals with all the web protocols leaving you free to write the code specific to your web app. Most python frameworks are server-side technology. They provide support with activities such as receiving form parameters, dealing with cookies or handling session data. Frameworks that provide all the components to build a large web app are known as full-stack frameworks. They handle aspects such as authentication and databases. To use a Framework, you write code that conforms to the conventions of the framework and effectively delegate responsibility for the standard web app stuff allowing you to concentrate on your application logic. You plug your code into the framework. While code you use from a library does the opposite, it plugs into your code.
Python comes with a wide range of functions. However many of these are part of standard libraries like the math
library rather than built-in.
Conversion from hexadecimal to decimal is done by adding prefix 0x to the hexadecimal value or vice versa by using built in hex( )
, Octal to decimal by adding prefix 0 to the octal value or vice versa by using built in function oct( )
.
hex(171) # hexadecmial value as string
'0xab'
0xAB
171
int( )
converts a number to an integer. This can be a single floating point number, integer or a string. For strings the base can optionally be specified:
print(int(7.7), int('111',2),int('7'))
7 7 7
Similarly, the function str( )
can be used to convert almost anything to a string
print(str(True),str(1.2345678),str(-2))
True 1.2345678 -2
Mathematical functions include the usual suspects like logarithms, trigonometric fuctions, the constant $\pi$ and so on.
import math
math.sin(math.pi/2)
from math import * # avoid having to put a math. in front of every mathematical function
sin(pi/2) # equivalent to the statement above
1.0
round( )
function rounds the input value to a specified number of places or to the nearest integer.
print( round(5.6231) )
print( round(4.55892, 2) )
6 4.56
abs( )
provides the absolute value of any number (including the magnitude of a complex number).
c =complex('5+2j')
print("|5+2i| =", abs(c) , "\t |-5| =", abs(-5) )
|5+2i| = 5.385164807134504 |-5| = 5
divmod(x,y)
outputs the quotient and the remainder in a tuple (you will be learning about tuples in the further chapters) in the format (quotient, remainder).
divmod(9,2)
(4, 1)
input(prompt)
, prompts for and returns input as a string. A useful function to use in conjunction with this is eval()
which takes a string and evaluates it as a python expression.
Note: In notebooks it is often easier just to modify the code than to prompt for input.
abc = input("abc = ")
abcValue=eval(abc)
print(abc,'=',abcValue)
abc = 42 42 = 42
Recall from the previous section that strings can be entered with single, double or triple quotes:
'All', "of", '''these''', """are
valid strings"""
Unicode: Python supports unicode strings - however for the most part this will be ignored in here. If you are workign in an editor that supports unicode you can use non-ASCII characters in strings (or even for variable names). Alternatively typing something like "\u00B3"
will give you the string "³" (superscript-3).
As seen previously, The print()
function prints all of its arguments as strings, separated by spaces and follows by a linebreak:
- print("Hello World")
- print("Hello",'World')
- print("Hello", <Variable>)
Note that print
is different in old versions of Python (2.7) where it was a statement and did not need parentheses around its arguments.
print("Hello","World")
Hello World
The print has some optional arguments to control where and how to print. This includes sep
the separator (default space) and end
(end charcter) and file
to write to a file. When writing to a file, setting the argument flush=True
may be useful to force the function to write the output immediately. Without this Python may buffer the output which helps to improve the speed for repeated calls to print(), but isn't helpful if you are, for example, wanting to see the output immediately during debugging)
print("Hello","World",sep='...',end='!!',flush=True)
Hello...World!!
There are lots of methods for formating and manipulating strings built into python. Some of these are illustrated here.
String concatenation is the "addition" of two strings. Observe that while concatenating there will be no space between the strings.
string1='World'
string2='!'
print('Hello' + " " + string1 + string2)
Hello World!
The %
operator is used to format a string inserting the value that comes after. It relies on the string containing a format specifier that identifies where to insert the value. The most common types of format specifiers are:
- %s -> string
- %d -> Integer
- %f -> Float
- %o -> Octal
- %x -> Hexadecimal
- %e -> exponential
These will be very familiar to anyone who has ever written a C or Java program and follow nearly exactly the same rules as the printf()
function.
print("Hello %s" % string1)
print("Actual Number = %d" %18)
print("Float of the number = %f" %18)
print("Octal equivalent of the number = %o" %18)
print("Hexadecimal equivalent of the number = %x" %18)
print("Exponential equivalent of the number = %e" %18)
Hello World Actual Number = 18 Float of the number = 18.000000 Octal equivalent of the number = 22 Hexadecimal equivalent of the number = 12 Exponential equivalent of the number = 1.800000e+01
When referring to multiple variables parentheses is used. Values are inserted in the order they appear in the parantheses (more on tuples in the next section)
print("Hello %s %s. This meaning of life is %d" %(string1,string2,42))
Hello World !. This meaning of life is 42
We can also specify the width of the field and the number of decimal places to be used. For example:
print('Print width 10: |%10s|'%'x')
print('Print width 10: |%-10s|'%'x') # left justified
print("The number pi = %.2f to 2 decimal places"%3.1415)
print("More space pi = %10.2f"%3.1415)
print("Pad pi with 0 = %010.2f"%3.1415) # pad with zeros
Print width 10: | x| Print width 10: |x | The number pi = 3.14 to 2 decimal places More space pi = 3.14 Pad pi with 0 = 0000003.14
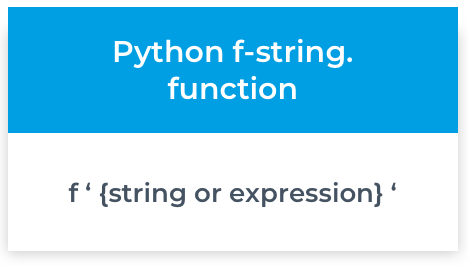
The more advanced form of doing string formatting is by using what are called; f-strings.
When formatting with f-strings, you would do the following:
f"{variable}"
It is also valid to use the capital letter F
. The only consideration required to use f-strings is your version of python, which needs to be version 3.6 or above.
In the previous lesson, string concatenation was done with the +
symbol. Doing concatenation of strings and numbers you had to type convert the number to a string using the str()
method in order to output it in a string. In the example below, you will see that when using the f-string formatting methods, you do not need to convert the number to a string as python converts it for you.
name = "Peppa Pig"
age = 42
# The Modern way of formatting a string
print(f"Hello {name}, you are {age} years old")
Hello Peppa Pig, you are 42 years old
String methods are built-in to Python, allowing you to work on strings. String methods return a new value. They do not change the original string.
As you can see, there are many string methods, some more niche than others.
Method | Description |
---|---|
capitalize() |
Capitalizes the first character of the string |
center() |
Centers string |
count() |
Returns a count of times a specified value occurs in the string |
encode() |
Returns an encoded version of the string (use decode() to decode) |
endswith() |
Returns True if the string ends with a specified suffix |
expandtabs() |
Sets the tab size in spaces of the string |
find() |
Returns the lowest index position of where a specified character was found |
index() |
Searches for a specified value and returns the position of where it was found or an error if not found |
isalnum() |
Returns True if all characters are alphanumeric |
isalpha() |
Returns True if all characters are alphabetic |
isdigit() |
Returns True if all characters are digits |
islower() |
Returns True if all characters are lower case |
isspace() |
Returns True if all characters are whitespace |
istitle() |
Returns True if the string is titlecased |
isupper() |
Returns True if all characters in the string are upper case |
join() |
concatenates string |
ljust() |
Returns a left justified version of the string |
lower() |
Converts a string into lower case |
lstrip() |
Returns a left trim version of the string |
partition() |
Returns a tuple where the string is parted into two strings and the separator |
replace() |
Returns a string where a old value is replaced with a new value |
rfind() |
Searches highest index in the string for a specified value |
rindex() |
Same but with error if nothing found |
rjust() |
Returns a right justified version of the string |
rpartition() |
Returns a tuple where the string is parted into three parts |
rsplit() |
Splits the string at the specified separator, and returns a list |
rstrip() |
Returns a right trim version of the string |
split() |
Splits the string at the specified separator, and returns a list |
splitlines() |
Splits the string at line breaks and returns a list |
startswith() |
Returns true if the string starts with the specified value |
strip() |
Returns a trimmed version of the string |
swapcase() |
Swaps cases, lower case becomes upper case and vice versa |
title() |
Converts the first character of each word to upper case |
translate() |
Returns a translated string |
upper() |
Converts a string into uppercase |
zfill() |
Fills the string with a specified number of 0 values at the beginning |
Strings can be transformed by a variety of functions that are all methods on a string. That is they are called by putting the function name with a .
after the string. They include:
upper()
, lower()
, captialize()
, title()
and swapcase()
with mostly the obvious meaning. Note that capitalize
makes the first letter of the string a capital only, while title
selects upper case for the first letter of every word.center(n)
, ljust(n)
and rjust(n)
each place the string into a longer string of length n padded by spaces (centered, left-justified or right-justified respectively). zfill(n)
works similarly but pads with leading zeros.strip()
, lstrip()
, and rstrip()
respectively to remove from spaces from the both end, just left or just the right respectively. An optional argument can be used to list a set of other characters to be removed.s="heLLo wORLd!"
print(s.capitalize(),"vs",s.title())
print("upper: '%s'"%s.upper(),"lower: '%s'"%s.lower(),"and swapped: '%s'"%s.swapcase())
print('|%s|' % "Hello World".center(30)) # center in 30 characters
print('|%s|'% " lots of space ".strip()) # remove leading and trailing whitespace
print('%s without leading/trailing d,h,L or ! = |%s|',s.strip("dhL!"))
print("Hello World".replace("World","Class"))
Hello world! vs Hello World! upper: 'HELLO WORLD!' lower: 'hello world!' and swapped: 'HEllO WorlD!' | Hello World | |lots of space| %s without leading/trailing d,h,L or ! = |%s| eLLo wOR Hello Class
There are also lost of ways to inspect or check strings. Examples of a few of these are given here:
startswith("string")
and endswith("string")
checks if it starts/ends with the string given as argumentisupper()
, islower()
and istitle()
isdecimal()
. Note there is also isnumeric()
and isdigit()
which are effectively the same function except for certain unicode charactersisalpha()
or combined with digits: isalnum()
isprintable()
accepts anything except '\n' an other ASCII control codesisspace()
isidentifier()
s.count(w)
finds the number of times w occurs in s, while s.find(w)
and s.rfind(w)
find the first and last position of the string w in s.s="Hello World"
print("The length of '%s' is"%s,len(s),"characters") # len() gives length
s.startswith("Hello") and s.endswith("World") # check start/end
# count strings
print("There are %d 'l's but only %d World in %s" % (s.count('l'),s.count('World'),s))
print('"el" is at index',s.find('el'),"in",s) #index from 0 or -1
The length of 'Hello World' is 11 characters There are 3 'l's but only 1 World in Hello World "el" is at index 1 in Hello World
Strings can be compared in lexicographical order with the usual comparisons. In addition the in
operator checks for substrings:
'abc' < 'bbc' <= 'bbc'
True
"ABC" in "This is the ABC of Python"
True
Strings can be indexed with square brackets. Indexing starts from zero in Python. And the len()
function provides the length of a string
s = '123456789'
print("The string '%s' string is %d characters long" % (s, len(s)) )
print('First character of',s,'is',s[0])
print('Last character of',s,'is',s[len(s)-1])
The string '123456789' string is 9 characters long First character of 123456789 is 1 Last character of 123456789 is 9
Negative indices can be used to start counting from the back
print('First character of',s,'is',s[-len(s)])
print('Last character of',s,'is',s[-1])
First character of 123456789 is 1 Last character of 123456789 is 9
Finally a substring (range of characters) an be specified as using $a:b$ to specify the characters at index $a,a+1,\ldots,b-1$. Note that the last charcter is not included.
print("First three characters",s[0:3])
print("Next three characters",s[3:6])
First three characters 123 Next three characters 456
An empty beginning and end of the range denotes the beginning/end of the string:
print("First three characters", s[:3])
print("Last three characters", s[-3:])
First three characters 123 Last three characters 789
When processing text, the ability to split strings appart is particularly useful.
partition(separator)
: breaks a string into three parts based on a separatorsplit()
: breaks string into words separated by white-space (optionally takes a separator as argument)join()
: joins the result of a split using string as separators = "one -> two -> three"
print( s.partition("->") )
print( s.split() )
print( s.split(" -> ") )
print( ";".join( s.split(" -> ") ) )
('one ', '->', ' two -> three') ['one', '->', 'two', '->', 'three'] ['one', 'two ', ' three'] one;two ; three
It is important that strings are constant, immutable values in Python. While new strings can easily be created it is not possible to modify a string:
s='012345'
sX=s[:2]+'X'+s[3:] # this creates a new string with 2 replaced by X
print("creating new string",sX,"OK")
sX=s.replace('2','X') # the same thing
print(sX,"still OK")
creating new string 01X345 OK 01X345 still OK
s[2] = 'X' # an error!!!
---------------------------------------------------------------------------
TypeError Traceback (most recent call last)
<ipython-input-66-93bf77b20e7d> in <module>
4 sX=s.replace('2','X') # the same thing
5 print(sX,"still OK")
----> 6 s[2] = 'X' # an error!!!
TypeError: 'str' object does not support item assignment
For more advanced string processing there are many libraries available in Python including for example:
The key thing to note about Python's control flow statements and program structure is that it uses indentation to mark blocks. Hence the amount of white space (space or tab characters) at the start of a line is very important. This generally helps to make code more readable but can catch out new users of python.
if
statements in Python work in the same way as in JavaScript. There are, of course, some key differences in syntax.
In Python, the condition to be evaluated is terminated with a colon and a new line. The conditional code to be run if True
is indented by four spaces as opposed to the curly braces used in JavaScript.
if
¶if some_condition:
code_block
Only execute the code if some condition
is satisfied (True
)
x = 12
if x > 10:
print("Hello")
Hello
if
-else
¶if some_condition:
first_codeblock
else:
second_codeblock
As above but if the condition is False
, then execute the second_codeblock
x = 12
if 10 < x < 11:
print("hello")
else:
print("world")
world
if
-elif
-else
¶if some_condition:
algorithm
elif some_condition:
algorithm
else:
algorithm
Any number of conditions can be chained to find which part we want to execute.
x = 10
y = 12
if x > y:
print("x>y")
elif x < y:
print("x<y")
else:
print("x=y")
x<y
if
-else
statements¶if
statement inside of an if
statement or if
-elif
or if
-else
are called nested if
statements.
We can write an if
-elif
-else
statement inside another if
-elif
-else
statement which is called nesting conditions. Python relies on indentation to define scope so if you want to create a code block, then four-space indentation is used to determine the nesting.
exit_program = True
manual_override = False
critical_systems_shutdown = False
if not exit_program and not critical_systems_shutdown:
if manual_override:
print("Shutting system down manually")
else:
print("This program will not exit just yet")
elif exit_program and critical_systems_shutdown is not True:
print("Critical systems must be safely shut down before exiting the program")
else:
print("This program will now be terminated...")
Critical systems must be safely shut down before exiting the program
In the if
statement, we have two conditions. We are checking to see if both exit_program
and critical_systems_shutdown
are False
. If both are False
, then inside our if
block we write another check to see if manual_override
is True
. If manual_override
is True
, then we print out Shutting system down manually
. else we print out This program will not exit just yet
. Else if exit_program
is True
, but critical_systems_shutdown
is False
, then we print out Critical systems must be safely shut down before exiting the program
. Else, if both exit_program
and critical_systems_shutdown
are True
, then we exit the program by printing This program will now be terminated…
In addition to using the
if
-else
ladders that we have used in lessons up until now, Python also comes with a shorthand version of the if
-else
statements that is usually called the if
expression. It is a conditional expression or ternary operator.
The expression syntax is as follows:
<expression1> if <condition> else <expression2>
This first evaluates the <condition>
rather than <expression1>
. If <condition>
is True
, <expression1>
is evaluated, and its value is returned; otherwise, <expression2>
is evaluated, and its value is returned.
Read the code below and try and work out whether the if
condition will evaluate to True
or False
. Then try altering the value of my_boolean
to True
to see what changes.
my_boolean = False
my_string = "Hello" if my_boolean else "World"
print(my_string)
World
for
loop
for
loops allow us to iterate over a predefined set of data and will perform a task for each item in a given collection. A for
loop can iterate over a sequence that is a list, tuple, dictionary, set or string. In a for loop, you do not require an indexing variable to be set. In the Checking Containment with Containment Operators unit, the in
keyword was introduced to iterate over a sequence. This same keyword is used in a for
loop. A for
loop will run until every item in the sequence is iterated over.
for item in collection:
code_block
How we build up a for loop is by first using the for
keyword. After the for
keyword we have item
. item
is a variable name. You can call this variable whatever you like (within the Python variable naming conventions), but usually, you use the singular of the sequence name you are iterating over. A for
loop will continue until the last item is reached at which point the loop will be exited.
When looping over integers the range()
function is useful which generates a range of integers:
In mathematical terms range range(a,b)
$=[a,b)\subset\mathbb Z$
languages = ["HTML", "CSS", "JavaScript"]
for language in languages:
print(language)
HTML CSS JavaScript
In the runnable example language
has been used as the sequence is named languages
. This variable will act as a placeholder. After item, we have in
. It is used in this instance to iterate through all values in the sequence. For each iteration of the for
loop, Python will get the next item from the series and store it in the language
variable so we can use it inside the for
loop. Then inside the for loop we simply print out each item value of the sequence, starting at HTML
and working up to JavaScript
.
Another example is iterating through the characters in a string. In this case, we have named the item variable character
and have stepped through the characters in the string Python
.
for character in "Python":
print(character)
P y t h o n
total=0
for i,j in [(1,2),(3,1)]:
total += i**j
print("total =",total)
total = 4
It is also possible to iterate over a nested list illustrated below.
list_of_lists = [[1, 2, 3], [4, 5, 6], [7, 8, 9]]
for list1 in list_of_lists:
print(list1)
[1, 2, 3] [4, 5, 6] [7, 8, 9]
A use case of a nested for loop in this case would be,
list_of_lists = [[1, 2, 3], [4, 5, 6], [7, 8, 9]]
total=0
for list1 in list_of_lists:
for x in list1:
total = total+x
print(total)
45
There are many helper functions that make for loops even more powerful and easy to use. For example enumerate()
, zip()
, sorted()
, reversed()
print("reversed: \t",end="")
for ch in reversed("abc"):
print(ch,end=";")
reversed: c;b;a;
print("enuemerated:\t",end="")
for i,ch in enumerate("abc"):
print(i,"=",ch,end="; ")
enuemerated: 0 = a; 1 = b; 2 = c;
print("zip'ed: ")
for a,x in zip("abc","xyz"):
print(a,":",x)
zip'ed: a : x b : y c : z
range()
¶If you want to loop through code a specific number of times you can use the range
function. The range()
function will generate a sequence of integers. In passing through an argument of 5
, we’re saying that we wish for that sequence to be comprised of 5
numbers. Most programming languages, including Python, are zero-based. Therefore they start counting at 0
instead of 1
. When we use the range function to generate a sequence of 5
integers, it will create a series ranging from [0
-4
]. Those numbers are 0
, 1
, 2
, 3
and 4
. We use the for
loop to iterate each of the numbers in this sequence.
range()
can take up to three arguments: range(start,stop,step)
range()
accepts. It is an optional argument and will be given a default value of 0
.range()
to work, we need to provide a stop argument.range()
takes. It is also an optional argument. If we don’t provide one, Python will default to 1
. A negative value steps negatively.for
loops allow us to iterate over a predefined set of data, iterating over collections of data and will perform a task for each item in a given collection. In this case, range()
can be combined with len()
to calculate the length of the collection dynamically. This is particularly useful when you do not know in advance how many items will be in the sequence.
foods = ['bacon', 'sausage', 'egg', 'spam']
for ind in range(len(foods)):
# In this example only the index is iterated over not the value
print(ind, foods[ind])
0 bacon 1 sausage 2 egg 3 spam
Have a look at the following example and see if you can figure out why it gives an incorrect result. This code is expected to return a value of 1,2,3,4,5, but it does not.
# Return integers from 1 through 5
for i in range(1,5,1):
print(i, end='')
1234
This logical error is known as an out by one error.
while
loop¶while
loops allow us to execute a block of code indefinitely. Indefinite running is an advantageous property but does have some pitfalls if misused. If you look at the image below you can see the loop will run, as long as the condition is True
. Only if the condition is False
will the loop end.
Syntax:
while some_condition:
code_block
Repeatedly execute the code_block
until the some_condition
fails (or exit via a break
statement as shown below)
In the first example, we declare a variable called countdown_number
; then we proceed to begin a countdown sequence. Then we have our while
loop. We create this by starting with the while
keyword, followed by a condition. In this case, the code inside the while loop will be executed so long as countdown_number
is greater than or equal to 0
. Inside the while
block, we print out the countdown_number
, followed by the word seconds
. Next, we subtract 1
from the countdown_number
, meaning that with each iteration, the countdown_number
gets closer to 0
. Once the countdown_number reaches 0
, on the last iteration the countdown_number
will be set to -1
. Since this value is not greater than or equal to 0
, the conditional expression of the while loop will evaluate to False
and the while
block will be skipped. After exiting the loop, we simply print out, And We Have Lift Off!
NOTE: Be careful when constructing a while
loop. If we’d forgotten to subtract one from the countdown_number
at the end of each iteration, the loop would have run forever as the condition would always evaluate to True
. This error is called an infinite loop.
countdown_number = 3
print("Initiating Countdown Sequence...")
print("Lift Off Will Commence In...")
while countdown_number >= 0:
print(f"{countdown_number} seconds...")
countdown_number -= 1
print("And We Have Lift Off!")
Initiating Countdown Sequence... Lift Off Will Commence In... 3 seconds... 2 seconds... 1 seconds... 0 seconds... And We Have Lift Off!
In this second, the code will continue to run until the player declares they want to stop. Read the code to see if you can figure out how it works.
play_game = True
while play_game:
continue_playing = input("Would you like to continue playing the game? y/n ")
if continue_playing.lower() == "y":
print("You have decided to continue playing the game.")
elif continue_playing.lower() == "n":
print("Now closing the game...")
play_game = False
else:
print("That is not a valid option. Please try again.")
print("Thanks for playing")
Here we’ve declared a variable called play_game
which is set to True
. While play_game is True
, we do the following.
continue_playing
. NOTE: We’ve used the
.lower()
method, just in case a user uses an uppercase input. When working with uppercase and lowercase, it’s important to note that, while they are the same letter, they are not the same Unicode character.
while
loop will begin its next cycle, and the user will be prompted again. continue_playing
is equal to n
, then we inform them that they’ve decided to quit the game, and we set the play_game
variable to False
. Now that the play_game variable is no longer True
, the program will exit the loop and print out, Thanks for playing.
y
or n
, then they’ll be informed that their decision was invalid and they need to try again.for number in range(5):
if number == 3:
break # break here
print(f'Number is {number}')
print('Left the loop')
Number is 0 Number is 1 Number is 2 Left the loop
continue
¶The continue
allows you to abandon the current iteration cycle and continue with the next iteration. Again this can only be used in a while
or for
loop. It is typically only used within an if
statement (otherwise the remainder of the loop would never be executed).
for number in range(5):
if number == 3:
continue # skip 3
print(f'Number is {number}')
print('Left the loop')
Number is 0 Number is 1 Number is 2 Number is 4 Left the loop
pass
¶A pass
statement disregards the condition, and the program carries on as though the condition statement was not there. The pass
statement allows you to handle the condition without the loop being affected in any way. The loop will carry on as normal. In the image, you can see the flow of the code does not leave the loop but carries on. It is not ignored by the interpreter like a comment but it is not executed so results in no operation. The pass
statement is frequently used when developing to allow code to run before you have fully figured out the logic you intend.
for number in range(5):
if number == 3:
pass # disregard the if case
print(f'Number is {number}')
print('Left the loop')
Number is 0 Number is 1 Number is 2 Number is 3 Number is 4 Left the loop
else
statement on loops¶Sometimes we want to know if a loop exited 'normally'. This can be achieved with an else
statement in a loop which only executes if there was no break
count = 0
while count < 10:
count += 1
if count % 2 == 0: # even number
count += 2
continue
elif 5 < count < 9:
break # abnormal exit if we get here!
print("count =",count)
else: # while-else
print("Normal exit with",count)
count = 1 count = 5 count = 9 Normal exit with 12
print "Fizz" at each integer divisible by 2, print "Buzz" at each divisible by 3, else print the number.
for i in range(1,12):
printed = False
if not i%2:
print('Fizz', end="")
printed = True
if not i%3:
print('Buzz', end="")
printed = True
print("" if printed else i)
1 Fizz Buzz Fizz 5 FizzBuzz 7 Fizz Buzz Fizz 11
A Python loop can be nested within another Python loop. The program runs the first loop iteration, which then triggers the second loop which then runs to completion and returns to the outer loop.
10
. A prime number is an integer greater than 1
that is divisible only by itself and by 1
. The outer loop stops when it reaches 10
. If you want to find prime numbers below 100
, for example, then change this to while i < 100
.i
meets the criteria of a prime number.i
and j
incremented by 1
each time they run. The if
statement prints a result if a prime number is found. i
with a value of 2
and is incremented by 1
after each run of the outer loop. j
with a value of 2
and is incremented by 1
after each run of the inner loop but only if i
modulus j
is False
.Don't worry too much about the arithmetic. What is important here is the nested loops and their logic. If you step through the code, you will see that the inner loop sometimes runs more than once depending on the values of i
and j
. Only when the inner loop is completed its logic does the program return to the outer loop.
i = 2
while i < 10:
j = 2
while j <= i/j:
if not i % j:
break
j += 1
else:
print(f'{i} is a prime number')
i += 1
2 is a prime number 3 is a prime number 5 is a prime number 7 is a prime number
So far we have only seen numbers and strings and how to write simple expressions involving these. In general writing programs is about managing more complex collections of such items which means think about data structures for storing the data and algorithms for manipulating them. This part of the tutorial and the next looks at the some of the powerful built-in data structures that are included in Python, namely list
, tuple
, dict
and set
data structures.
A list
is one of the four collection data types. A list
is a collection of items or elements that are ordered and is changeable. It can contain duplicate items. Those items can be of different types such as strings, integers, floats or even another list. As a list is ordered, you can use an index to find an element in the list
. Lists are zero-indexed, so the first element has index 0
.
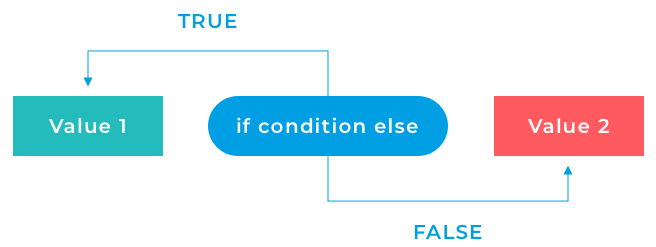
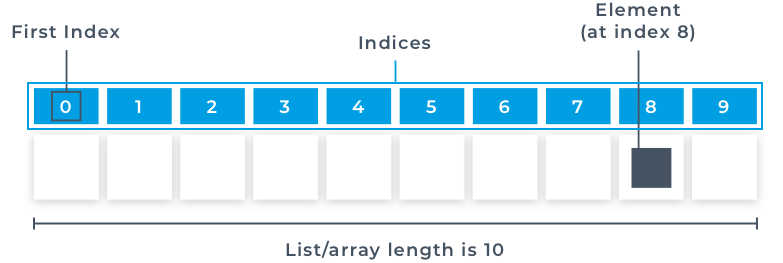
When coding, you would choose a
list
data structure when you need an ordered sequence of items that you intend to be modified or appended. The list
data type has methods to alter lists. We will cover these in the upcoming units.
Lists are the most commonly used data structure. Think of it as a sequence of data that is enclosed in square brackets and data are separated by a comma. Each element of a list can be accessed the position of the element within the list.
Lists are declared by just equating a variable to '[ ]' or list.
a = []
type(a)
list
fruits = ['apple', 'orange', 'banana', 'pear', 'plum']
# Print all fruits
for fruit in fruits:
print(fruit)
apple orange banana pear plum
# Get an item located in a list
second_item = fruits[1]
print(second_item)
orange
# Add an item to the list
fruits.append('cherries')
print(fruits)
['apple', 'orange', 'banana', 'pear', 'plum', 'cherries']
# Reverse the list
fruits.reverse()
print(fruits)
['cherries', 'plum', 'pear', 'banana', 'orange', 'apple']
# Sort the list alphabetically (inplace):
fruits.sort()
print(fruits)
['apple', 'banana', 'cherries', 'orange', 'pear', 'plum']
When working with lists, we don’t have to work with lists as a whole. We can access each item in a list using indexing. Every item in a list has an index, and we can use that index to target specific items, or to access groups of items in lists. These items are usually referred to as elements. Lists are zero-indexed, so
0
, 1
and so on.
To use the third item in a list named mylist
you would use square bracket notation mylist[2]
to get its value. -1
.mylist[-2]
gets the second last item of the list.If you attempt to use an index integer that does not exist in the list then you will get an IndexError: string index out of range
. The index is also useful to get a subset of a string.
The list fruits
, which has six elements will have apple
at index 0
and plum
at index 5
.
[fruits[0], fruits[5]]
['apple', 'plum']
Indexing can also be done in reverse order. That is the last element can be accessed first. Here, indexing starts from -1
. Thus index value -1
will be plum
and index -5
will be banana
.
[fruits[-1], fruits[-5]]
['plum', 'banana']
As you might have already guessed, fruits[0]
is the same as fruits[-6]
, fruits[1]
equals fruits[-5]
. This concept can be extended towards lists with many more elements.
[fruits[0], fruits[-6]]
['apple', 'apple']
Here we have declared two lists fruits
and vegetables
. Each containing its own data. Now, these two lists can again be put into another list say z
which will have it's data as two lists. This list inside a list is called as nested lists and is how an array would be declared which we will see later.
vegetables = ['carrot','potato','leek','onion','spinach']
z = [fruits, vegetables]
print( z )
[['apple', 'banana', 'cherries', 'orange', 'pear', 'plum'], ['carrot', 'potato', 'leek', 'onion', 'spinach']]
Indexing in nested lists can be quite confusing if you do not understand how indexing works in python. So let us break it down and then arrive at a conclusion.
Let us access the data 'apple' in the above nested list. First, at index 0 there is a list ['apple','orange'] and at index 1 there is another list ['carrot','potato']. Hence z[0] should give us the first list which contains 'apple' and 'orange'. From this list we can take the second element (index 1) to get 'orange'
print(z[0][1])
banana
Lists do not have to be homogenous. Each element can be of a different type:
["this is a valid list",2,3.6,(1+2j),["a","sublist"]]
['this is a valid list', 2, 3.6, (1+2j), ['a', 'sublist']]
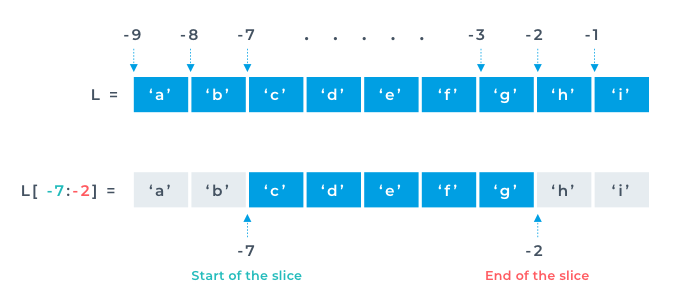
Indexing was only limited to accessing a single element, Slicing on the other hand is accessing a sequence of data inside the list. In other words "slicing" the list. Slice notation with indexing is used to slice the list up. We can slice up lists to get subsets of a list. For example, if we wanted to get the first two items in a list, then we would use the following syntax
slice(2)
which creates a new list with only the first two elements of the existing list. This slice
method can take three arguments: slice(start, end, step)
which takes integer values of the start
ing position, end
position and step
size.
fruits = ["apple", "banana", "peach", "pear", "plum", "orange"]
x = slice(1, 4, 2)
fruits[x]
['banana', 'pear']
However, when slicing lists, you can use a shortened slice
notation rather than using the slice
object each time. Behind the scenes slice
is still being used. We will use the shortened slice notation in the upcoming examples. Observe the following notation provides the same result as the slice(1,4,2)
before.
fruits[1:4:2]
['banana', 'pear']
In the for loop units, we used indexing with lists. Slicing also uses the index to identify where to slice. In the above example, we’ve added [1:4:2]
to the end of our list name, which is called slice notation. It works like a combination of indexing and range
.
1
- second element.:
, we use the index at which we want to stop: 4
- fifth element. Similar to the range function, the stop value is the everything up to, but not including, that value. Here it will, therefore, consider everything up to index 4, except for index 4 itself.2
If we wanted to start at the very beginning of a list, we could just say [0:2]
or shorter {:2]
. By not providing a start value, Python will just grab everything up to the (but not including) stop value. As the start default is index 0 you could, of course, just use slice(2) instead.
fruits[:2]
['apple', 'banana']
Similarly, if we set a start value and don’t specify a stop value, it will only get everything up to the end of the list. If we don’t provide a start or stop value, then it will just grab everything from the beginning, all the way to the end. We would do this if we wanted to create a copy of a list.
fruits[:]
['apple', 'banana', 'peach', 'pear', 'plum', 'orange']
The negative step will count from the end, so you can reverse the list using the list[::-1]
notation. You can also use negative values for a start and stop if you want to index from the end of the list.
fruits[::-1]
['orange', 'plum', 'pear', 'peach', 'banana', 'apple']
The list object has many methods. Some modify the list like inserting, sorting or removing. Others return information about the items in the list. As a list can contain many data types, not all methods will work on all lists. You would not be able to sort the list [None, 1, 'one']
as the types of the items are not comparable.
Method | Description |
---|---|
list.append(x) | Add an item to the end of the list. |
list.extend(list) | Extend the list by appending another list. |
list.insert(i, x) | nsert an item at a given position. The first argument is the index of the element before which to insert |
list.remove(x) | Remove the first item from the list whose value is equal to x. It raises a ValueError if there is no such item. |
list.pop(i) | Remove the item at the given position in the list, and return it. If no index is specified, a.pop() removes and returns the last item in the list. |
list.clear() | Remove all items from the list. |
list.index(x, start, end) | Return zero-based index in the list of the first item whose value is equal to x. Raises a ValueError if there is no such item.The optional arguments start and end are interpreted as in the slice notation. |
list.count(x) | Return the number of times x appears in the list. |
list.sort(key=None, reverse=False) | Sort the items of the list in place |
list.reverse() | Reverse the elements of the list in place. |
list.copy() | Return a copy of the list. Equivalent to a[:] |
Examples of list methods are in the runnable example below. Note that methods which alter the list (reverse
, append
and sort
) return None
when called. Other methods like count
, index
and pop
return integers, indices and items respectively.
Lists can be used to implement useful computing concepts such as a stack. A stack is where the last element added is the first element retrieved. To do this use append()
to add a new item to the top of the stack. Use pop()
to retrieve an item from the top of the stack.
append
ing a list to a list would create a sublist:
lst1=['a','b','c','b']
lst2=['d','e']
lst1.append(lst2)
lst1
['a', 'b', 'c', 'b', ['d', 'e']]
If a nested list is not what is desired then the extend( )
function can be used.
lst1=['a','b','c','b']
lst1.extend(lst2)
lst1
['a', 'b', 'c', 'b', 'd', 'e']
The same concatenation is achieved with the +
operator
['a','b','c','b'] + ['Z']
['a', 'b', 'c', 'b', 'Z']
If you want to replace one element with another element you simply assign the value to that particular index.
lst1[2] = 'Python'
lst1
['a', 'b', 'Python', 'b', 'd', 'e']
insert(x,y)
is used to insert an element y
at a specified index value x
. Note that L.append(y)
is equivalent to L.insert(len(L)+1,y)
- that is insertion right at the end of the list L.
lst1.insert(2, 'JavaScript')
lst1
['a', 'b', 'JavaScript', 'Python', 'b', 'd', 'e']
One can remove element by specifying the element itself using the remove( )
function:
lst1.remove('JavaScript')
lst1
['a', 'b', 'Python', 'b', 'd', 'e']
Alternative to remove
function but with using index value is del
del lst1[2]
lst1
['a', 'b', 'b', 'd', 'e']
count( )
is used to count the number of a particular element that is present in the list.
['a', 'b', 'c', 'b'].count('b')
2
index( )
is used to find the index value of a particular element. Note that if there are multiple elements of the same value then the first index value of that element is returned.
lst1.index('b')
1
pop( )
function return the last element in the list. This is similar to the operation of a stack. Hence lists can be used as stacks by using append()
for push and pop()
to remove the most recently added element.
lst1=['a', 'b', 'c', 'b']
lst1.pop()
'b'
lst1
['a', 'b', 'c']
Index value can be specified to pop a certain element corresponding to that index value.
lst1.pop(1)
'b'
lst1
['a', 'c']
The entire elements present in the list can be reversed by using the reverse()
function.
lst1.reverse()
lst1
['c', 'a']
Python offers built in operation sort( )
to arrange the elements in ascending order. Alternatively sorted()
can be used to construct a copy of the list in sorted order
lst1.sort()
print(lst1)
['a', 'c']
lst2=sorted([3,2,1]) # another way to sort
lst2
[1, 2, 3]
For descending order an optional keyword argument reverse
is provided. Setting this to True
would arrange the elements in descending order.
lst2=sorted([3,1,2],reverse=True)
lst2 # remember that `sorted` creates a copy of the list in sorted order
[3, 2, 1]
Similarly for lists containing string elements, sort( )
would sort the elements based on it's ASCII value in ascending and by specifying reverse=True in descending.
menu = ['eggs', 'bacon', 'spam', 'ham']
menu.sort()
menu
['bacon', 'eggs', 'ham', 'spam']
menu.sort(reverse=True)
menu
['spam', 'ham', 'eggs', 'bacon']
To sort based on length key=len
should be specified as shown:
menu.sort(key=len)
menu
['ham', 'spam', 'eggs', 'bacon']
To find the length of the list or the number of elements in a list, len( )
is used.
len(menu)
4
If the list consists of all integer elements then min( )
and max( )
gives the minimum and maximum value in the list. Similarly sum
is the sum
nums=[2,3,4,5]
print("min =",min(nums)," max =",max(nums)," total =",sum(nums))
min = 2 max = 5 total = 14
Lists can be concatenated by adding them with +
. The resultant list will contain all the elements of the lists that were added. The resultant list will not be a nested list.
[1,2,3] + [5,4,7]
[1, 2, 3, 5, 4, 7]
There might arise a requirement where you might need to check if a particular element is there in a predefined list. Consider the below list to check if Fire
and Metal
are present in the list names.
names = ['Earth','Air','Fire','Water']
A conventional approach would be to use a for
loop and iterate over the list and use the if
condition. But in python you can use a in b
concept which would return True
if a
is present in b
and False
if not.
'Fire' in names
True
'Metal' in names
False
In a list with string elements, max( )
and min( )
are still applicable and return the first/last element in lexicographical order.
mlist = ['bzaa','ds','nc','az','z','klm']
print("max =",max(mlist))
print("min =",min(mlist))
max = z min = az
Here the first index of each element is considered and thus z
has the highest ASCII value thus it is returned and minimum ASCII is a
. But what if numbers are declared as strings?
nlist = ['5','24','93','1000']
print("max =",max(nlist))
print('min =',min(nlist))
max = 93 min = 1000
Even if the numbers are declared in a string the first index of each element is considered and the maximum and minimum values are returned accordingly.
But if you want to find the max( )
string element based on the length of the string then another parameter key
can be used to specify the function to use for generating the value on which to sort. Hence finding the longest and shortest string in mlist
can be doen using the len
function:
print('longest =',max(mlist, key=len))
print('shortest =',min(mlist, key=len))
longest = bzaa shortest = z
Any other built-in or user defined function can be used.
A string can be converted into a list by using the list()
function,
list('hello world !')
['h', 'e', 'l', 'l', 'o', ' ', 'w', 'o', 'r', 'l', 'd', ' ', '!']
or more usefully using the split()
method, which breaks strings up based on spaces.
'Hello World !!'.split()
['Hello', 'World', '!!']
Assignment of a list does not imply copying. It simply creates a second reference to the same list. Most of new python programmers get caught out by this initially. Consider the following,
lista= [2,1,4,3]
listb = lista
print(listb)
[2, 1, 4, 3]
Here, We have declared a list, lista = [2,1,4,3]
. This list is copied to listb
by assigning its value. Now we perform some random operations on lista
lista.sort()
lista.pop()
lista.append(9)
print("A =",lista)
print("B =",listb)
A = [1, 2, 3, 9] B = [1, 2, 3, 9]
listb
has also changed though no operation has been performed on it. This is because in Python assignment assigns references to the same object, rather than creating copies. So how do fix this?
If you recall, in slicing we had seen that parentlist[a:b]
returns a list from parent list with start index a and end index b and if a and b is not mentioned then by default it considers the first and last element. We use the same concept here. By doing so, we are assigning the data of lista to listb as a variable.
lista = [2,1,4,3]
listb = lista[:] # make a copy by taking a slice from beginning to end
print("Starting with:")
print("A =",lista)
print("B =",listb)
lista.sort()
lista.pop()
lista.append(9)
print("Finnished with:")
print("A =",lista)
print("B =",listb)
Starting with: A = [2, 1, 4, 3] B = [2, 1, 4, 3] Finnished with: A = [1, 2, 3, 9] B = [2, 1, 4, 3]
3 * ['a',1]
['a', 1, 'a', 1, 'a', 1]
['a',1] * 4
['a', 1, 'a', 1, 'a', 1, 'a', 1]
List comprehension (looping expression) is available in Python as a concise way to create a list (that also applies to Tuples, Sets and Dictionaries as we will see below). It is commonly used where you want to generate a list based on an operation or to create a new sub-list of an existing list.
In general this takes the form of [ <expression> for <variable> in <List> ]
. That is a new list constructed by taking each element of the given List in turn, assigning it to the variable and then evaluating the expression with this variable assignment.
Let's compare the list comprehension syntax with what you’ve seen before.
numbers = []
for x in range(10):
numbers.append(x)
numbers
[0, 1, 2, 3, 4, 5, 6, 7, 8, 9]
This same code could be written as a list comprehension.
[x for x in range(10)]
[0, 1, 2, 3, 4, 5, 6, 7, 8, 9]
This is a more straightforward cleaner way to write the list. The list comprehension can also include additional logic. Here's a much more complex example.
combination = []
for x in [1,2,3]:
for y in [3,1,4]:
if x != y:
combination.append((x,y))
combination
[(1, 3), (1, 4), (2, 3), (2, 1), (2, 4), (3, 1), (3, 4)]
The above code generates a list of tuples. This can be done in one line:
[(x, y) for x in [1,2,3] for y in [3,1,4] if x != y]
[(1, 3), (1, 4), (2, 3), (2, 1), (2, 4), (3, 1), (3, 4)]
This creates a new list resulting from the evaluation of the expression taking the for
and if
clauses into consideration. It combines the elements of the two lists if they are not equal. Notice how the for
and if
clauses are in the same order in the two examples.
# every natural number
[i for i in range(10)]
[0, 1, 2, 3, 4, 5, 6, 7, 8, 9]
# every second natural number
[i for i in range(0,11,2)]
[0, 2, 4, 6, 8, 10]
# squared numbers
[x**2 for x in range(0,8)]
[0, 1, 4, 9, 16, 25, 36, 49]
# list of Tupels of number pairs
[((i,(i+1))) for i in range(5)]
[(0, 1), (1, 2), (2, 3), (3, 4), (4, 5)]
# repeat a string 7 times in a new list
['woohoo' for i in range(7)]
['woohoo', 'woohoo', 'woohoo', 'woohoo', 'woohoo', 'woohoo', 'woohoo']
# list of letters of a string
[i for i in 'hello world']
['h', 'e', 'l', 'l', 'o', ' ', 'w', 'o', 'r', 'l', 'd']
# generate list of Tuples
ab = 'ABCDEF'
[(ab[i],ab[j]) for i in range(0,3) for j in range(3,6)]
[('A', 'D'), ('A', 'E'), ('A', 'F'), ('B', 'D'), ('B', 'E'), ('B', 'F'), ('C', 'D'), ('C', 'E'), ('C', 'F')]
[i**2 for i in [1,2,3]]
[1, 4, 9]
As can be seen this constructs a new list by taking each element of the original [1,2,3]
and squaring it. We can have multiple such implied loops to get for example:
[10*i+j for i in [1,2,3] for j in [5,7]]
[15, 17, 25, 27, 35, 37]
Finally the looping can be filtered using an if expression with the for - in construct.
[10*i+j for i in [1,2,3] if i%2==1 for j in [4,5,7] if j >= i+4] # keep odd i and j larger than i+3 only
[15, 17, 37]
If we look at the list comprehensions in the last unit, we can use another list comprehension as the initial expression.
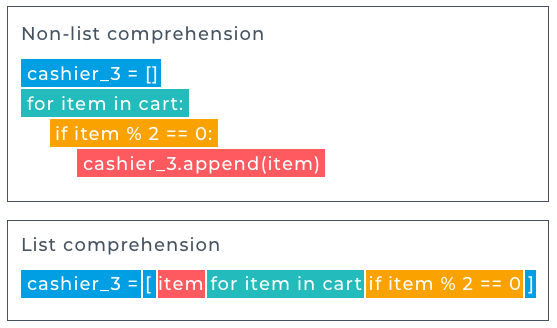
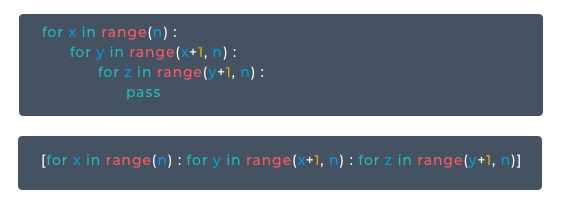
This is called nesting.
Let's look at the runnable example to see how this works if we start with a list of lists where there are three lists of length four. If we wanted to write code to transpose this into a list of lists where there are four lists of length three then we would need quite a complicated nested for loop.
matrix = [
[11, 12, 13, 14],
[15, 16, 17, 18],
[19, 20, 21, 22],]
transposed = []
for i in range(4):
transposed_row = []
for row in matrix:
transposed_row.append(row[i])
transposed.append(transposed_row)
print(transposed_row)
[11, 15, 19] [12, 16, 20] [13, 17, 21] [14, 18, 22]
This is quite a lot of code, but you can see there is an empty list outside the for loop but then another empty list nested within in the for loop. Each new list of 3 is created and then appended to the empty list.
[[row[i] for row in matrix] for i in range(4)]
[[11, 15, 19], [12, 16, 20], [13, 17, 21], [14, 18, 22]]
Tuples are similar to lists but only big difference is the elements in a tuple cannot be changed. Tuples are the natural extension of ordered pairs, triplets etc in mathematics.
It can contain duplicate items. Those items can be of different types such as strings, integers, floats or even another tuple.
Creating a tuple is referred to as packing. So when you want to get the values back, it is referred to as unpacking. It is also possible to get a value with indexing.
1,2,3
(1, 2, 3)
() # empty, zero-length tuple
()
tuple( )
object constructortuple() # also, empty, zero-length tuple
()
42,
(42,)
So why choose a tuple over a list? As it is not changeable, it can be used where you have a constant set of values. Use one where you do not intend to change the data set. A tuple can be used as a dictionary key, unlike a list. Tuples are also more memory efficient.
To show how this works consider the following code working with cartesian coordinates in the plane:
origin = (0.0,0.0,0.0)
x = origin
# x[1] = 1 # can't do something like this as it would change the origin
x = (1, 0, 0) # perfectly OK
print(x)
print(type(x))
(1, 0, 0) <class 'tuple'>
21
when multiplied by 2
yields 42
, but when multiplied with a tuple the data is repeated twice.
2*(21,)
(21, 21)
Values can be assigned while declaring a tuple. It takes a list as input and converts it into a tuple:
tuple([1,2,3])
(1, 2, 3)
it can take a string and convert it into a tuple:
tuple('Hello')
('H', 'e', 'l', 'l', 'o')
It follows the same indexing and slicing as Lists.
(3,5,7)[2]
7
(3,5,7)[1:3]
(5, 7)
Tupples can be used as the left hand side of assignments and are matched to the correct right hand side elements - assuming they have the right length
(a,b,c)= ('alpha','beta','gamma') # parentheses are optional
a,b,c= 'alpha','beta','gamma' # The same as the above
print(a,b,c)
alpha beta gamma
a,b,c = ['Alpha','Beta','Gamma'] # can assign lists
print(a,b,c)
Alpha Beta Gamma
[a,b,c]=('this','is','ok') # even this is OK
print(a,b,c)
this is ok
More complex nexted unpackings of values are also possible
(w,(x,y),z)=(1,(2,3),4)
print(w,x,y,z)
1 2 3 4
(w,xy,z)=(1,(2,3),4)
print(w,xy,z) # notice that xy is now a tuple
1 (2, 3) 4
count()
function counts the number of specified element that is present in the tuple.
d=tuple('a string with many "a"s')
d.count('a')
3
index()
function returns the index of the specified element. If the elements are more than one then the index of the first element of that specified element is returned
d.index('a')
0
Note that many of the other list functions such as min()
, max()
, sum()
and sorted()
, as well as the operator in
, also work for tuples in the expected way.
A dictionary is another useful Python data type. It is similar in concept to a dictionary of written language. If we want to know the meaning of 'immutable' in English for example, we would look it up in an English dictionary and get the derivation "adjective: unchanging over time or unable to be changed."
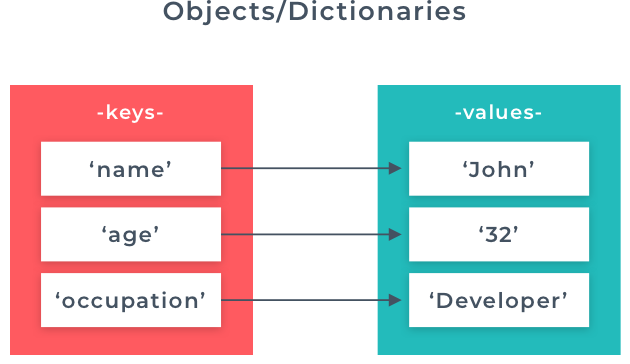
Dictionaries allow us to take things a step further when it comes to storing information in a collection. Dictionaries will enable us to use what are called key/value pairs. In the example above, 'immutable' is the key, and its derivation is the value. When using a dictionary in Python, we define our key/value pairs enclosed in curly braces
{ }
. After that, we use a string as our key or any other immutable data type. Then we use a colon to separate the key from the value, and then we have the value.
Dictionaries are mappings between keys and items stored in the dictionaries. Alternatively one can think of dictionaries as sets in which something stored against every element of the set. They can be defined as follows:
To define a dictionary, equate a variable to { }
or dict()
d = dict() # or equivalently d={}
print(type(d))
d['abc'] = 3
d[4] = "A string"
print(d)
<class 'dict'> {'abc': 3, 4: 'A string'}
As can be guessed from the output above, Dictionaries can be defined by using the { key : value }
syntax. The following dictionary has three elements
d = { 1: 'One', 2 : 'Two', 100 : 'Hundred'}
len(d)
3
Now you are able to access 'One'
by the index value set at 1
print(d[1])
One
You would choose a dictionary as a data structure when you have values you want to associate with a key. For example, if you want to map a phone number to a name. A dictionary is very efficient to search as you have the key. Lists are on the other hand, much slower to search.
In this case, we have a dictionary called user. This dictionary has four keys (username, first_name, last_name, and age). Each of these keys has a value associated with it (“tombombadil”, “Tom”, “Bombadil”, 100)
.
As you can see in the runnable example, you can access a value 100
by using the key age
in square brackets. You can assign a new key/value pair with the same syntax for the key home
and the assignment operator equals for the value Withywindle, Middle-Earth
The same syntax with an existing key age
changes the value 99
. To delete a key/value pair use del
and the key. To list the keys in the dictionary, you can use list()
or sorted()
but if you just want to know if a key exists within the dictionary, use the in
keyword.
user = {
"username": "tombombadil",
"first_name": "Tom",
"last_name": "Bombadil",
"age": 100
}
print(user)
print(user['age'])
{'username': 'tombombadil', 'first_name': 'Tom', 'last_name': 'Bombadil', 'age': 100} 100
user['home'] = 'Withywindle, Middle-Earth'
user['age'] = 99
print(user)
{'username': 'tombombadil', 'first_name': 'Tom', 'last_name': 'Bombadil', 'age': 99, 'home': 'Withywindle, Middle-Earth'}
del user['home']
print(user)
{'username': 'tombombadil', 'first_name': 'Tom', 'last_name': 'Bombadil', 'age': 99}
print(list(user))
print(sorted(user))
print(user)
['username', 'first_name', 'last_name', 'age'] ['age', 'first_name', 'last_name', 'username'] {'username': 'tombombadil', 'first_name': 'Tom', 'last_name': 'Bombadil', 'age': 99}
print('username' in user)
True
There are a number of alternative ways for specifying a dictionary including as a list of (key,value)
tuples.
To illustrate this we will start with two lists and form a set of tuples from them using the zip() function
Two lists which are related can be merged to form a dictionary.
names = ['One', 'Two', 'Three', 'Four', 'Five']
numbers = [1, 2, 3, 4, 5]
[ (name,number) for name,number in zip(names,numbers)] # create (name,number) pairs
[('One', 1), ('Two', 2), ('Three', 3), ('Four', 4), ('Five', 5)]
Now we can create a dictionary that maps the name to the number as follows.
a1 = dict((name,number) for name,number in zip(names,numbers))
print(a1)
{'One': 1, 'Two': 2, 'Three': 3, 'Four': 4, 'Five': 5}
Note that the ordering for this dictionary is not based on the order in which elements are added but on its own ordering (based on hash index ordering). It is best never to assume an ordering when iterating over elements of a dictionary.
Note: Any value used as a key must be immutable. That means that tuples can be used as keys (because they can't be changed) but lists are not allowed. As an aside for more advanced readers, arbitrary objects can be used as keys -- but in this case the object reference (address) is used as a key, not the "value" of the object.
The use of tuples as keys is very common and allows for a (sparse) matrix type data structure:
matrix={ (0,1): 3.5, (2,17): 0.1}
matrix[2,2] = matrix[0,1] + matrix[2,17]
# matrix[2,2] is equivalent to matrix[ (2,2) ]
print(matrix)
{(0, 1): 3.5, (2, 17): 0.1, (2, 2): 3.6}
Dictionary can also be built using the list comprehension style definition.
a2 = { name : len(name) for name in names}
print(a2)
{'One': 3, 'Two': 3, 'Three': 5, 'Four': 4, 'Five': 4}
A dictionary can be thought of as a mapping between indexes (known as keys) and values. Each key must be unique and unchanging as that key maps to a particular value. The value can be any type of object and can appear in the same dictionary multiple times. This association is called a key:value pair or an item. The order of a dictionary is not fixed. It does not have an index as a list has. Two people creating the same dictionary on different computers might get a different order of items. To get the value of a dictionary, you have to use the key.
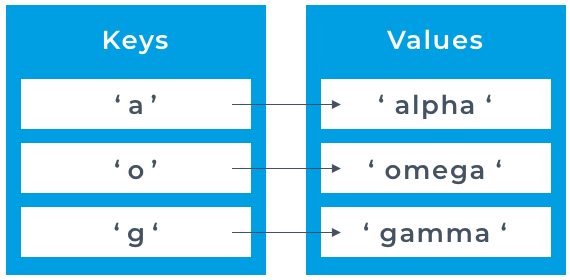
This time in the runnable example, we have created our dictionary with default values of empty strings. In this case, we have used the
dict()
function, which can create dictionaries from lists. The fromkeys()
method is used to specify the keys list as the keys and a variable of an empty string as the values.
keys = ['username', 'first_name', 'last_name', 'age']
default_value = ''
user = dict.fromkeys(keys, default_value)
print(user)
{'username': '', 'first_name': '', 'last_name': '', 'age': ''}
To set a value, you can use the items key in square bracket notation and the assignment operator with a value. The default values are all overridden with the new values.
user['username'] = 'tombombadil'
user['first_name'] = 'Tom'
user['last_name'] = 'Bombadil'
user['age'] = 100
print(user)
{'username': 'tombombadil', 'first_name': 'Tom', 'last_name': 'Bombadil', 'age': 100}
To get a value, you can use the same notation without the assignment. Here we have printed the age of 100
. However, if we attempted to get the value of a nonexistent key, then an error would occur. To avoid this you can use the get()
method which will get the value if the key exists and return None
if it does not. More methods will be covered in the next unit.
print(user['age'])
100
As key home
returns None
lets add a key:value
pair. The same syntax is used as when we were setting the username
, first_name
, last_name
and age
values. As home
key is new, it is added to the dictionary with its value. As the age
key already exists, the value is changed from 100
to 99
.
print(user.get('home', "doesn't exist"))
user['home'] = 'Withywindle, Middle-Earth'
user['age'] = 99
print(user)
doesn't exist {'username': 'tombombadil', 'first_name': 'Tom', 'last_name': 'Bombadil', 'age': 99, 'home': 'Withywindle, Middle-Earth'}
If we delete a key the value is deleted with it.
del user['home']
print(user)
{'username': 'tombombadil', 'first_name': 'Tom', 'last_name': 'Bombadil', 'age': 99}
If we want to get a list of the keys only, you can use the keys()
method and wrap that in a list()
function. The same syntax but using values
or items
will get a list of the dictionary values or items instead.
print(list(user.keys()))
print(list(user.values()))
print(user.items())
['username', 'first_name', 'last_name', 'age'] ['tombombadil', 'Tom', 'Bombadil', 99] dict_items([('username', 'tombombadil'), ('first_name', 'Tom'), ('last_name', 'Bombadil'), ('age', 99)])
The dictionary object has many methods. Some are used to create dictionaries, some to update them and some to get items from them. We used the get(keyname, None)
method in the last unit as it returns None
(or a specified default) instead of giving an error. If you wanted to merge two dictionaries, then the update()
method could be used. However, in cases where both dictionaries have the same key, the values will be blindly overwritten. The pop()
method is useful to remove a value when you know the key. To remove the last inserted item, then the popitem()
method will do that. To remove all items, then the clear()
method will do the job. Methods that alter the dictionary return None as default.
Method | Description | |
---|---|---|
clear() | Removes all the elements from the dictionary | |
copy() | Returns a copy of the dictionary | |
fromkeys() | Returns a new dictionary with the specified keys and value | |
get(keyname, value) | Returns the value of the specified keyname. Used in the previous unit. Returns default None if the | keyname doesn't exist unless you override this default with a optional value. |
items() | Returns a list containing a tuple for each key:value pair | |
keys() | Returns a list containing the dictionary's keys. Used in the previous unit. | |
pop() | Removes the element with the specified key | |
popitem() | Removes the last inserted key:value pair | |
setdefault() | Returns the value of the specified key. If the key does not exist: insert the key, with the specified value | |
update() | Updates the dictionary with the specified key:value pairs | |
values() | Returns a list of all the values in the dictionary. Used in the previous unit. |
Note that methods which alter the dictionary
clear()
andupdate()
returnNone
when printed. Methods that do not return any value returnNone
as default in Python. Other methods likeitems()
,get()
andpopitem()
return items.
user = {
"username": "tombombadil",
"first_name": "Tom",
"last_name": "Bombadil",
"age": 100
}
print(user)
print(user.items())
{'username': 'tombombadil', 'first_name': 'Tom', 'last_name': 'Bombadil', 'age': 100} dict_items([('username', 'tombombadil'), ('first_name', 'Tom'), ('last_name', 'Bombadil'), ('age', 100)])
In the get()
method for age
, an optional value of 0
has been included so that will be returned rather than None
if no age
value is in the dictionary.
print(user.get('age', 0))
100
The update()
takes another dictionary and adds it to the existing one. If the key had already existed in the user dictionary, then its value would have been overwritten.
user.update({'home': 'Withywindle, Middle-Earth'})
print(user)
{'username': 'tombombadil', 'first_name': 'Tom', 'last_name': 'Bombadil', 'age': 100, 'home': 'Withywindle, Middle-Earth'}
The popitem()
in this case, removes the home
key and its associated value as they were the last to be added.
print(user.popitem())
print(user)
('home', 'Withywindle, Middle-Earth') {'username': 'tombombadil', 'first_name': 'Tom', 'last_name': 'Bombadil', 'age': 100}
The clear()
method removes all key:value
pairs from the dictionary leaving an empty dictionary.
user.clear()
print(user)
{}
The len()
function and in
operator have the obvious meaning:
print("a1 has",len(a1),"elements")
print("One is in a1",'One' in a1,"but not 2:", 2 in a1) # 'in' checks keys only
a1 has 5 elements One is in a1 True but not 2: False
The clear( )
function is used to erase all elements.
a2.clear()
print(a2)
{}
The values( )
function returns a list with all the assigned values in the dictionary. (Acutally not quit a list, but something that we can iterate over just like a list to construct a list, tuple or any other collection):
[ v for v in a1.values() ]
[1, 2, 3, 4, 5]
keys( )
function returns all the index or the keys to which contains the values that it was assigned to.
{ k for k in a1.keys() }
{'Five', 'Four', 'One', 'Three', 'Two'}
items( )
is returns a list containing both the list but each element in the dictionary is inside a tuple. This is same as the result that was obtained when zip function was used - except that the ordering may be 'shuffled' by the dictionary.
", ".join( "%s = %d" % (name,val) for name,val in a1.items())
'One = 1, Two = 2, Three = 3, Four = 4, Five = 5'
The pop( )
function is used to get the remove that particular element and this removed element can be assigned to a new variable. But remember only the value is stored and not the key. Because the is just a index value.
val = a1.pop('Four')
print(a1)
print("Removed",val)
{'One': 1, 'Two': 2, 'Three': 3, 'Five': 5} Removed 4
In the for
-loops unit, we saw how to iterate over strings and lists. The simplest case is to use the in
keyword to iterate through the string or list. We also looked at using integers as indexes for the list. This could be done using range()
and len()
.
Dictionaries are more complicated due to the key: value
structure. You can use the keyword in
for dictionaries but what will be returned is just the key. You could, of course, return the value using the square bracket notation. However, there is a better way to iterate over a dictionary. If we needed access to both, key
s, and values
, we’d have to use a dictionary method called .items()
In the followin example, we define two new variables in our for
loop, key
and value
. These variables don’t need to be called key
and value
, but as the first variable will be the key and the second variable will the value, it’s considered to be a good convention. Then after that, we just print out the key
and the value
, with some nice formatting to denote each key/value with which we’re working.
user = {
"username": "tombombadil",
"first_name": "Tom",
"last_name": "Bombadil",
"age": 100
}
for key, value in user.items():
print(f"Key: {key}")
print(f"Value: {value}")
print("------------------")
Key: username Value: tombombadil ------------------ Key: first_name Value: Tom ------------------ Key: last_name Value: Bombadil ------------------ Key: age Value: 100 ------------------
Dictionary comprehensions are just like list comprehensions.
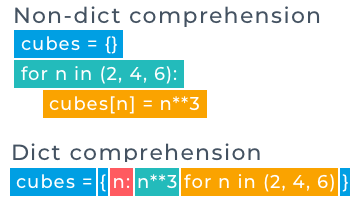
The difference in the syntax is that curly rather than square brackets are used. Also, before the for keyword you need to include the key and value separated with a colon.
Let's compare the dict comprehension syntax with what you’ve seen before.
squares = {}
for x in (2, 4, 6):
squares[x] = x**2
squares
{2: 4, 4: 16, 6: 36}
This same code could be written as a dictionary comprehension.
{x: x**2 for x in (2, 4, 6)}
{2: 4, 4: 16, 6: 36}
{fruit:len(fruit) for fruit in ['apple', 'mango', 'banana','cherry']}
{'apple': 5, 'mango': 5, 'banana': 6, 'cherry': 6}
{i:(i*'*') for i in range(0,5)}
{0: '', 1: '*', 2: '**', 3: '***', 4: '****'}
{i:(True if i%2==0 else False) for i in range(10)}
{0: True, 1: False, 2: True, 3: False, 4: True, 5: False, 6: True, 7: False, 8: True, 9: False}
{(i,j): (True if i==j else False) for i in range(4) for j in range(4)}
{(0, 0): True, (0, 1): False, (0, 2): False, (0, 3): False, (1, 0): False, (1, 1): True, (1, 2): False, (1, 3): False, (2, 0): False, (2, 1): False, (2, 2): True, (2, 3): False, (3, 0): False, (3, 1): False, (3, 2): False, (3, 3): True}
In the followinge example, we see the type of nesting dictionary structure you might find in a database. To access the nested dictionary, you string together the commands you would normally use. Therefore payroll['emp1']['name']
goes down one level to get the name of the first employee. The get()
method can also be used; payroll['emp1'].get('Wage')
as in this case to get the first employee's wage. We can add and delete values as before using their keys. To print this data out in an easily readable fashion, it is best to use a nested loop. The first loop gets the key
-value
pairs and prints the key
. The nested loop gets the key
-value
pairs from the nested dictionary and prints both.
payroll = {'emp1': {'name': 'Precious', 'job': 'Mgr', 'Wage': 50000},
'emp2': {'name': 'Kim', 'job': 'Dev', 'Wage': 60000},
'emp3': {'name': 'Sam', 'job': 'Dev', 'Wage': 70000}}
print(payroll)
{'emp1': {'name': 'Precious', 'job': 'Mgr', 'Wage': 50000}, 'emp2': {'name': 'Kim', 'job': 'Dev', 'Wage': 60000}, 'emp3': {'name': 'Sam', 'job': 'Dev', 'Wage': 70000}}
print(payroll['emp1']['name'])
print(payroll['emp1'].get('salary'))
print(payroll['emp1'].get('Wage'))
payroll['emp4'] = {'name': 'Max', 'job': 'Admin', 'Wage': 30000}
print(payroll)
del payroll['emp3']
Precious None 50000 {'emp1': {'name': 'Precious', 'job': 'Mgr', 'Wage': 50000}, 'emp2': {'name': 'Kim', 'job': 'Dev', 'Wage': 60000}, 'emp3': {'name': 'Sam', 'job': 'Dev', 'Wage': 70000}, 'emp4': {'name': 'Max', 'job': 'Admin', 'Wage': 30000}}
for id, info in payroll.items():
print(f'Employee ID: {id}')
for key in info:
print(f'{key} : {info[key]}')
print()
Employee ID: emp1 name : Precious job : Mgr Wage : 50000 Employee ID: emp2 name : Kim job : Dev Wage : 60000 Employee ID: emp4 name : Max job : Admin Wage : 30000
The choice of whether to store data in a list or dictionary (or set) may seem a bit arbitrary at times. Here is a brief summary of some of the pros and cons of these:
x in C
is valid whether the collection C
is a list, set or dictonary. However computationally for large collections this is much slower with lists than sets or dictionaries. On the other hand if all items are indexed by an integer than x[45672]
is much faster to look up if x is a list than if it is a dictionary.from timeit import timeit
bigList = [i for i in range(0,100000)]
bigSet = set(bigList)
# how long to find the last number out of 10,000 items?
timeit(lambda: 99999 in bigList, number=1000) # run command 1000 times
2.3167801000000168
timeit(lambda: 99999 in bigSet, number=1000) # run command 1000 times
0.0004320999999549713
A set is another useful Python data type. It is a mathematical concept of a collection of items with no duplicates.
It also uses curly brackets, but commas separate items in the collection. However, this means that to create an empty set; you have to use the method
set()
as {}
would create an empty dictionary. Also set([sequence])
can be executed to declare a set with elements. Note that unlike lists, the elements of a set are not in a sequence and cannot be accessed by an index. You can use the in
keyword to see if an item is in a set.
Sets are mainly used to eliminate repeated numbers in a sequence/list. It is also used to perform some standard set operations. A set is a useful data structure if you want to forbid duplicates in your data. Also, like a dictionary, it is very quick to check if a value is there. A use case would be to get all the unique words in a document.
In the first runnable example, we have added multiple identical items to the set. However, when we print the set, the duplicates have been removed. You cannot change the items in a set, but you can add an additional single item with add() or add new multiple items as a list with update(). To remove an item use discard() rather than remove() as it will error where the item does not exist. Sets are unordered so using pop() is not recommended as you will not necessarily know which 'last item' will be removed except by the return value.
breakfast = {'bacon', 'egg', 'spam', 'spam', 'spam', 'spam', 'spam'}
print(breakfast)
print('egg' in breakfast)
breakfast.add('sausage')
print(breakfast)
breakfast.update(['Lobster Thermidor', 'truffle pate', 'crevettes', 'shallots','aubergines'])
print(breakfast)
breakfast.discard('aubergines')
print(breakfast)
{'bacon', 'spam', 'egg'} True {'bacon', 'spam', 'sausage', 'egg'} {'spam', 'egg', 'aubergines', 'sausage', 'shallots', 'bacon', 'truffle pate', 'Lobster Thermidor', 'crevettes'} {'spam', 'egg', 'sausage', 'shallots', 'bacon', 'truffle pate', 'Lobster Thermidor', 'crevettes'}
set1 = set()
print(type(set1))
<class 'set'>
set0 = set([1,2,2,3,3,4])
set0 = {3,3,4,1,2,2} # equivalent to the above
print(set0) # order is not preserved
{1, 2, 3, 4}
elements 2,3 which are repeated twice are seen only once. Thus in a set each element is distinct.
However be warned that {} is NOT a set, but a dictionary (see next chapter of this tutorial)
type({})
dict
Here is how you would iterate over a set
. It is much like for a list
. However, remember that the order may not remain static. You could also use range()
and len()
to get index values.
# Create a set
directions = set(['north', 'south', 'east', 'west'])
# Print its members
for direction in directions:
print(direction)
# Add an item to the set:
directions.add('northwest')
print()
# Print the members again
# Notice the order cannot be relied upon!
for direction in directions:
print(direction)
south west north east south west north northwest east
Sets have mathematical operations like union, intersection, difference, and symmetric difference. A union is all values that are in either set or both. The intersection is the values that are in both sets. The difference is the values that are in the first set but not the second. The symmetric difference is all values that are in one of the sets but not both of them.
hello = set("Hello")
world = set("World")
print(f"The unique letters in hello are: {hello}")
print(f"The letters in hello or world or both are: {hello|world}") # | is the symbol for union
print(f"The letters in both hello and world are: {hello&world}") # & is the symbol for intersection
print(f"The letters in hello but not world are: {hello-world}") # - is the symbol for difference
print(f"The letters in hello and world but not both are: {hello^world}") # ^ is the symbol for symmetric difference
The unique letters in hello are: {'H', 'e', 'o', 'l'} The letters in hello or world or both are: {'H', 'W', 'o', 'l', 'd', 'e', 'r'} The letters in both hello and world are: {'o', 'l'} The letters in hello but not world are: {'H', 'e'} The letters in hello and world but not both are: {'H', 'W', 'd', 'e', 'r'}
set1 = set([1,2,3])
set2 = set([2,3,4,5])
union( )
function returns a set which contains all the elements of both the sets without repition.
set1.union(set2)
{1, 2, 3, 4, 5}
add( )
will add a particular element into the set. Note that the index of the newly added element is arbitrary and can be placed anywhere not neccessarily in the end.
set1.add(0)
set1
{0, 1, 2, 3}
intersection( )
function outputs a set which contains all the elements that are in both sets.
set1.intersection(set2)
{2, 3}
difference( )
function ouptuts a set which contains elements that are in set1 and not in set2.
set1.difference(set2)
{0, 1}
symmetric_difference( )
function computes the set of elements that are in exactly one of the two given sets.
set2.symmetric_difference(set1)
{0, 1, 4, 5}
issubset( ), isdisjoint( ), issuperset( )
are used to check if the set1 is a subset, disjoint or superset of set2respectively.
print( set1.issubset(set2) )
print( set1.isdisjoint(set2) )
print( set1.issuperset(set2) )
False False False
pop( )
is used to remove an arbitrary element in the set
set1.pop()
print(set1)
{1, 2, 3}
remove( )
function deletes the specified element from the set.
set1.remove(2)
set1
{1, 3}
clear( )
is used to clear all the elements and make that set an empty set.
set1.clear()
set1
set()
In python an empty data structure is always equivalent to False
not "" and not set() and not [] and not {}
True
"" or [] # returns the last "False" value
[]
{1,2} or ""
{1, 2}
Strings have already been discussed in Chapter 02, but can also be treated as collections similar to lists and tuples. For example
S = 'The Taj Mahal is beautiful'
print([x for x in S if x.islower()]) # list of lower case charactes
words=S.split() # list of words
print("Words are:",words)
print("--".join(words)) # hyphenated
" ".join(w.capitalize() for w in words) # capitalise words
['h', 'e', 'a', 'j', 'a', 'h', 'a', 'l', 'i', 's', 'b', 'e', 'a', 'u', 't', 'i', 'f', 'u', 'l'] Words are: ['The', 'Taj', 'Mahal', 'is', 'beautiful'] The--Taj--Mahal--is--beautiful
'The Taj Mahal Is Beautiful'
String Indexing and Slicing are similar to Lists which was explained in detail earlier.
print(S[4])
print(S[4:])
T Taj Mahal is beautiful
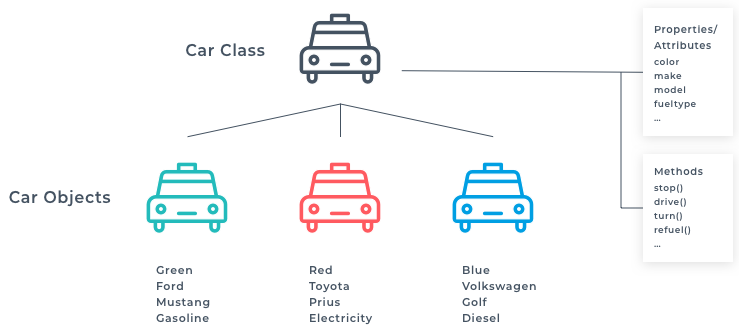
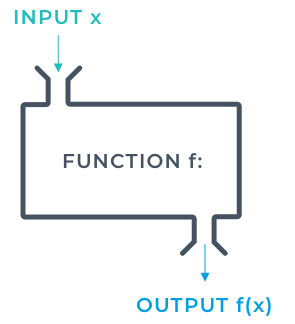
Up until now we’ve been writing little pieces of code and haven’t been concerned about the structure or readability of our application. What I mean by this is that all the code we’ve written so far has been at the top level of our Python files. There once was a time when applications were written in this fashion, but the sheer amount of what makes up the basis of an application would become unwieldy very quickly. Thankfully there are specific constructs that we can use to help improve this. Functions allow us to write a chunk of code that we can invoke whenever we choose.
We’ve already used functions at this point, like print()
. This is a function that Python provides for us, so we don’t have to write all of the logic to perform the task ourselves. Not only does this mean that we can reuse the same pieces of code, but also helps to improve the readability of the code. For example, print()
would be quite difficult to implement if we had to write out the logic every time that we wanted to print something out to the console. It would be much more beneficial if we could just write the code once and then use it again and again. Not only that, but the word print
is much easier to read and understand than the code would be if we were to write out all of that code ourselves. Let’s take a look at how we can create some functions.
print("Hello Jack.")
print("Jack, how are you?")
Hello Jack. Jack, how are you?
Instead of writing the above two statements every single time it can be replaced by defining a function which would do the job in just one line.
Defining function print_message()
:
def print_message():
print("Hello Jack.")
print("Jack, how are you?")
print_message() # execute the function
Hello Jack. Jack, how are you?
The editor highlights the code with color to show the purpose of each section.
def
: This is the keyword that we use to tell Python that we are creating a function definition. Note that the editor colors the keywords green.
print_message
: This is the name that we’ve decided to give our function. Be sure to give your functions meaningful names so that when other people try to use your code, they’ll able to make sense of what the function does without having to read the code in the function. Editor colors the function name blue.
()
: The parentheses denote the parameters that a function takes. In this example, we don’t have any parameters yet, but we’ll start adding some in future lessons.
After all of this, we have the code inside of our function. The code inside the function is the actual logic that we wish to perform. It is indented by four spaces to show that this code is in the function. In this instance, we just print out Hello World, which is colored red by the editor as it's a string. As you can see we are calling the print()
function (also colored green) from within our print_message
function. Functions can call functions. Lastly, on line 4 we invoke that function which works in the same way that we used print()
, only this time we don’t have arguments to pass as the function doesn’t take any parameters. It is not indented to show it is not in the function.
If you remove the code from line 4 and rerun the code to see what happens. Nothing, right? That’s because just defining the function doesn’t do anything until we invoke or call it.
Functions can represent mathematical functions. More importantly, in programmming functions are a mechansim to allow code to be re-used so that complex programs can be built up out of simpler parts.
Important: Starting to write a python program by just writing a few lines of code and testing as you go is great -- but a common beginner mistake is to keep doing this. You do not want to have a program that consists of 20,000 lines in one long file/notebook. Think of functions like paragraphs in writing English. Whenever you start a new idea, start a new function. This makes your code much more readable, easier to debug and ultimately to re-use parts of the code in ways that may not have been anticipated when initially started writing.
This is the basic syntax of a function
def funcname(arg1, arg2,... argN):
''' Document String'''
statements
return value
Read the above syntax as, A function by name funcname
is defined, which accepts arguements arg1
,arg2
,....
,argN
. The function is documented with '''Document String'''
. The function after executing the statements returns a value
.
Return values are optional (by default every function returns None
(a special object that is equivalent to False
) if no return statement is executed
print_message()
just prints the message every time to a single person. We can make our function print_message()
to accept arguments which will store the name and then prints its message to that name. To do so, add a argument within the function as shown.
def print_message(username):
print("Hello %s." % username)
print(username + ',' ,"how are you?")
name1 = 'Sally' # or use input('Please enter your name : ')
So we pass this variable to the function firstfunc()
as the variable username because that is the variable that is defined for this function. i.e name1 is passed as username.
print_message(name1)
Hello Sally. Sally, how are you?
The same rules for naming variables also apply to functions. When naming a function, try and give it a name that provides the reader with an idea of the purpose of the function.
A function within a class is known as a method. A method has the same naming conventions as a class. If you have a method in a class you don't wish to be public, then start its name with an underscore _
. This is just a convention for saying "Please don't touch" to other developers who are working on your code.
If you use a double underscore prefix __
(dunder) for an attribute in a method, then the attribute name will be altered, so it cannot be accessed by the regular methods. The attribute name is mangled.
A function is a block of code that only runs when it is called. Calling a function is executing the code. When you defined a function, you used the def
keyword but to call it you simply use the function name followed by parentheses. You can pass information into the function as arguments inside the parentheses separated by commas. A parameter is the variable listed in the parentheses when the function is defined, and the argument is the value you pass into the function parentheses when it is called. You have to supply the same number of arguments as there are parameters. A function can be called by another function or even by itself. Python functions must be declared and defined before they are called.
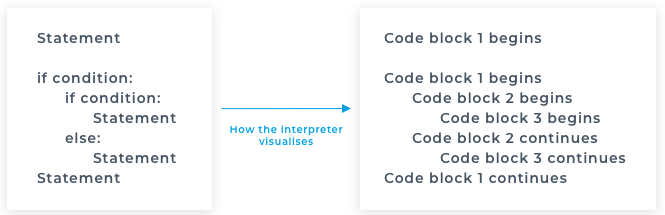
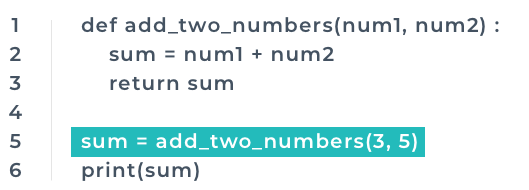
In the image the code runs in this order
In the below example, we have two functions, each with one parameter. We call the get_user_input function
twice with a different string each time. As you can see we have assigned the function call to a variable so that the variable will now contain the result of that function call. Then we can use that variable in an f-string when calling the print_out_to_console
function. This shows the benefit of using functions. Here the function is being used to abstract areas of code. What we mean by abstraction is reducing complexity of code. It can be thought of like the "Don't repeat yourself" (DRY) principle. Note than both functions, in this case, are themselves calling other functions.
# 2. This function runs for the name and age function calls
def get_user_input(prompt):
return input(prompt)
# 4. This function runs twice
def print_out_to_console(value_to_be_printed):
print(value_to_be_printed)
# 1. name and age are the first two function calls to run sequentially
name = get_user_input("Input your name:")
age = get_user_input("Input your age:")
# 3. Then function calls run sequentially
print_out_to_console(f"Your name is {name}")
print_out_to_console(f"You are {age} years old")
When the function results in some value and that value has to be stored in a variable or needs to be sent back or returned for further operation to the main algorithm, a return statement is used.
def times(x,y):
z = x*y
return z
z = 17 # this statement is never executed
The above defined times( )
function accepts two arguements and return the variable z which contains the result of the product of the two arguements
c = times(4,5)
print(c)
20
The z value is stored in variable c and can be used for further operations.
Instead of declaring another variable the entire statement itself can be used in the return statement as shown.
def times(x,y):
'''This multiplies the two input arguments'''
return x*y
c = times(4,5)
print(c)
20
Since the times()
is now defined, we can document it as shown above. This document is returned whenever times()
function is called under help()
function.
help(times)
Help on function times in module __main__: times(x, y) This multiplies the two input arguments
Multiple variable can also be returned as a tuple. However this tends not to be very readable when returning many value, and can easily introduce errors when the order of return values is interpreted incorrectly.
eglist = [10,50,30,12,6,8,100]
def egfunc(eglist):
highest = max(eglist)
lowest = min(eglist)
first = eglist[0]
last = eglist[-1]
return highest,lowest,first,last
If the function is just called without any variable for it to be assigned to, the result is returned inside a tuple. But if the variables are mentioned then the result is assigned to the variable in a particular order which is declared in the return statement.
egfunc(eglist)
(100, 6, 10, 100)
a,b,c,d = egfunc(eglist)
print(' a =',a,' b =',b,' c =',c,' d =',d)
a = 100 b = 6 c = 10 d = 100
When an argument of a function is common in majority of the cases this can be specified with a default value. This is also called an implicit argument.
def implicitadd(x,y=3,z=0):
print("%d + %d + %d = %d"%(x,y,z,x+y+z))
return x+y+z
implicitadd( )
is a function accepts up to three arguments but most of the times the first argument needs to be added just by 3. Hence the second argument is assigned the value 3 and the third argument is zero. Here the last two arguments are default arguments.
Now if the second argument is not defined when calling the implicitadd( )
function then it considered as 3.
implicitadd(4)
4 + 3 + 0 = 7
7
However we can call the same function with two or three arguments. A useful feature is to explicitly name the argument values being passed into the function. This gives great flexibility in how to call a function with optional arguments. All off the following are valid:
implicitadd(4,4)
implicitadd(4,5,6)
implicitadd(4,z=7)
implicitadd(2,y=1,z=9)
implicitadd(x=1)
4 + 4 + 0 = 8 4 + 5 + 6 = 15 4 + 3 + 7 = 14 2 + 1 + 9 = 12 1 + 3 + 0 = 4
4
If the number of arguments that is to be accepted by a function is not known then a asterisk symbol is used before the name of the argument to hold the remainder of the arguments. The following function requires at least one argument but can have many more.
def add_n(first,*args):
"return the sum of one or more numbers"
reslist = [first] + [value for value in args]
print(reslist)
return sum(reslist)
The above function defines a list of all of the arguments, prints the list and returns the sum of all of the arguments.
add_n(1,2,3,4,5)
[1, 2, 3, 4, 5]
15
add_n(6.5)
[6.5]
6.5
Arbitrary numbers of named arguments can also be accepted using **
. When the function is called all of the additional named arguments are provided in a dictionary
def namedArgs(**names):
'print the named arguments'
# names is a dictionary of keyword : value
print(" ".join(name+"="+str(value)
for name,value in names.items()))
namedArgs(x=3*4,animal='mouse',z=(1+2j))
x=12 animal=mouse z=(1+2j)
Scope when referring to variables means where within the program can that variable be accessed.
If a variable is needed throughout the program, then declaring it at the top outside any functions will make it global. However, declaring variables as global when they are not required everywhere in a program is bad practice. Consider local scope instead.
Declaring your variables inside the functions in which they will be used is good practice. However, you will run into issues with the local scope if you need to use a variable in nested functions. In Python, a variable is considered local by default.
def firstfunc():
x=1
def secondfunc():
x=2
print("Inside secondfunc x =", x)
secondfunc()
print("Outside x =", x)
x=0
firstfunc()
print("Global x =",x)
Inside secondfunc x = 2 Outside x = 1 Global x = 0
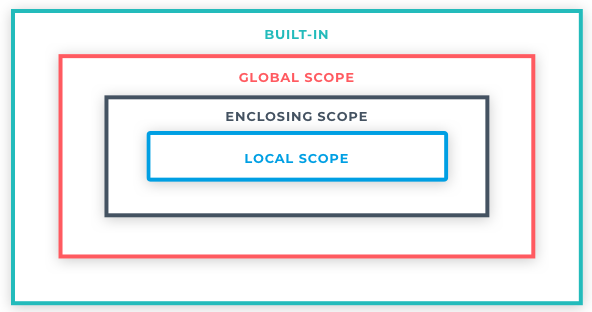
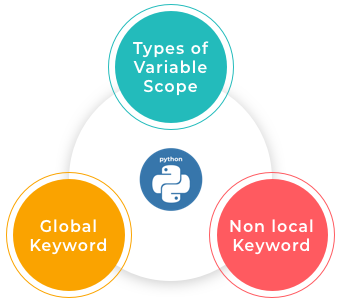
Python deals regards variables as local, if not otherwise declared. This will cause problems, for example, if you access a variable declared outside a function (global) within a function and try and reassign its value. If you then access the global variable outside the function, it will still have its original value rather than the new one reassigned within the function. One workaround would be to return the variable from the function so now it's reassigned value is available outside the function. However, there is a better option, and that is to use keywords to state which scope is to be used unambiguously.
global
¶In the first example below, you will see that the can_access
variable retains False
in the global scope despite being reassigned to True
in the update_access
function.
can_access = False
def update_access():
can_access = True
update_access()
print(can_access) # will still print out False
False
In this second example you will see that the global variable can_access
changes to True
in the global scope despite changed only inside of the function. This is because the global
keyword has been used.
can_access = False
def update_access():
global can_access
can_access = True
update_access()
print(can_access) # will still print out False
True
local
¶In the nested function example below you can see that variable my_age
is local to the which_scope
function. To update the same my_age
variable from inside of inner_scope
function, we have to use the nonlocal
keyword. Without the nonlocal
declaration the execution would throw error
UnboundLocalError: local variable 'my_age' referenced before assignment
def which_scope():
my_age = 49 # local variable my_age
def inner_scope():
nonlocal my_age
my_age += 1 # Issue when we try to run this line.
print(my_age)
inner_scope()
which_scope()
50
There is another type of function in Python known as Lambda. A lambda function is a small anonymous function. It can take any number of arguments but only has one expression. Lambda functions comes very handy when operating with lists. These function are defined by the keyword lambda followed by the variables, a colon and the expression.
As you can see the function has no name (hence anonymous) so we have assigned it to the variable add
.
add = lambda a, b : a + b
print(add(5, 12))
17
Lambda functions can also be used to compose functions
def double(x):
return 2*x
def square(x):
return x*x
def f_of_g(f,g):
"Compose two functions of a single variable"
return lambda x : f(g(x))
doublesquare= f_of_g(double,square)
print("doublesquare is a",type(doublesquare))
doublesquare(3)
doublesquare is a <class 'function'>
18
One thing you may have noticed in the calling functions example is that functions are passed around to other functions. This is possible in Python as a function is itself an object. A function object can be referred to in the same way as a string object. You can assign a function to a variable or even store it in a data structure. A function can be passed into another function or even to itself.
Below we have a list of numbers. We use the list method pop
on numbers
but assign it to the variable remove
. By merely adding parentheses to the variable, we can use the pop
method. We have assigned the method to the variable.
numbers = [4, 7, 12, 33, 13, 67]
remove = numbers.pop
print(remove())
print(remove(0))
67 4
Then we create another list and a function that returns True
if the integer is divisible by three. We then pass both the function and the list to a built-in function called filter()
which returns only the values that are True
. We have converted to a list so we can print out the list of filtered values.
numbers = [1, 2, 3, 4, 5, 6]
def is_mult_of_three(n):
return n % 3 == 0
list(filter(is_mult_of_three, numbers))
[3, 6]
The other example creates function pass_function
, where the first parameter is a function:
def pass_function(function_name, **args):
"""Takes a function as an argument
Passes the argument 'l' to the function passed in
"""
print("This function takes another function as an argument")
function_name(f=args['l'])
def print_arguments( **args ):
"""Prints the arguments"""
print(f'The arguments are {args}')
pass_function(print_arguments, l='spam')
This function takes another function as an argument The arguments are {'f': 'spam'}
A decorator is a way in Python to add new functionality to an existing function without modifying its structure. This is useful as you do not need to create new functionality in your code if a decorator already exists for that purpose. A decorator is said to wrap a function to modify its behaviour. Python has something called the “pie syntax” to make decorator use simpler. The @
symbol is used to prefix the decorator name.
Here is a very simple decorator. It modifies the function say_hello
by printing a string before it is called and after it is called. The decorator is modifying the behaviour of the function. It wraps the function and extends the behaviour of the wrapped function without modifying the function permanently.
def my_decorator(func):
def wrapper():
print("The function has not been called yet. Let's call it.")
func()
print("The function was called and has returned a result.")
# returns the wrapper function itself!
return wrapper
@my_decorator
def say_hello():
print("Hello, world!")
say_hello()
The function has not been called yet. Let's call it. Hello, world! The function was called and has returned a result.
Try @my_decorator
again on a different function:
@my_decorator
def greet():
print("Greetings!")
greet()
The function has not been called yet. Let's call it. Greetings! The function was called and has returned a result.
Now let's look at a real-world example of using a decorator. We have a decorator that defines what units you want to display your function results in. It is demonstrated with a function to calculate area. The decorator is then used to say that on this occasion you want the result in meters squared. By changing the argument in the decorator, you can change this to acres, for example, without altering the function. This same decorator could be used for any function that outputs a value with units.
def define_units(unit):
"""Define the units"""
def decorator_define_units(func):
func.unit = unit
return func
return decorator_define_units
@define_units('m^2')
def area(length, width):
"""Calculate area of rectangle or parallelogram"""
return length * width
# The unit defined in the decorator can be used with dot notation
# In this case the function are units can be used as area.unit
print(f'The area is {area(3,5)}{area.unit}')
The area is 15m^2
Decorate the adder()
and subtractor functions so that the result of the adder
function is multiplied by 2
and the result of the subtract
function is multiplied by 3
.
def multiply(by = None):
def multiply_real_decorator(function):
def wrapper(*args,**kwargs):
return by * function(*args,**kwargs)
return wrapper
return multiply_real_decorator
@multiply(by = 2)
def adder(a,b):
return a + b
@multiply(by = 3)
def subtractor(a,b):
return a - b
print(adder(2,3))
print(subtractor(2,3))
10 -3
Python is known as an object-oriented language, which means it has first-class support for classes. Unlike some other languages, for instance, Java, you’re not forced to use classes, as you can see by the fact that we haven’t used classes in any of the other units. Python is also known as mixed-paradigm language in that you can use either a functional or object-orientated style. Classes are a good way of combining data and methods and are useful when dealing with hierarchies. They are generally used to model more complex data types which can’t be modelled using Python’s built-in data structures such as lists and dicts.
We define a class by using the class
keyword followed by the name. Like functions, a class does not do anything until it is executed. Scope also applies to classes so global and nonlocal scope have to be taken into consideration. A class name should start with a capital letter and should have a docstring. Classes can contain functions and other statements.
class HelloWorld:
"""A simple example class"""
i = 12345
def f(self):
return 'Hello, world!'
__init__()
Method¶The first thing to note is that a function within a class is known as a method. A particular type of method that runs when an instance of the class is created is an initializer. The __init__
method is known as a dunder, double-underscore or magic method, and these tend to be used on classes mainly. They use double underscores so as not to conflict with your own defined classes.
An __init__()
method on its own would simply create an empty class object. However, an __init__()
method can take arguments. The first parameter should always be the self
object:
class MyClass:
def __init__(self, ...):
...
One of the advantages of object-orientated programming is the ability to model the real world in code. If you were writing software to use in a car factory or dealership, you could use a class to create an object Car
that has the same properties and attributes as a real car. In the runnable example, we have initialized a Car
object with attributes Green
, Ford
, Mustang
and Gasoline
. Note the use of the self
keyword.
class Car:
def __init__(self, color, make, model, fueltype):
self.color = color
self.make = make
self.model = model
self.fueltype = fueltype
bullitt = Car('Green', 'Ford', 'Mustang', 'Gasoline')
self
keyword¶The self
keyword associates functions and properties with a class. It also holds references to data and behaviour of particular instances of a class. It’s customary to use self
to refer to the class instance, but in fact, any variable could be used. It must be the first parameter of any function in the class. Python simply uses self
to state to what instance to assign an instance attribute. In the previous unit, we created an object bullitt
with color of Green
. The self
keyword is used to confirm that the argument Green
for the object instance bullitt
is a reference to the color
attribute of the class Car
.
This example of a class Bird
has properties of name
and call
. A method to describe the bird is included in the class.
class Bird:
""" Bird class """
def __init__(self, kind, call):
#properties
self.kind = kind
self.call = call
#behaviour
def description(self):
""" describe the bird """
return f"A(n) {self.kind} goes {self.call}"
owl = Bird('Owl', 'Twit Twoo!')
print(owl.description())
A(n) Owl goes Twit Twoo!
You can create multiple instances of a class. An instance is an individual object of the class in memory. It exists live in RAM until the point it is removed.
Let's return to the Bird
class. When you create an instance of the class, it is the initializer code that runs. This is the __init__
method. This method assigns the values to the object properties. The self
keyword is a reference to the current instance of the class and is used to access variables that belong to the class. To create an instance of the class, you need to provide the same quantity of values as there are properties (in this case two). Once you have an instance of that class, you can access the variables and methods using the dot notation.
parrot = Bird('Parrot', 'Parrr!')
parrot.call
'Parrr!'
crow = Bird('Crow', 'Caaaw!')
crow.description()
'A(n) Crow goes Caaaw!'
crow.call = 'screech'
crow.description()
'A(n) Crow goes screech'
del crow.call
del
keyword can be used to delete a property or an object. Try creating and editing other instances of the Bird
class.A class can contain data. If you create a Python variable within the class, it is known as a class attribute. As it is created outside the constructor function, it is shared between all objects of this class. However, if you create a Python variable within the constructor function, it is known as an instance attribute. An instance attribute is only accessible from the scope of an object instantiated from the class.
When we access these attributes from the class or from the object, they are referred to as properties. A class attribute can be accessed as a class property or an instance property. If you try and access an instance attribute as a class property, then you will raise an AttributeError
.
In the runnable example, there is both a class attribute of definition
and two instance attributes of kind
and call
. The owl
object instantiated from the Bird
class is able to access the class and instance properties with dot notation. The Bird
class, however, can only access the class property. Trying to access call
gives the following error; AttributeError: type object 'Bird' has no attribute 'call'
class Bird:
""" Bird class """
# class attribute
definition = "a warm-blooded egg-laying vertebrate animal distinguished by the possession of feathers, wings, a beak, and typically by being able to fly."
def __init__(self, kind, call):
self.kind = kind # instance attribute
self.call = call # instance attribute
def description(self):
""" describe the bird """
return f"A(n) {self.kind} goes {self.call}"
owl = Bird('Owl', 'Twit Twoo!')
print(owl.description())# class method called trough instance
print(owl.definition) # this is class property accessed through instance
print(owl.call) # this is instance property
A(n) Owl goes Twit Twoo! a warm-blooded egg-laying vertebrate animal distinguished by the possession of feathers, wings, a beak, and typically by being able to fly. Twit Twoo!
print(Bird.definition) # this is class property accessed through class
a warm-blooded egg-laying vertebrate animal distinguished by the possession of feathers, wings, a beak, and typically by being able to fly.
print(Bird.call) # instance property through class, doesn't even make sense
---------------------------------------------------------------------------
AttributeError Traceback (most recent call last)
<ipython-input-1-10e9d506640f> in <module>
---> print(Bird.call)
AttributeError: type object 'Bird' has no attribute 'call'
A method is a function that is within a class or object. When you have seen the term method used in the lessons so far it has concerned the built-in methods such as append()
for a list
. You can create your methods within your classes. When you create an instance of that class, then you can call the method using dot notation. In the class instance unit, we used the description method on the object owl
, which was instantiated from the Bird
class. This is referred to as invoking the description()
method. Not all methods in a class need to be public. If you want to indicate to other developers that a method is private, then prefix the method name with an underscore. A private method is one that cannot be accessed except within the class. We will use private methods in an upcoming unit.
Subclassing is a useful way of creating a specialised version of a class with its methods but re-using existing methods and properties of the parent (or base) class.
class SubClass(SuperClass):
def __init__(self):
SuperClass.__init__(self, 'foo')
In the example we create a Parrot
class which subclasses the Bird
class created in previous units. We use the existing methods on the parent/base class, and we don’t have to supply the kind
or call
attributes, because that’s inherited into the Parrot
class. We can add specialized behaviour such as the additional property of color
.
class Bird:
""" Bird class """
# class attribute
definition = "a warm-blooded egg-laying vertebrate animal distinguished by the possession of feathers, wings, a beak, and typically by being able to fly."
def __init__(self, kind, call):
self.kind = kind # instance attribute
self.call = call # instance attribute
def description(self):
""" describe the bird """
return f"A {self.kind} goes {self.call} and is {self.definition}"
class Parrot(Bird):
def __init__(self, color):
Bird.__init__(self, 'Parrot', 'Kah!') # call the parent's init method
self.color = color # subclass attribute, eadditional to the inherited attributes
parrot = Parrot('blue')
print(parrot.color)
print(parrot.description())
blue A Parrot goes Kah! and is a warm-blooded egg-laying vertebrate animal distinguished by the possession of feathers, wings, a beak, and typically by being able to fly.
We created a subclass that inherited from a parent class. This inheritance relationship states that a Parrot
is a Bird
. It means you do not have to duplicate all the properties of a Bird
when you create a subclass. Anywhere in your code that you used a Bird
object, you can now use a Parrot
one.
A mixin is a class that provides methods to other classes but is not itself a parent class. You cannot create a subclass of a mixin. If you find yourself creating methods in your subclasses that are very similar, then this is an opportunity to move that method into a mixin.
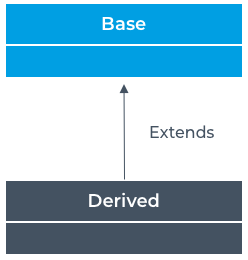
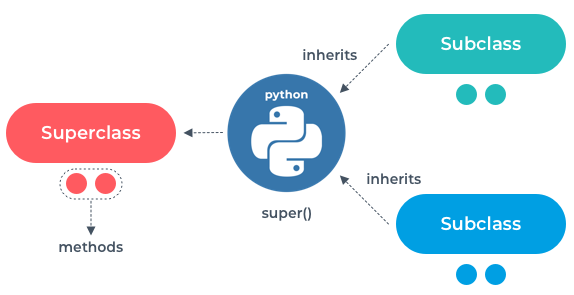
The purpose of a mixin is to reduce the amount of unnecessary duplication of code. If you have a piece of logic that is frequently repeated in the subclasses, then move it to a mixin.
Here we have a superclass with a method that returns x
and two subclasses with methods that return y
and z
respectively as a tuple including the inherited x
from their parent class. However, both subclasses also use a mixin which unpacks a tuple and returns the values in a string with some formatting. The mixin has no __init__
so cannot be a superclass. It is just a class containing a method that you can use in any other class in your program.
class SuperClass:
"""This is the base or parent class"""
def __init__(self, x):
self.x = x
def result(self):
"""Method returns a variable x"""
return self.x
class Mixin:
"""This mixin can be used with any class"""
def prettify_string(self, a):
"""Method that returns a string containing variables c and d"""
c, d = a # Unpacks the tuple a into variables c and d
return f'{c}, {d}!'
class SubClass1(Mixin, SuperClass):
def __init__(self, x, y):
"""Inherits x from SuperClass and extends with variable y"""
SuperClass.__init__(self, x)
self.y = y
def result1(self):
"""Returns a tuple of x and y"""
return self.x, self.y
class SubClass2(Mixin, SuperClass):
def __init__(self, x, z):
"""Inherits x from SuperClass and extends with variable z"""
SuperClass.__init__(self, x)
self.z = z
def result2(self):
"""Returns a tuple of x and z"""
return self.x, 2 * self.z
hello = SubClass1('Hello', 'World')
world = SubClass2('Hello', 'World')
print(hello.prettify_string(hello.result1()))
print(world.prettify_string(world.result2()))
Hello, World! Hello, WorldWorld!
In the below example, we create a simple Human Resources application. The first class is Employee
which is the base class. It takes the necessary information about the employees and increments the employee number for each new employee added to the system. Then we have a mixin class HolidayMixin
. This is just a piece of logic to calculate the extra holidays you accrue the longer you work for the company. You cannot create an instance of this class. As a mixin, it just contains a method to return the number of holidays a particular employee is due. It bases this on the number of years of service.
The next class is DirectDeveloper
. This subclasses Employe
e but takes an additional parameter of prog_language
, allowing you to specify which programming language this developer uses. There is a method here to calculate the salary
and give a bonus
to Python developers as they are most in demand. The details method inherits from the Employee
class and adds additional information about the programming language.
We have instantiated two developers here, one Python and one PHP. See how their details differ. Also, we use the method from the mixin to see how much annual leave they have accrued. You can also call the method to see their salary. Try adding some other developers and see the employee numbers increase. Try different programming languages and years of service to see how the salary or holiday benefits change.
class Employee:
"""
Base class for employees
"""
# class attribute
employee_no = 0
def __init__(self, name, no_of_years):
# instance attribute
self.name = name
self.no_of_years = no_of_years
Employee.employee_no += 1
self.employee_no = Employee.employee_no
def details(self):
"""
Method to return employee details as a string
"""
return f"Name: {self.name}\n Years Worked: {self.no_of_years}\n Employee Number: {self.employee_no}\n"
class HolidayMixin:
"""
Mixin to calculate holiday entitlement by years of service.
Note that a mixin has no __init__ as you cannot create an instance of a mixin
"""
def calculate_holidays(self, no_of_years):
"""
Method that returns holidays as an integer if given no of years of service
"""
BASE_HOLIDAY = 20
bonus = 0
holidays = BASE_HOLIDAY
if no_of_years < 3:
bonus = holidays + 1
elif no_of_years <= 5:
bonus = holidays + 2
elif no_of_years > 5:
bonus = holidays + 3
return f'Holidays: {bonus}'
class DirectDeveloper(HolidayMixin, Employee):
"""
Class for direct developer employee inheriting from
Employee class but also inheriting from HolidayMixin
"""
def __init__(self, name, no_of_years, prog_lang):
self.prog_language = prog_lang
Employee.__init__(self, name, no_of_years)
def calculate_salary(self):
"""
Returns salary plus bonus as an integer
"""
base = 30000
if self.prog_language.lower() == 'python':
bonus = base * 0.10
else:
bonus = 0
return base + bonus
def get_details(self):
"""
Method to return direct developer details as a string
Uses details() method inherited from Employee super class
"""
return Employee.details(self) + f'Programming Language: {self.prog_language}'
eric = DirectDeveloper("Eric Praline", 2, "python")
# Prints out all the attributes of your eric instance using get_details method from DirectDeveloper
# If you use the details method from Employee then the Programming Language will not print
print(eric.get_details())
# The mixin method is usable for instance eric
print(eric.calculate_holidays(eric.no_of_years))
# Uses the calculate_salary method from DirectDeveloper
print(f'${eric.calculate_salary()}')
luigi = DirectDeveloper("Luigi Vercotti", 10, "php")
print(luigi.get_details())
print(luigi.calculate_holidays(luigi.no_of_years))
print(f'${luigi.calculate_salary()}')
Name: Eric Praline Years Worked: 2 Employee Number: 1 Programming Language: python Holidays: 21 $33000.0 Name: Luigi Vercotti Years Worked: 10 Employee Number: 2 Programming Language: php Holidays: 23 $30000
In object-orientated programming, two significant concepts are inheritance and composition.
Inheritance is what we have used up until now in this lesson. For example, a subclass Parrot
inherits from a Bird
class. The inheritance relationship, in this case, is that a Parrot
is a Bird
.
Composition is where one class contains the object of another class. In this case, we could have a Bird
class and a Tail
class. The composition relationship here would be that a Parrot
has a tail so would inherit from both Bird
and Tail
. However, a Kiwi
does not have a tail, so would only inherit from Bird
. That way, you can have a Duck
and a Parrot
class that reuse Tail
but are themselves not derived from each other. A Parrot
is not a Duck
, but both of them have a Tail
.
The purpose of both mixin and composite is to reduce the amount of unnecessary duplication of code. With the Bird
example, you can have many bird subclasses, but if some of them share certain properties, then there is the opportunity to move them into a class with a composite relationship. You could, for example, reuse the Tail
class in another program where you have a Reptile
base class.
In this example, Electric
inherits from Vehicle
. Therefore the tesla
object is a Vehicle
. However, InternalCombustion
class has a composition relationship with Engine
. The volkswagen
has an engine, but it is not an engine. The Engine
class could be reused for a PowerBoat
class without PowerBoat
and InternalCombustion
being derived from one another.
class Vehicle:
def __init__(self, make, model):
self.make = make
self.model = model
class Engine:
def __init__(self, capacity, fuel):
self.capacity = capacity
self.fuel = fuel
class InternalCombustion(Vehicle, Engine):
def __init__(self, make, model, capacity, fuel):
Vehicle.__init__(self, make, model)
Engine.__init__(self, capacity, fuel)
class Electric(Vehicle):
def __init__(self, make, model):
Vehicle.__init__(self, make, model)
volkswagen = InternalCombustion("Volkswagen", "Golf", 1.7, "Diesel")
tesla = Electric("Tesla", "X")
In the following example, we extend our simple Human Resources application. The first additional class is ExternalContract
for employees who are not direct employees of the company but are contract employees. This has an instance attribute to take the cost of the contract and a method that returns that added to the employee salary.
Finally, we have the ContractDeveloper
class. This is for developers who are not direct employees. This has a composition relationship with ExternalContract
. A contract developer has an external contract. A direct developer does not. You can reuse this ExternalContract
for any other job class you create. Here we have also included the HolidayMixin
. This class uses composition and mixin. The method details for ContractDeveloper
inherits from Employee
but also provides for the cost of the contract.
We have instantiated two developers here, one direct and one contract. See how their details differ. Also, we use the method from the mixin to see how much annual leave they have accrued. For the direct developer, you can also call the method to see their salary.
class Employee:
"""
Base class for employees
"""
# class attribute
employee_no = 0
def __init__(self, fname, sname, no_of_years):
# instance attribute
self.fname = fname
self.sname = sname
self.no_of_years = no_of_years
Employee.employee_no +=1
self.employee_no = Employee.employee_no
def details(self):
"""
Method to return employee details as a string
"""
return f"First Name: {self.fname}\n Surname: {self.sname}\n Years Worked: {self.no_of_years}\n Employee Number: {self.employee_no}\n"
class ExternalContract:
"""
Class for contract employees
"""
def __init__(self, contract_cost):
self.contract_cost = contract_cost
def cost(self):
"""
Returns the contract cost added to the salary
"""
return self.contract_cost + 30000
class HolidayMixin:
"""
Mixin to calculate holiday entitlement by years of service.
"""
def calculate_holidays(self, no_of_years):
"""
Returns holidays as an integer
"""
BASE_HOLIDAY = 20
bonus = 0
holidays = BASE_HOLIDAY
if self.no_of_years < 3:
bonus = holidays + 1
elif self.no_of_years <= 5:
bonus = holidays + 2
elif self.no_of_years > 5:
bonus = holidays + 3
return f'Holidays: {bonus}'
class DirectDeveloper(HolidayMixin, Employee):
"""
Class for direct developer employee inheriting from
Employee class.
"""
def __init__(self, fname, sname, no_of_years, prog_lang):
self.prog_language = prog_lang
Employee.__init__(self, fname, sname, no_of_years)
def calculate_salary(self):
"""
Returns salary plus bonus as an integer
"""
base = 30000
if self.prog_language.lower() == 'python':
bonus = base * 0.10
else:
bonus = 0
return base + bonus
def details(self):
"""
Method to return direct developer details as a string
"""
return Employee.details(self) + f'Programming Language: {self.prog_language}'
class ContractDeveloper(HolidayMixin, Employee, ExternalContract):
"""
Class is subclass of Employee, composition relationship
with ExternalContract and using HolidayMixin
"""
def __init__(self, fname, sname, no_of_years, prog_language, contract_cost):
self.prog_language = prog_language
self.contract_cost = contract_cost
Employee.__init__(self, fname, sname, no_of_years)
def details(self):
"""
Returns inherited details plus contract cost
"""
return Employee.details(self) + f'Programming Language: {self.prog_language}\n Contract cost: {ExternalContract.cost(self)}'
dev = DirectDeveloper("Eric", "Praline", 2, "python")
# There is no composition relationship here. A DirectDeveloper is an Employee
print(dev.details())
print(dev.calculate_holidays(dev.no_of_years))
print(f'${dev.calculate_salary()}')
contractor = ContractDeveloper("Luigi", "Vercotti", 10, "python", 100000)
# When the contractor details are printed the Contract cost is obtained from ExternalContract class
# There is a composition relationship as contractor has an ExternalContract
# However, an external contract is not an employee
# ExternalContract is an object that could be reused by many other objects.
print(contractor.details())
# The mixin can also be used
print(contractor.calculate_holidays(contractor.no_of_years))
First Name: Eric Surname: Praline Years Worked: 2 Employee Number: 1 Programming Language: python Holidays: 21 $33000.0 First Name: Luigi Surname: Vercotti Years Worked: 10 Employee Number: 2 Programming Language: python Contract cost: 130000 Holidays: 23
We have already looked at how to inherit properties from one class to another. The class that inherits is the subclass. Therefore, if you refer to the class, it is inheriting from the superclass. Up till now in this lesson when referring to the superclass in a subclass, we have explicitly used the superclass name in front of the inherited attributes or properties. To improve the maintainability of your code, use the super()
function in place of the superclass name. Therefore, if you ever change the superclass you only then need to change the argument in the subclass definition not everywhere else in the code. See line 3 below, the reference to superclass SuperClass
is replaced with the function super()
in the subclass SubClass
:
class SubClass(SuperClass):
def __init__(self, height):
super().__init__(height, height)
Let's look at a simple example. When we look at simple shapes, you can see that a square is a special type of rectangle where the width and height are the same. How would you show this relationship in object-orientated programming?
class Rectangle:
def __init__(self, height, width):
self.height = height
self.width = width
def area(self):
return self.height * self.width
def perimeter(self):
return 2 * (self.height + self.width)
class Square(Rectangle):
def __init__(self, height):
super().__init__(height, height) # here we use the super() instead of Rectangle
One thing you may have noticed in the examples is that methods are passed around from superclass or mixin to subclass. This is possible in Python as a method is itself an object. Methods are functions within a class so in the same way functions are passed around so are methods.
If we return to the Parrot
example, we see that we can use the description
method belonging to the Bird
class with an instance of the Parrot
class. The method has been passed from the superclass to the subclass and is available for use by an object instantiated from the subclass.
class Bird:
""" Bird class """
# class attribute
definition = "a warm-blooded egg-laying vertebrate animal distinguished by the possession of feathers, wings, a beak, and typically by being able to fly."
def __init__(self, kind, call):
self.kind = kind # instance attribute
self.call = call # instance attribute
def description(self):
""" describe the bird """
return f"A {self.kind} goes {self.call} and is {self.definition}"
class Parrot(Bird):
def __init__(self, color):
Bird.__init__(self, 'Parrot', 'Kah!')
self.color = color
parrot = Parrot('blue')
print(parrot.color)
print(parrot.description()) #this is originally the Bird class's method, inherited into Parrot
blue A Parrot goes Kah! and is a warm-blooded egg-laying vertebrate animal distinguished by the possession of feathers, wings, a beak, and typically by being able to fly.
A decorator is a way in Python to add new functionality to an existing method without modifying its structure. This is useful as you do not need to create new functionality in your code if a decorator already exists for that purpose.
Now let's look at a real-world example of using a decorator. If we return to Bird
objects again, we have an instance variable called fowl_types
with information about the species. We don’t want to accidentally corrupt this information. Classes should only share what data is needed. This is known as Encapsulation and Separation of Concerns. To mark fowl_types
as private and only available to other methods in the class, we have prefixed the name with a __
dunder. Now we cannot access it but the new method within the class named fowl_type()
can. The return
in the description
method now uses that method to display the information on fowl type. However, for this to work, we need to give read-only access. A built-in decorator already exists in Python for that purpose. Therefore we can wrap the fowl_type()
method in a @property
decorator. Try removing it to see what happens.
class Bird(object):
""" Bird superclass """
def __init__(self, kind, call):
self.kind = kind # instance attribute
self.call = call # instance attribute
def description(self):
""" Returns description string including instance attributes """
return f'A {self.kind} goes {self.call}'
class Fowl(Bird):
""" Subclass of the superclass Bird """
def __init__(self, kind, call, category):
self.__fowl_types = {'landfowl': 'Landfowl is an order of heavy-bodied ground-feeding birds that includes turkey, grouse, chicken, New World quail and Old World quail, ptarmigan, partridge, pheasant, junglefowl and the Cracidae',
'waterfowl': 'Waterfowl is an order of birds that comprises about 180 living species in three families: Anhimidae (the screamers), Anseranatidae (the magpie goose), and Anatidae,the largest family, which includes over 170 species of waterfowl, among them the ducks, geese, and swans.'}
self.category = category
super().__init__(kind, call) # Uses super() function to state kind, call from superclass Bird
@property # make a Read-Only property out of a method
def fowl_type(self):
return self.__fowl_types[self.category.lower()]
def description(self):
""" Returns string from superclass description method and appends a string to include additional information """
return f'{super().description()} \nSome interesting facts about the {self.kind} : A {self.kind} is of type {self.category}. {self.fowl_type}'
mute = Fowl('Swan', 'honk', 'Waterfowl')
print(mute.description())
print(mute.fowl_type) # <= the decorator makes it possible to treat the function as a property
A Swan goes honk Some interesting facts about the Swan : A Swan is of type Waterfowl. Waterfowl is an order of birds that comprises about 180 living species in three families: Anhimidae (the screamers), Anseranatidae (the magpie goose), and Anatidae,the largest family, which includes over 170 species of waterfowl, among them the ducks, geese, and swans. Waterfowl is an order of birds that comprises about 180 living species in three families: Anhimidae (the screamers), Anseranatidae (the magpie goose), and Anatidae,the largest family, which includes over 170 species of waterfowl, among them the ducks, geese, and swans.
In this unit, we're going to have a look at file input and output or I/O for short. Data that is taken from the user for example from a keyboard can be written to file. Data in a file can be read and output to the screen.
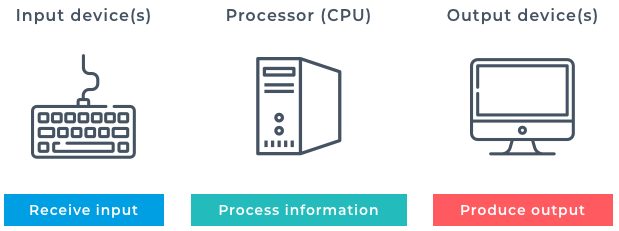
Most programs store data in memory while they're running. Choosing the correct data structure can make all the difference in the performance of an application. A skilled developer knows how to use and combine smaller data structures into more substantial and more elaborate models in memory. But as great as these models are, anything held in RAM, or Random Access Memory, is volatile. That means that when the program shuts down, either by deliberately exiting or as a result of a crash, then the data is lost.
Also, as data gets more and more elaborate, some programs just can't store all of the information they work with, in the memory at the same time. Now, this is changing. Memory capacities are growing, and the cost is continuing to fall. Still, to be safe, a persistent store of data on a non-volatile hard drive, solid-state drive, flash memory or some other storage device will continue to be a part of computing for the foreseeable future.
In this module, we're going to have a look at how to store data on a disk using files. You'll already be very familiar with files from your operating system, and there are other ways of storing data, for example in a database, but this is beyond the scope of the current lesson. Even that usually just amounts to storing data in files and accessing them in a certain way.
When working with computers, we use what is called an interface to interact with the computer. We’re all familiar with working with Graphical User Interface (GUI). The GUI is where we execute applications from our Desktop, opening folders from My Computer, creating Documents in Microsoft Office, and browsing the web with Chrome or Firefox. While we’re working with Python, and providing output to a user, we’re using the Command Line Interface or CLI. This interface is text-based, as opposed to the graphics-based interface we’re all used to seeing, but just remember that all we’re doing is taking input and outputting information to the user.
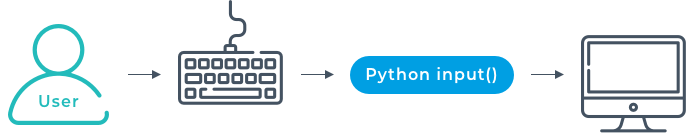
With that in mind, let’s take a look at how we can receive some input from a user. For this, we’ll need to use the input function. The input function takes a string as an argument. This is the prompt the user will see. The input function stops the running of the program and waits for the user to enter data in the command line and press return. Whatever the user inputs is converted to a string. Therefore if you need it as a number, you need to convert it.
username = input("Type in your name and press return: ")
# The programme will remain stopped until you respond to this prompt with some text and press the return key
# As the value type that is received from an input is a string
# We need to convert it to a number to be able to use it on line 6
# We can do this by wrapping the input inside the int() method
age = int(input("Please enter your age: "))
days = 365 * age
# days is a number
# To concatenate it to the string we have to convert it to a String
# Notice below we do this like: str(days)
print("Hello " + username + ", you have been alive for at least " + str(days) + " days")
In a command-line Python, program output can be given in several ways. One example is simple statements. An expression statement can be used to compute and write a value. You will also have seen statements in the terminal when an error occurs. These are assertion and raise statements. We will see more of those in the upcoming error handling units. In the IO unit, you saw that output could also write to a file. We will cover this in more detail in an upcoming unit. The most frequently used output you have seen is the print function. This allows you to output data in a human-readable format.
Let’s look at fancier ways to format our output. The most basic output is a statement. In this case, we have a simple one-line expression 10 + 20
which is assigned to a variable i
. When we print this to the console it is considered to be a statement.
i = 10 + 20
print(i)
30
Formatted string literals are a way to improve the human readability of the output. We have assigned a string to variable language
and an integer to variable version
. With string literals, we can pass these values directly to the print statement with no need to convert data types.
language = "Python"
version = 3
f'We are using {language}{version}'
'We are using Python3'
This can also be done with expressions. The value of pi
from the math
library is expressed within the print
statement. A format specifier can be included after the colon. In this case, the value is rounded to two significant digits. If instead of a format specifier an integer is placed after the colon, the field will be set to a minimum character value equal to the integer value. Here we have chosen 25
to take into account the longest string.
import math
# Here the format specifier .2f is used to truncate at 2 decimal places
f'The value of pi to 2 decimal places is {math.pi:.2f}'
'The value of pi to 2 decimal places is 3.14'
When including a non-keyboard character such as the pound sterling, it can be done by using the chr()
and the Unicode value (163
in this case).
# The currency symbol for pounds sterling has Unicode character number 163
pound = chr(163)
tabulate = {'Egg & Spam': 1, 'Egg, Bacon & Spam': 1.5, 'Egg, Bacon Sausage & Spam': 2, }
# Loops over a dictionary of menu items as keys and prices as values
for item, price in tabulate.items():
# The format specifiers here denote a minimum width of 25 and 5 characters
print(f'{item:25} - {pound}{price:5}')
Egg & Spam - £ 1 Egg, Bacon & Spam - £ 1.5 Egg, Bacon Sausage & Spam - £ 2
The following example includes expressions within the formatted string literals. Additionally, the newline \n
is used to add a new line after the second print statement. This also helps make the output easier to read.
for number in range(3, 0, -1):
print(f"{number} bottle(s) of beer on the wall. {number} bottle(s) of beer")
print(f"Take one down, pass it around. {number-1} bottle(s) of beer on the wall\n")
3 bottle(s) of beer on the wall. 3 bottle(s) of beer Take one down, pass it around. 2 bottle(s) of beer on the wall 2 bottle(s) of beer on the wall. 2 bottle(s) of beer Take one down, pass it around. 1 bottle(s) of beer on the wall 1 bottle(s) of beer on the wall. 1 bottle(s) of beer Take one down, pass it around. 0 bottle(s) of beer on the wall
The most uncomplicated persistent storage is a text file. You can save lines of text in the file then use python
io
to open the file and read the contents. There are several methods to do this. You can use readlines()
which reads all the lines into a list, readline()
which reads one line at a time, read()
which reads the entire file or seek()
which moves to a particular point in a file.
It’s important to understand that when you open a file, you are reading or writing to a particular position within the file. If you use readline
to read a line, your location within the file is advanced by a line. The next time you read a line, the line will be read from the end of the last line. It’s also important to understand that files don’t have lines. A file is just one long sequence of bytes (the computer’s way to store characters), but when Python sees a line separator such as \n
, it interprets that as marking the break between two lines.
In the example, the code opens the file, reads the lines it contains into a variable called lines
. When printed out, we see that it's a list of strings. The 'r'
means that the file is opened as read-only. We can also see that each line contains the newline character \n
. This makes sense because the file data.txt
contains four separate lines. What is interesting is that the readlines
method splits the data read from the files at those newline characters, to create a line of strings. Modify the program slightly and use the read
method instead of readlines
. All of the data will be read into a single string, including the newline characters. When the string is printed to the console now, it just appears as text, not a list of strings. The newline characters cause the string to be displayed over several lines.
f = open('./img/fourlines.txt', 'r')
lines = f.readlines()
f.close()
print(lines)
['This is the first line\n', 'And this is the second\n', 'Here is the third line\n', 'And here the fourth']
A straightforward, practical thing we can do with text files is to count the occurrences of words. Here's a runnable example. It uses two standard libraries, re
and collections
. The re
library will allow us to identify the words in the file using regular expressions, and the collections
library allows us to count occurrences of words. Notice that the entire contents of the file are read into a single variable called text
, and the findall
method is then used to parse that string and find words. A full discussion of regular expressions is beyond the scope of this lesson; however, the findall method ensures that all occurrences of the pattern are found. The pattern for a word is \w+
. The \w
denotes not whitespace. The +
denotes one or more. So, every occurrence of one or more characters that are not whitespace will be considered a word. It's not perfect, it may get some false positives, but it's fine for our purposes. The Counter
method of collections will count how many occurrences there are of each word. The most_common
method will limit the results to the top 10 words. When this is printed, we get a list of tuples where each tuple contains a word and a number of occurrences.
import re
import collections
text = open('./img/book.txt', 'r').read().lower()
words = re.findall('\w+', text)
print(collections.Counter(words).most_common(10))
[('the', 28), ('to', 21), ('i', 15), ('a', 13), ('and', 12), ('he', 12), ('of', 11), ('her', 11), ('you', 11), ('be', 10)]
To write to a file, we change the second argument in the file open
command from 'r'
to either 'w'
for write or 'a'
for append. These are known as file modes, and they are listed in the image below. If you open a file in write mode, you can write some content to it. If the file does not exist, it will be created.
In the runnable example below, a newfile.txt
will be created containing Hello!
. If you change the content to be written from Hello!
to World
and rerun the program, it overwrites the content of the file rather than appending the new content. By changing the file mode to a
for append, the new content will be appended to the end of the text file. There is no newline between the words, and they all appear on the same line. If you use the append method, the text you write is simply appended onto the existing text. You can include newline characters \n
if you want line breaks. The file will include the newline characters. Using \n
in the middle of the string will split the words, for example, Hello
and World
over two lines. Using \n
at the end of the string will mean that each run of the program writes to a new line.
f = open('./img/newfile.txt', 'w')
f.write('Hello!')
f.close()
A list of strings can be written to a file, with the writelines
method analogous to the readlines
method in the last unit. It won't, however, include newline characters. To write lines on separate lines, you can join the strings into a single string, inserting newline characters between them, and use the write
method to write the string. This is shown in the second example.
f = open('./img/newfile.txt', 'a')
lines = ['Hello','World','Welcome','To','File IO']
text = '\n'.join(lines)
f.writelines(text)
f.close()
In this unit, we will explore various options for interacting with and gathering data from the internet through Python. Python is a backend language. Unlike JavaScript which runs in a browser, Python runs on a server. It is necessary to get data from a website before any work on it commences. Data on a website is intended for human readers. It isn't always formatted in a way that is helpful to programmers. But, with a bit of work, you can usually extract the data you need from a page. Automated data collection from websites is known as web scraping. Some websites limit or even entirely forbid users from scraping their data with automated tools. Websites do so because of two related reasons; Making many repeated requests to a website's server may use up bandwidth, slowing down the website for other users and potentially overloading the server such that the website stops responding entirely. Scraping of a website’s information might go against that site’s business model. Many websites might rely solely on ads for their hosting costs, and such sites may choose only to allow users to access their data if they also watch the ads while doing so. You should always check a website's acceptable use policy before scraping its data to see if accessing the website by using automated tools is a violation of its terms of use. In this unit, we will explore interacting with and gathering data from the internet through Python.
A common use case for reading data from the web is a web crawler or spider. These are used by web search engines to index the web or copy pages for quicker serving. Another use case is for comparison websites. You might want to scrape websites for price data.
In the runnable example, we import the library requests_html
. This library allows you to parse HTML to obtain data within it. Firstly you instantiate the class HTMLsession
and assign it to variable session.
You can use the method get
and pass it a URL as an argument. This links to the URL in the same way a browser does so, in this case, it will return a 200
if the site is available.
Further methods are then used to get the HTML code and then find a specific id within the code. In this case, the id for the main heading has been used. The print
statements show the heading text and the HTML code.
from requests_html import HTMLSession
session = HTMLSession()
# Makes a GET request to Wikipedia Web Scraping page
r = session.get('https://en.wikipedia.org/wiki/Web_scraping')
# Selects the heading element with ID firstHeading
# The optional first=True avoids a list being returned
heading = r.html.find('#firstHeading', first=True)
# Grabs the text from that h1
# Without first=True you would then have to use heading[0].text
print(heading.text)
# prints the inner HTML content for that h1 element
print(heading.html)
Web scraping <h1 id="firstHeading" class="firstHeading">Web scraping</h1>
When using Python in a web application, you will typically use a framework to connect the Python server to the frontend HTML. Popular frameworks are Flask and Django. In a framework, you can have a basic HTML template and then inject in content from your Python code. This reduces the number of HTML pages you need to create, which is a significant saving in a large web app.
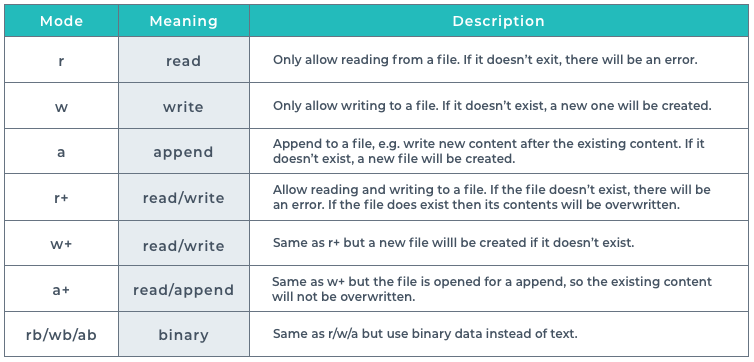
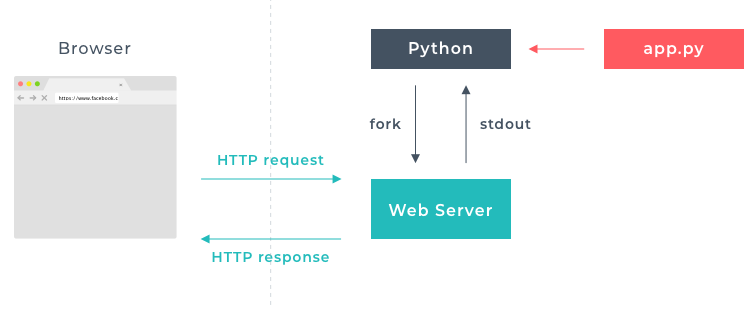
A web server hosts the files required for your website. It can read data from the browser and write data to the browser using HTTP protocols. You can also manipulate the data in your web server. A common use case would be to generate HTML files from a base template to reduce duplicate code.
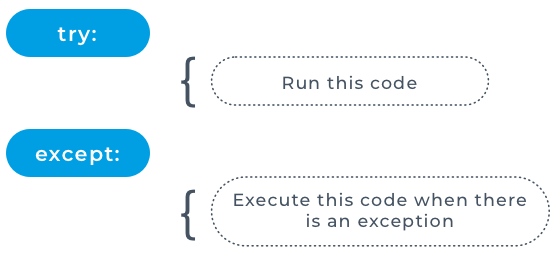
In the runnable example, we have created a simple Python web server. It uses the SimpleHTTPRequestHandler
class imported from the http.server
package in Python. This serves files in the current directory to the web through port 8000
. This port is one that is generally available for accessing the web from a computer.
We have a template.html
file with boilerplate HTML. However, where you would normally have text for the title, heading, section and footer, we instead have placeholders. These placeholders are a variable enclosed in curly brackets. The curly braces are simply used to denote that this is not regular text.
template.html
<!DOCTYPE html>
<html lang="en">
<head>
<meta charset="UTF-8">
<title>{title}</title>
</head>
<body>
<nav><a href="{link}.html">{link}</a></nav>
<h1>{heading}</h1>
<section>{body}</section>
<hr>
<footer>{footer}</footer>
</body>
</html>
In the Python code, there is a dictionary of dictionaries named replacements
. This contains all the content you need to create multiple HTML pages based on the template. In this case, only an index and contact page are shown, but you could add as many as you like. The placeholder variable in curly braces is used as the key
where the value
is the content as a string. As before, trying to open the non-existent index.html
and contact.html
files as write will create them as blank documents. Then we open
the template.html
file twice as newindex
and newcontact
. Then we can iterate over the nested dictionary and use the replace
string method to replace the placeholder curly braces variable with the text value in the index
and contact
dictionaries. As always remember to close all the open files. When you run the code the index.html
file is served on port 8000
.
import http.server
import socketserver
PORT=5500 # A port is a communication endpoint where a computer can link to a network
replacements = {
'index.html': {'template': './img/template.html', '{link}': 'contact',
'{title}': 'Landing Page', '{heading}': 'Welcome',
'{body}': 'This is my cool website', '{footer}': 'Made with a framework'},
'contact.html': {'template': './img/template.html', '{link}': 'index',
'{title}': 'Contact Me', '{heading}': 'Get In Touch',
'{body}': 'me@example.com', '{footer}': 'Made with a framework'},
}
index = open('index.html', 'w')
contact = open('contact.html', 'w')
newindex = open(replacements['index.html']['template'], 'r')
newcontact = open(replacements['contact.html']['template'], 'r')
# This outer loop iterates through each line in newindex
for line in newindex:
# This inner loop iterates through the key:value pairs in the items of the replacements['index.html'] dictionary
for src, target in replacements['index.html'].items():
# Here we replace the key with the value
line = line.replace(src, target)
index.write(line)
for line in newcontact:
for src, target in replacements['contact.html'].items():
line = line.replace(src, target)
contact.write(line)
index.close()
contact.close()
newindex.close()
newcontact.close()
# The code below serves html files relative to the current directory
# The port number is the PORT constant value set at the top of the file
Handler = http.server.SimpleHTTPRequestHandler
with socketserver.TCPServer(("", PORT), Handler) as httpd:
print("serving at port", PORT)
print(f"access the generated web page through this link: http://localhost:{PORT}")
# uncomment the following line to make it work
#httpd.serve_forever()
serving at port 5500 access the generated web page through this link: http://localhost:5500
Python error messages are called exceptions. When an error occurs, an exception is raised. All exceptions are instances of a class BaseException
. The exceptions can be generated either by the interpreter while running the code or by functions in the code. As a developer, you can raise these exceptions to deal with errors caused by incorrect user input, for example. There are many specific exceptions in Python; for example, ZeroDivisionError
raised when the second argument of a division or modulo operation is zero. However, if an error does not fall into one of these specific categories, a RuntimeError
will be raised. The associated string will explain what has gone wrong.
The example will print text to the terminal if 1
or 2
is entered. However, what happens if a user enters another number or a string instead? In the else
, we have used the keyword raise
to raise a RuntimeError
exception if this happens. A RuntimeError
is posted in the terminal, but it is not particularly informative. Also, our program has still crashed. In the next units, we see how to handle these errors without crashing the program and how to get a more informative error message.
def choices(n):
if n == 1:
print("First item chosen")
elif n == 2:
print("Second item chosen")
else:
raise RuntimeError
choices(3)
---------------------------------------------------------------------------
RuntimeError Traceback (most recent call last)
<ipython-input-238-5dc413041e05> in <module>
7 raise RuntimeError
8
----> 9 choices(3)
<ipython-input-238-5dc413041e05> in choices(n)
5 print("Second item chosen")
6 else:
----> 7 raise RuntimeError
8
9 choices(3)
RuntimeError:
In the previous unit, we saw that we could raise
an error when a user does something unexpected. However, the program still crashed. It is better to catch and handle these exceptions in such a way that your application continues to run.
Python has a try
block in which you put code where you anticipate an error could occur. Often this is where you foresee an issue caused by a users input or corrupt data in a file. The program runs any code after the try
statement in the usual manner. However, if an error occurs rather than raise
an exception in the terminal, it runs code in a following except
block. After the except
statement, you write the code for what you want to do in cases where an error occurs. If this is user input, it might just be a message to the user that the data was invalid and please try again. If it is data from a file, then you might just skip the bad data points and carry on.
In summary, the
try
block allows you to test a code block for errors. The except
block enables you to handle the errors.
In the following example, we have asked the user for a number. This code block is wrapped in a try
block and runs exactly as though the try
block was not there as long as the user enters numbers. However, if the user enters a letter, for example, there is an error, and the except
block code is run. In this case, we just print Not a number
, but crucially the code keeps running and asks the user for input again. The error is caught and handled.
while True:
try:
x = int(input('Enter a number.'))
print(f'Number is {x}')
except:
print('Not a number')
If we return to the previous example, we have added ValueError
to the except
statement. This is one of the built-in exceptions in Python. It is more specific than RuntimeError
, and we have used it as we know in this case, an inappropriate value input causes an error. If you run the code now, you will see the exception
is raised, and the except
code block is run.
while True:
try:
x = int(input('Enter a number: '))
if not x:
break
print(f'Number is {x}')
except ValueError: # more specific
print('Not a number')
-------------------------------------------------------
Enter a number: quit
Not a number
Enter a number: 42
Number is 42
Enter a number: 0
In some cases, you may anticipate more than one type of error. Multiple specific exceptions can be included in one except block if they are added to a tuple in the except statement.
while True:
try:
a = int(input("Please enter an integer as the numerator: "))
b = int(input("Please enter an integer as the denominator: "))
print(a / b)
except (ZeroDivisionError, ValueError):
print('An error has occurred')
Python allows you to have multiple except
statements. In the runnable example, we have three except
blocks. If more than one is valid, the first exception raised is the one you’ll see. Here we check for division by zero and an inappropriate value entered. Try both to see what happens. If another error occurs that the first two except blocks don’t catch then the third block catches it. To test this, you can provoke an error by trying ctrl
-c
in the terminal.
while True:
try:
a = int(input("Please enter an integer as the numerator: "))
if not a:
break
b = int(input("Please enter an integer as the denominator: "))
print(a / b)
except ZeroDivisionError:
print("Please enter a valid denominator.")
except ValueError:
print("Both values have to be integers.")
except:
print('Another error has occurred')
-------------------------------------------------------------------
Please enter an integer as the numerator: 42
Please enter an integer as the denominator: 6
7.0
Please enter an integer as the numerator: 1
Please enter an integer as the denominator: 0
Please enter a valid denominator.
Please enter an integer as the numerator: 13
Please enter an integer as the denominator: Thirteen
Both values have to be integers.
Please enter an integer as the numerator: Another error has occurred
In addition to the basic RuntimeError
, you have seen the use of ValueError
and ZeroDivisionError
. These are more specific exceptions provided by Python. When writing your code, it is essential to think about what possible errors might happen and how to handle them. It is a good idea to test your code as you go. What happens when you enter incorrect values for your function arguments, for example? Using more specific exceptions can make it quicker to debug what has gone wrong with your code. When you raise an exception, you can include a string of text to provide information pertinent to your code.
If you would like to see a complete list of the built-in Python exceptions then the official documentation is here: Built-in Exceptions
as
¶The built-in exceptions contain information about the error. Up till now, we have just displayed the exception in the terminal. The exception object includes the error message and also additional arguments.
In this example, we have passed the UnicodeError
exception to a variable e
. Then we have access to the various attributes.
def encode_name(name):
try:
name = name.encode('ascii')
except UnicodeError as e:
print(f'The name {e.object} has a character at position {e.start}',
f'that cannot be encoded in {e.encoding} due to {e.reason}')
return name
encode_name('Stéfan')
The name Stéfan has a character at position 2 that cannot be encoded in ascii due to ordinal not in range(128)
'Stéfan'
In the example below there is no file data.txt
, so the except
block runs. The exception OSError
is passed to variable e
, so we have access to the arguments. The OSError
exception is for operating system errors such as file not found.
Then we pass the arguments to a tuple with variable names errno
and strerror
. These are the numeric error code and corresponding error message respectively. We could also have used the filename
argument, for example.
try:
f = open('neverland.txt')
s = f.readline()
except OSError as e:
errno, strerror = e.args
print(f"An I/O error occured. #{errno}: {strerror}.")
An I/O error occured. #2: No such file or directory.
else
and finally
Clauses¶The try
-except
has an optional else
clause. This is placed after all of the except
clauses and deals with any code that must be executed in the case where the try
clause does not raise an exception
.
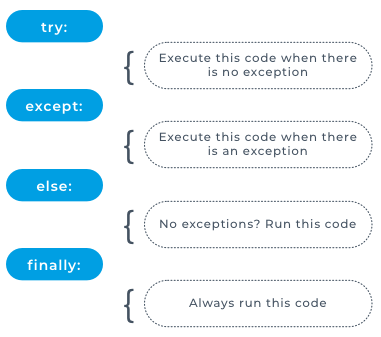
The code placed in the
try
block should only be the code where you are anticipating the exception. Any other code that should run along with it should be placed in the else
block.
There is an additional optional clause finally
, which is the last clause to run. It runs whether or not an exception has been raised. It is intended for any ‘clean-up’ code that must run regardless of whether an exception was caught or not.
In the example, we have a function that opens a text file, counts the lines and prints the opening line of the file.
try
block catches if a file does not exist and the except
block deals with the error so that the program does not crash.else
block deals with the code that should run in the case of no error (the file exists). finally
block runs whether or not the file exists. Here it just lets the user know that the function has complete. Note that it runs after the try
, except
and else
blocks.def linecount(filename):
"""
Counts the lines in a text file.
Prints the opening line of a text file.
"""
try:
f = open(filename, 'r')
s = f.readlines()
except OSError as e:
# OSError exception is used as it deals with system errors such as I/O errors
# OSError returns an error code (errno) and message (strerror)
errno, strerror = e.args
print(f"An I/O error occured. #{errno}: {strerror}.")
else:
# This is the code that does the line counting
print(f'{filename} is {len(s)} lines long.')
print(f"The opening line of {filename} is '{s[0]}'")
f.close()
finally:
# This will print whether the line count has been successful or not
print(f'Finished with {filename}.')
linecount('./img/gulliver.txt')
print()
linecount('./img/swift.txt')
./img/gulliver.txt is 14 lines long. The opening line of ./img/gulliver.txt is 'My father had a small estate in Nottinghamshire; I was the third of five ' Finished with ./img/gulliver.txt. An I/O error occured. #2: No such file or directory. Finished with ./img/swift.txt.
As you are already aware when using IO, you always should close the file when you are finished working on it. As this is such an important issue, Python has included a with
statement to deal with it. Behind the scenes, it is in effect a type of try
-finally
statement.
f = open(filename)
try:
# My Code
finally:
f.close()
In reality, what is happening is that special methods __enter__
and __exit__
are used.
f = open()
f.__enter__()
try:
# My Code
finally:
f.__exit__()
You do not need to type any of this code. Just use the with
statement as follows.
with open(filename) as f:
#My Code
As you can see we have refactored the code to use this syntax. No explicit file close statement is required.
def linecount(filename):
"""
Counts the lines in a text file.
Prints the opening line of a text file.
"""
try:
with open(filename, 'r') as f:
s = f.readlines()
except OSError as e:
errno, strerror = e.args
print(f"An I/O error occured. #{errno}: {strerror}.")
else:
print(f'{filename} is {len(s)} line long.')
print(f"The opening line of {filename} is '{s[0]}'")
finally:
print(f'Finished with {filename}.')
linecount('gulliver.txt')
print()
linecount('swift.txt')
An I/O error occured. #2: No such file or directory. Finished with gulliver.txt. An I/O error occured. #2: No such file or directory. Finished with swift.txt.
In the last example, we handled the error by telling the user that they had not entered a number. No exception
, however, was raised so there is no record of the error. As a developer, you might want to record the incidence of this error, so perhaps you can improve your UX. In a case where it is not user data entry but a file, you might want to record how many data points are bad. To do this, you can raise
an exception
in the except
block.
A specific exception
can be raised anywhere in your code to handle errors. In the runnable example, we have a try
block which counts down from 5
to -5
but raises an exception
for negative numbers. At the point this exception
is raised the except
block is run, where a list is looped through and another exception
is raised if a non-integer value is seen. Note that both exceptions include custom text. In the except a TypeError
has been raised as we are explicitly checking for type.
try:
for i in range(5, -5, -1):
if i < 0:
raise Exception('Integers must be positive.')
else:
print(i, end=" ")
except Exception as e:
print("Aborted: ", e)
x = [1, 2, 3,"hello"]
for item in x:
if not type(item) is int:
raise TypeError("Only integers are allowed")
else:
print(item, end=" ")
5 4 3 2 1 0 Aborted: Integers must be positive.
1 2 3
---------------------------------------------------------------------------
Exception Traceback (most recent call last)
<ipython-input-253-773ad3fa2a09> in <module>
3 if i < 0:
----> 4 raise Exception('Integers must be positive.')
5 else:
Exception: Integers must be positive.
During handling of the above exception, another exception occurred:
TypeError Traceback (most recent call last)
<ipython-input-253-773ad3fa2a09> in <module>
12 for item in x:
13 if not type(item) is int:
---> 14 raise TypeError("Only integers are allowed")
15 else:
16 print(item, end=" ")
TypeError: Only integers are allowed
Apart from dealing with system errors, try
-raise
-except
also alows aborting from somewhere deep down in nested execution.
try:
count=0
while True:
while True:
while True:
print("Looping")
count = count + 1
if count > 3:
raise Exception("abort") # exit every loop or function
if count > 4:
raise StopIteration("I'm bored") # built in exception type
except StopIteration as e:
print("Stopped iteration:",e)
except Exception as e: # this is where we go when an exception is raised
print("Caught exception:",e)
finally:
print("All done")
Looping Looping Looping Looping Caught exception: abort All done
This can also be useful to handle unexpected system errors more gracefully:
try:
for i in [2,1.5,0.0,3]:
inverse = 1.0/i
except Exception as e: # no matter what exception
print("Cannot calculate inverse because:", e)
Cannot calculate inverse because: float division by zero
When you create a Python program, you might split your code up into different files. These files are known as modules. We touched on this in the Frameworks, Modules And Libraries unit. Python allows you to import entire modules or individual functions, classes or variables into other modules.
Python has built-in modules that we can import from as well. We do this with the import
statement.
In the example, we have a division
function in a divide.py
module. In main.py
, we have imported the division
function from the divide.py
module, which allows us to use the division
function using the division()
syntax directly. However, we do not have access to the mod
function unless we also add a from divide import mod
statement in main.py
.
To avoid this, we could have used import divide
to import the whole module and then used divide.division()
or divide.mod()
directly.
divide.py
def division(numerator, denominator):
result = numerator / denominator
return result
def mod(numerator, denominator):
result = numerator % denominator
return result
main.py
from divide import division
print(division(4, 2))
Python has a plethora of built-in libraries for everyday tasks. One of the most useful is Math
. If you need to do a calculation in your code, then it is a good idea to import
from this library, rather than reinventing the wheel. As math is a built-in library it comes with Python, and there is no need to install it separately.
Most frequently used elements from Math
module:
Method | Description |
---|---|
ceil() | Rounds a number up to the nearest integer |
comb() | Returns the number of ways to choose k items from n items without repetition and order |
dist() | Returns the Euclidean distance between two points (p and q), where p and q are the coordinates of that point |
exp() | Returns E raised to the power of x |
fabs() | Returns the absolute value of a number |
factorial() | Returns the factorial of a number |
floor() | Rounds a number down to the nearest integer |
fmod() | Returns the remainder of x/y |
fsum() | Returns the sum of all items in any iterable (tuples, arrays, lists, etc.) |
isnan() | Checks whether a value is NaN (not a number) or not |
perm() | Returns the number of ways to choose k items from n items with order and without repetition |
pow() | Returns the value of x to the power of y |
prod() | Returns the product of all the elements in an iterable |
remainder() | Returns the closest value that can make numerator completely divisible by the denominator |
sqrt() | Returns the square root of a number |
trunc() | Returns the truncated integer parts of a number |
Math Constants
Constant | Description |
---|---|
e | Returns Euler's number (2.7182...) |
inf | Returns a floating-point positive infinity |
nan | Returns a floating-point NaN (Not a Number) value |
pi | Returns PI (3.1415...) |
tau | Returns tau (6.2831...) |
import math
print(math.pi)
print(math.sqrt(4))
3.141592653589793 2.0
A full list of the mathematical functions available can be found in the official python documentation.
Dates and times can be tricky to work with, when coding. This is due to the differences in how a user may input a date. Also, you have to take into account whether the program has access to timezone information and what operating system is used by the computer on which you are running the program. There is no date data type in Python. The built-in datetime library allows you to manipulate dates and times.
In the example, we have displayed the local current date and time where this code is running. The date contains a year, month, day, hour, minute, second and microsecond. The library contains methods to access that data. We have obtained the year and printed it to the console. A common usage of the datetime
library is to get a readable string from the datetime
object. There is a method called strftime()
that takes a parameter format to return the string as you would like to display it to your user. In the first part of the runnable example we have shown the day of the week.
We can also access date information with python using datetime
instance methods such as date()
and time()
. You can see these in action in the second part of the example below.
from datetime import datetime
x = datetime.now()
print(x)
2021-04-23 09:22:30.041620
x.year
2021
x.strftime("%A")
'Friday'
str(datetime.now().date())
'2021-04-23'
str(datetime.now().time())
'09:22:30.110629'
There are a large number of date and time objects as well as methods that can be applied to them. You can find a comprehensive list of them on the official Python documentation.
The os
library provides a way of using the operating system (os) functionality. The operating system is the software that interfaces between the hardware and user on a computer. Common operating systems would be Windows, macOS, Linux or iOS.
A frequent use for this would be accessing the environment variables. Every computer has a set of environment variables listing information on how the machine is set up. Examples of this would be the directory structure of the home directory or the computers users profile.
In the runnable example, we use the get current working directory function getcwd()
to find the directory in which the python file is located.
import os
print(os.getcwd())
C:\Users\ruszk\Google Drive\Learning\Python
We can also list the files or directories with listdir()
within a directory.
print(os.listdir('./img/'))
['0+none.png', 'animal-class.png', 'arithmetic+operators.png', 'assignment+operators.png', 'book.txt', 'break+continue+pass.png', 'bug.png', 'car-class.png', 'class+method.png', 'class+mixin.png', 'class-properties.png', 'comparison+operators.png', 'containment.png', 'converting+between+data+types.png', 'data-types.png', 'datetime.png', 'decorator.png', 'dictionary-comprehension.png', 'dictionary-items.png', 'dictionary.png', 'errors.txt', 'f-string.png', 'file-open-modes.png', 'flask+about-1.png', 'flask+hello-world+tags.png', 'flask+hello-world.png', 'flask+home-1.png', 'flask-for+loop.png', 'flask-form-after.png', 'flask-form-before.png', 'flask-usage.png', 'for+loop.png', 'fourlines.txt', 'frameworks+modules+libraries.png', 'function+call.png', 'function+parameter+return.png', 'function.png', 'gulliver.txt', 'ide.png', 'if+elif+else.png', 'if+else.png', 'import.png', 'indentation.png', 'input+output.png', 'input-from-user.png', 'is+is-not.png', 'list-comprehension.png', 'list-indexing.png', 'list-slicing.png', 'logical+operators.png', 'naming-convention.png', 'nested+if+indentation.png', 'nested-data-structure.png', 'nested-loops.png', 'newfile.txt', 'nonetype.png', 'os-path.png', 'os.png', 'print+hello-world.png', 'random.png', 'read-file.png', 'read-web.png', 'reserved-keywords.png', 'runtime-errors.png', 'scope-keywords.png', 'scope.png', 'set.png', 'splat+args+kwargs.png', 'sqlite+chinook-closed.png', 'sqlite+chinook-open-db.png', 'sqlite+chinook-opened.png', 'sqlite+chinook-schema.png', 'sqlite+chinook-tables.png', 'sqlite+chinook-terminal.png', 'sqlite+path.png', 'string.png', 'subclass+inheritance.png', 'syntax-error.png', 'sys-files.png', 'system-exit.png', 'template.html', 'ternary+operator.png', 'try+except+else+finally.png', 'try+except.png', 'tuple.png', 'varable+assignment.png', 'web-server.png', 'while+loop.png']
There are a great number of commands from the operating system that you can run from the python code. For a comprehensive list of commands in the os
library check out the official python documentation.
os.path
Module¶Within the os
library, there is a module named path
. This allows you to manipulate the pathnames on the operating system of the computer on which you are running the code. This is useful when saving data to the local operating system. If you remember back to the CSS Essentials lessons, getting the correct relative or absolute pathname was vital in linking files. The os.path()
methods allow you to dynamically create path names so you can connect to files on the operating system and save files where you intend to.
In the example, we have taken the absolute path and joined it with the current working directory. This uses the join()
method of the path
module. There is also a split()
method allowing you to split a path. In this case, we have split the filename from the pathname and assigned them to a tuple. The splitext()
method allows you to split the module name from its file extension.
import os
# This is how you would join two paths in your code
print(os.path.join('/home/runner/', 'os'))
path = "/home/runner/os/main.py"
# Splits the path into a pair (head, tail) where the tail is the end of the pathname
# The tail is after the / and the head is the pathname up to that point
(dirname, filename) = os.path.split(path)
print(f'The directory path is {dirname}')
print(f'The filename is {filename}')
# Splits the filename into a pair (root, ext)
# The root is before the dot and the ext contains the dot with the suffix after it
(module, extension) = os.path.splitext(filename)
print(f'The module is {module}')
print(f'Its file suffix is {extension}')
/home/runner/os The directory path is /home/runner/os The filename is main.py The module is main Its file suffix is .py
There are many more methods in os.path
which can be found in the official python documentation.
sys
Library¶Python has an inbuilt interpreter. Python code does not need to be compiled. We can try out code in the Python interpreter. The sys
library provides us with information about the constants, functions and methods of the interpreter. Up till now, we have seen the output of our code and errors in the terminal. This is the standard output for a command-line program. The sys
library allows us to change that default location. For example, you could send error messages to a text file.
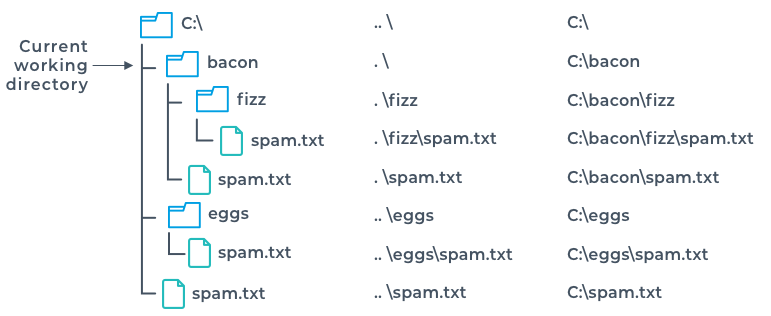
In the image, you can see file objects in the
sys
library. The stdin
object is interactive input. The stdout
object is the print or expression outputs that go to the terminal. The stderr
object is any error messages.
import sys
sys.getrecursionlimit()
3000
sys.version
'3.8.5 (default, Sep 3 2020, 21:29:08) [MSC v.1916 64 bit (AMD64)]'
sys.platform
'win32'
sys.path
['C:\\Users\\ruszk\\Google Drive\\Learning\\Python', 'C:\\ProgramData\\Anaconda3\\python38.zip', 'C:\\ProgramData\\Anaconda3\\DLLs', 'C:\\ProgramData\\Anaconda3\\lib', 'C:\\ProgramData\\Anaconda3', '', 'C:\\Users\\ruszk\\AppData\\Roaming\\Python\\Python38\\site-packages', 'C:\\ProgramData\\Anaconda3\\lib\\site-packages', 'C:\\ProgramData\\Anaconda3\\lib\\site-packages\\win32', 'C:\\ProgramData\\Anaconda3\\lib\\site-packages\\win32\\lib', 'C:\\ProgramData\\Anaconda3\\lib\\site-packages\\Pythonwin', 'C:\\ProgramData\\Anaconda3\\lib\\site-packages\\IPython\\extensions', 'C:\\Users\\ruszk\\.ipython']
In the runnable example, we use the sys.stderr
to redirect the standard error stream from the terminal to a text file. We then provoke an error message by dividing by zero. If you run the code, you will see the error message saved to an errors.txt
file. In the loops lessons, you were warned to avoid infinite loops as this will crash your computer. In reality, there is an upper limit set for the depth of the Python stack. You will receive an error message well below infinity! This value is settable, and you can find what value runnable example has set.
import sys
save_standard_error = sys.stderr
with open("errors.txt","w") as error_file:
sys.stderr = error_file
x = 10 / 0
# return to normal:
sys.stderr = save_standard_error
errors.txt
Traceback (most recent call last):
File "main.py", line 6, in <module>
x = 10 / 0
ZeroDivisionError: division by zero
All the additional available sys data can be seen at the official Python documentation.
random
Library¶An everyday computing problem is making a random choice. Computers are not good at being random. The random library generates pseudo-random numbers that are suitable for most purposes. You can use these for games or simple statistical checks.
In the runnable example, you can see how you would generate a random float, integer or choice. You can also shuffle existing data structures.
import random
print(f'A random float between 0 & 1.0: {random.random()}')
print(f'A random int between 0 & 10: {random.randrange(11)}')
print('A random choice from a list: ' + random.choice(['paper', 'scissors', 'rock']))
deck = ['hearts', 'diamonds', 'spades', 'clubs']
random.shuffle(deck)
print(deck)
A random float between 0 & 1.0: 0.4913461104112826 A random int between 0 & 10: 9 A random choice from a list: paper ['spades', 'hearts', 'clubs', 'diamonds']
All the additional available random methods can be seen at the official Python documentation.
In addition to the built-in libraries, as Python is open source, anyone can create software and share it with the community. A library is a collection of modules that have some common functionality. There is a Python Package Index (pypi.org) where these open source projects are shared.
In the example, we are using a third-party library named numpy
. It is a widely used library for scientific computing. We can give the package name an alias (np
in this case), so we don’t have to type it out each time. Numpy extends the abilities of Python into scientific computing. Here we are creating a simple one-dimensional array. If you were trying this on your computer, you would have to install numpy
locally as it is a third-party library rather than a built-in library installed with Python.
import numpy as np
a = np.array([1, 2, 3])
print(a)
[1 2 3]
from dateutil import parser
log_line = 'INFO 2020-07-03T23:27:51 Shutdown complete.'
timestamp = parser.parse(log_line, fuzzy=True)
print(timestamp)
2020-07-03 23:27:51
Scientific python refers to a large collection of libraries that can be used with python for a range of numerical and scientific computing tasks. Most of these already come with the Anaconda distribution, but if you have only installed the basic python distribution you may need to add the additional libraries (see scipy).
Here we just scratch the surface of what is available. This should be enough to get you started with some of the most commonly used modules, but for any specific project that you have, it is worth doing some searching online to see what is already availalbe as part of the this ecosystem.
Dealing with vectors and matrices efficiently requires the numpy library. For the sake of brevity we will import this with a shorter name:
import numpy as np
The numpy supports arrays and matrices with many of the features that would be familiar to matlab users. See here quick summary of numpy for matlab users.
Appart from the convenience, the numpy methods are also much faster at performing operations on matrices or arrays than performing arithmetic with numbers stored in lists.
x = np.array([1,2,3,4,5])
y = np.array([2*i for i in x])
x+y # element wise addition
array([ 3, 6, 9, 12, 15])
X = x[:4].reshape(2,2) # turn into a matrix/table
2*X # multiply by a scalar
array([[2, 4], [6, 8]])
However watch out: array is not quite a matrix. For proper matrix operations you need to use the matrix type. Unlike arrays that can have any number of dimensions, matrices are limited to 2 dimension. However matrix multiplication does what you would expect from a linear algebra point of view, rather than an element-wise multiplication:
Y = np.matrix(X)
print("X=Y=\n",Y)
print("array X*X=\n",X*X,'\nmatrix Y*Y=\n',Y*Y)
X=Y= [[1 2] [3 4]] array X*X= [[ 1 4] [ 9 16]] matrix Y*Y= [[ 7 10] [15 22]]
Much more information on how to use numpy is available at quick start tutorial
There are lots of configuration options for the matplotlib library that we are using here. For more information see [http://matplotlib.org/users/beginner.html]
To get started we need the import the required libraries.
import numpy as np
import matplotlib.pyplot as plt
Now we can try something simple. The most basic plot command simply takes a list of numbers to be plotted at integer positions.
plt.plot([1,4,2,3])
plt.ylabel('some numbers')
plt.show() # optional
Aside: In this notebook the examples use the pyplot
module which by default has a single global Figure
and associated Axes
object. This can be convenient but gets confusing if you want to create a whole series of plots. For such more advanced use you would want to do something like:
fig, ax = plt.subplots(figsize=(8, 8))
Then replace commands like plt.plot
with fig.plot
to crate a plot for this specific figure object. You can get access to the "global" figure object with plt.gcf()
(get current figure function) and similarly plt.gca()
gets the axes object.
As a slightly more complicated example, here is some CSV format data that we parse and plot as points (scatter plot). In this version of the plot command the x and y coordinates are given as separate lists followed by a formatting string "r*" (red asterix symbols)
data="""
4,1
2,5
9,2
6,3
6,7
8,4
"""
# crude parsing of CSV data - use csv module for reading csv files
xy = [ [float(i) for i in line.strip().split(",")]
for line in data.split()]
x = [ pt[0] for pt in xy]
y = [ pt[1] for pt in xy]
plt.plot(x,y,"r*")
plt.show()
# A slightly more complicated plot with the help of numpy
X = np.linspace(-np.pi, np.pi, 256, endpoint=True)
C, S = np.cos(X), np.sin(X) # create arrays of function values for each X value
plt.plot(X, C)
plt.plot(X, S)
plt.show()
Annotating plots can be done with methods like text() to place a label and annotate(). For example:
t = np.arange(0.0, 5.0, 0.01)
line, = plt.plot(t, np.cos(2*np.pi*t), lw=2)
plt.annotate('local max', xy=(2, 1), xytext=(3, 1.5),
arrowprops=dict(facecolor='black', shrink=0.05),
)
# text can include basic LaTeX commands - but need to mark
# string as raw (r"") or escape '\' (by using '\\')
plt.text(1,-1.5,r"Graph of $cos(2\pi x)$")
plt.ylim(-2,2)
plt.show()
Here is an example of how to create a basic surface contour plot.
from scipy.stats import * # for multivariate_normal to define our surface
delta = 0.025
x = np.arange(-3.0, 3.0, delta)
y = np.arange(-2.0, 2.0, delta)
X, Y = np.meshgrid(x, y) # define mesh of points
pos = np.empty(X.shape + (2,))
pos[:, :, 0] = X; pos[:, :, 1] = Y
rv1 = multivariate_normal([0, 0], [[1.0, 0.0], [0.0, 1.0]])
rv2 = multivariate_normal([1, 1], [[1.5, 0.0], [0.0, 0.5]])
#Z1 = bivariate_normal(X, Y, 1.0, 1.0, 0.0, 0.0)
#Z2 = bivariate_normal(X, Y, 1.5, 0.5, 1, 1)
Z1 = rv1.pdf(pos)
Z2 = rv2.pdf(pos)
Z = 10.0 * (Z2 - Z1) # difference of Gaussians
# Create a simple contour plot with labels using default colors. The
# inline argument to clabel will control whether the labels are draw
# over the line segments of the contour, removing the lines beneath
# the label
plt.figure()
CS = plt.contour(X, Y, Z)
plt.clabel(CS, inline=1, fontsize=10)
plt.title('Simplest default with labels')
plt.show()
If you want to use your plot in a paper or similar there a few differnt options:
savefig()
method on plots. The format is guessed based on the filename extensionCS = plt.contour(X, Y, Z)
plt.clabel(CS, inline=1, fontsize=10)
plt.title('Simplest default with labels')
# uncomment the following lines to make it work
#plt.savefig("surface_ex.png")
#plt.savefig("surface_ex.pdf")
Text(0.5, 1.0, 'Simplest default with labels')
Look in the directory containing this notebook and you should find 2 files: surface_ex.png
and surface_ex.pdf
that you can download.
The complete list of filetypes supported by matplotlib is:
for ext,description in plt.gcf().canvas.get_supported_filetypes().items():
print("%s: \t%s" % (ext,description))
eps: Encapsulated Postscript jpg: Joint Photographic Experts Group jpeg: Joint Photographic Experts Group pdf: Portable Document Format pgf: PGF code for LaTeX png: Portable Network Graphics ps: Postscript raw: Raw RGBA bitmap rgba: Raw RGBA bitmap svg: Scalable Vector Graphics svgz: Scalable Vector Graphics tif: Tagged Image File Format tiff: Tagged Image File Format
<Figure size 432x288 with 0 Axes>