Introduction to Object-Oriented Programming
This lesson uses classroom workspaces that contain all of the files and functionality you will need. You can also find the files in the data scientist nanodegree term 2 GitHub repo.
Object-oriented programming has a few benefits over procedural programming, which is the programming style you most likely first learned. As you'll see in this lesson,
Consider Python packages like Scikit-learn, pandas, and NumPy. These are all Python packages built with object-oriented programming. Scikit-learn, for example, is a relatively large and complex package built with object-oriented programming. This package has expanded over the years with new functionality and new algorithms.
When you train a machine learning algorithm with Scikit-learn, you don't have to know anything about how the algorithms work or how they were coded. You can focus directly on the modeling.
Here's an example taken from the Scikit-learn website:
from sklearn import svm
X = [[0, 0], [1, 1]]
y = [0, 1]
clf = svm.SVC()
clf.fit(X, y)
How does Scikit-learn train the SVM model? You don't need to know because the implementation is hidden with object-oriented programming. If the implementation changes, you as a user of Scikit-learn might not ever find out. Whether or not you SHOULD understand how SVM works is a different question.
In this lesson, you'll practice the fundamentals of object-oriented programming. By the end of the lesson, you'll have built a Python package using object-oriented programming.
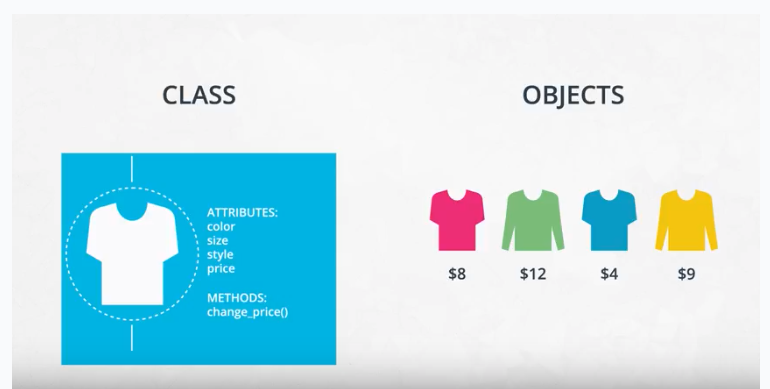
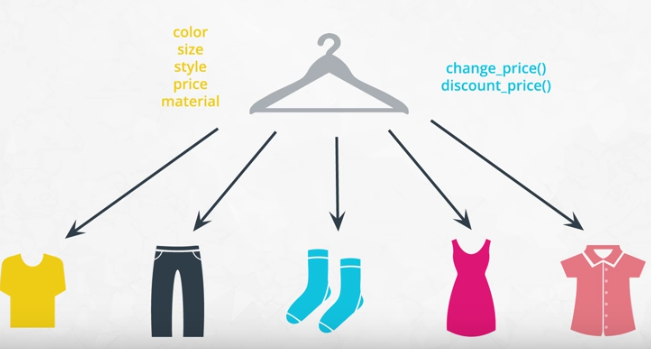
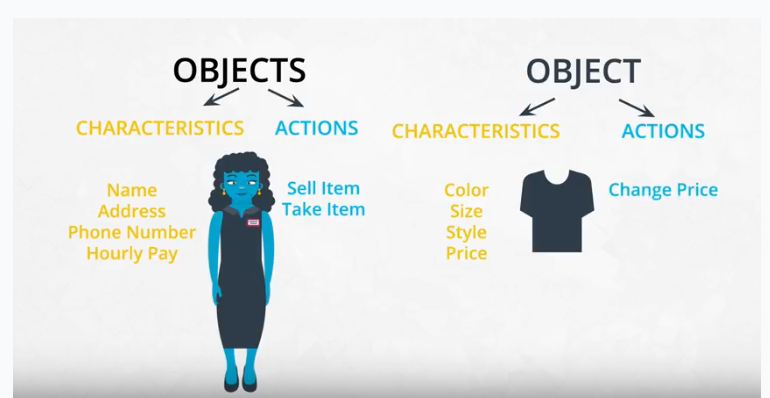
Objects are defined by their characteristics and their actions.
Another way to think about characteristics and actions is in terms of English grammar. A characteristic would be a noun. On the other hand, an action would be a verb.
Let's pick something from the real-world: a dog. A few characteristics could be the dog's weight, color, breed, and height. These are all nouns. What actions would a dog take? A dog can bark, run, bite and eat. These are all verbs.
In English, you might hear an attribute described as a property, description, feature, quality, trait, or characteristic. All of these are saying the same thing.
Here is a reminder of how a class, object, attributes and methods relate to each other.
shirt.py
# definition of Shirt class
class Shirt:
def __init__(self, shirt_color, shirt_size, shirt_style, shirt_price):
self.color = shirt_color
self.size = shirt_size
self.style = shirt_style
self.price = shirt_price
def change_price(self, new_price):
self.price = new_price
def discount(self, discount):
return self.price * (1 - discount)
example.py
# import Shirt class
from shirt import Shirt
# instantiate a shirt object with the following characteristics:
# color red, size S, style long-sleeve, and price 25
# store the object in a variable called shirt_one
shirt_one = Shirt('red','S','long-sleeve',25)
# print the price of the shirt using the price attribute
print(shirt_one.price)
# use the change_price method to change the price of the shirt to 10
shirt_one.change_price(10)
# print the price of the shirt using the price attribute
print(shirt_one.price)
# use the discount method to print the price of the shirt with a 12% discount
print(shirt_one.discount(.12))
OUTPUT
25
10
8.8
A function and a method look very similar. They both use the def keyword. They also have inputs and return outputs. The difference is that a method is inside of a class whereas a function is outside of a class.
If you instantiate two objects, how does Python differentiate between these two objects?
shirt_one = Shirt('red','S','long-sleeve',25)
shirt_two = Shirt('yellow','M','long-sleeve',20)
That's where self comes into play. If you call the change_price method on shirt_one, how does Python know to change the price of shirt_one and not of shirt_two?
shirt_one.change_price(12)
Behind the scenes, Python is calling the change_price method:
def change_price(self, new_price):
self.price = new_price
Self tells Python where to look in the computer's memory for the shirt_one object. And then Python changes the price of the shirt_one object. When you call the change_price method, shirt_one.change_price(12), self is implicitly passed in.
The word self is just a convention. You could actually use any other name as long as you are consistent; however, you should always use self rather than some other word or else you might confuse people.
Accessing attributes in Python can be somewhat different than in other programming languages like Java and C++.
The Shirt class has a method to change the price of the shirt: shirt_one.change_price(20). In Python, you can also change the values of an attribute with the following syntax:
shirt_one.price = 10
shirt_one.price = 20
shirt_one.color = 'red'
shirt_one.size = 'M'
shirt_one.style = 'long_sleeve'
This code accesses and changes the price, color, size and style attributes directly. Accessing attributes directly would be frowned upon in many other languages but not in Python. Instead, the general object-oriented programming convention is to use methods to access attributes or change attribute values. These methods are called set and get methods or setter and getter methods.
A get method is for obtaining an attribute value. A set method is for changing an attribute value. If you were writing a Shirt class, the code could look like this:
class Shirt:
def __init__(self, shirt_color, shirt_size, shirt_style, shirt_price):
self._price = shirt_price
def get_price(self):
return self._price
def set_price(self, new_price):
self._price = new_price
Instantiating and using an object might look like this:
shirt_one = Shirt('yellow', 'M', 'long-sleeve', 15)
print(shirt_one.set_price(12))
print(shirt_one.get_price())
In the class definition, the underscore in front of price is a somewhat controversial Python convention. In other languages like C++ or Java, price could be explicitly labeled as a private variable. This would prohibit an object from accessing the price attribute directly like shirt_one._price = 15. However, Python does not distinguish between private and public variables like other languages. Therefore, there is some controversy about using the underscore convention as well as get and set methods in Python. Why use get and set methods in Python when Python wasn't designed to use them?
At the same time, you'll find that some Python programmers develop object-oriented programs using get and set methods anyway. Following the Python convention, the underscore in front of price is to let a programmer know that price should only be accessed with get and set methods rather than accessing price directly with shirt_one._price. However, a programmer could still access _price directly because there is nothing in the Python language to prevent the direct access.
To reiterate, a programmer could technically still do something like shirt_one._price = 10, and the code would work. But accessing price directly, in this case, would not be following the intent of how the Shirt class was designed.
One of the benefits of set and get methods is that, as previously mentioned in the course, you can hide the implementation from your user. Maybe originally a variable was coded as a list and later became a dictionary. With set and get methods, you could easily change how that variable gets accessed. Without set and get methods, you'd have to go to every place in the code that accessed the variable directly and change the code.
You can read more about get and set methods in Python on this Python Tutorial site.
There are some drawbacks to accessing attributes directly versus writing a method for accessing attributes.
Why might it be better to change a value with a method instead of directly? Changing values via a method gives you more flexibility in the long-term. What if the units of measurement change, like the store was originally meant to work in US dollars and now has to handle Euros? Here's an example:
If you've changed attribute values directly, you'll have to go through your code and find all the places where US dollars were used, like:
shirt_one.price = 10 # US dollars
and then manually change to Euros
shirt_one.price = 8 # Euros
If you had used a method, then you would only have to change the method to convert from dollars to Euros.
def change_price(self, new_price):
self.price = new_price * 0.81 # convert to Euros
shirt_one.change_price(10)
For the purposes of this introduction to object-oriented programming, you will not need to worry about updating attributes directly versus with a method; however, if you decide to further your studies of object-oriented programming, especially in another language such as C++ or Java, you'll have to take this into consideration.
If you were developing a software program, you would want to modularize the code. You put the Shirt class into its own Python script called, say, shirt.py. And then in another Python script, you import the Shirt class with a line like: from shirt import Shirt.
A docstring is a type of comment that describes how a Python module, function, class or method works. Docstrings, therefore, are not unique to object-oriented programming. This section of the course is merely reminding you to use docstrings and to comment your code. It's not just going to help you understand and maintain your code. It will also make you a better job candidate.
From this point on, please always comment your code. Use both in-line comments and document level comments as appropriate.
Check out this link to read more about docstrings.
Below is an example of a class with docstrings and a few things to keep in mind:
class Pants:
"""The Pants class represents an article of clothing sold in a store
"""
def __init__(self, color, waist_size, length, price):
"""Method for initializing a Pants object
Args:
color (str)
waist_size (int)
length (int)
price (float)
Attributes:
color (str): color of a pants object
waist_size (str): waist size of a pants object
length (str): length of a pants object
price (float): price of a pants object
"""
self.color = color
self.waist_size = waist_size
self.length = length
self.price = price
def change_price(self, new_price):
"""The change_price method changes the price attribute of a pants object
Args:
new_price (float): the new price of the pants object
Returns: None
"""
self.price = new_price
def calculate_iscount(self, percentage):
"""The discount method outputs a discounted price of a pants object
Args:
percentage (float): a decimal representing the amount to discount
Returns:
float: the discounted price
"""
return self.price * (1 - percentage)
import math
class Gaussian():
def __init__(self, mu = 0, sigma = 1):
self.mean = mu
self.var = sigma**2
self.stdev = sigma
def calculate(self, data, sample=True):
if data:
self.mean = sum(data)/float(len(data))
denominator = float(len(self.data))
if sample:
denominator -= 1.0
self.var = sum([(x-self.mean)**2 for x in self.data]) / denominator
self.stdev = math.sqrt(self.var)
else:
self.mean, self.var, self.stdev = None, None, None
def __add__(self, other):
"""Magic method to add together two Gaussian distributions
Args:
other (Gaussian): Gaussian instance
Returns:
Gaussian: Gaussian distribution
"""
# create a new Gaussian object
result = Gaussian()
# calculate the mean, variance and standard deviation of the sum of two Gaussians
result.mean = self.mean + other.mean
result.var = self.var + other.var
result.stdev = math.sqrt(result.var)
return result
def __repr__(self):
"""Magic method to output the characteristics of the Gaussian instance
Args:
None
Returns:
string: characteristics of the Gaussian
"""
# Return a string in the following format: "mean 3.5, standard deviation 1.3"
return f"mean {self.mean}, standard deviation {self.stdev}"
gaussian_one = Gaussian(25, 3)
gaussian_two = Gaussian(30, 4)
gaussian_sum = gaussian_one + gaussian_two # ADDITION with two Gaussian objects
print(gaussian_sum)
mean 55, standard deviation 5 # PRINT of a Gaussian object
class Clothing: # parent class
def __init__(self, color, size, style, price):
self.color = color
self.size = size
self.style = style
self.price = price
def change_price(self, new_price):
self.price = new_price
def calculate_discount(self, percentage):
return self.price * (1 - percentage)
class Shirt(Clothing): # new Shirt class INHERITING from Clothing
def __init__(self, color, size, style, price, long_or_short): # ADDITIONAL attribute
Clothing.__init__(self, color, size, style, price) # call parent’s constructor
self.long_or_short = long_or_short
def double_price(self): # ADDITIONAL method
self.price = 2*self.price
class Pants(Clothing): # new Pants class INHERITING from Clothing
def __init__(self, color, size, style, price, waist):
Clothing.__init__(self, color, size, style, price)
self.waist = waist
def calculate_discount(self, discount): # OVERRIDE parent’s method
return self.price * (1 - discount / 2)
Inheritance is the last object-oriented programming topic in the lesson. Thus far you've been exposed to:
Classes, objects, attributes, methods, and inheritance are common to all object-oriented programming languages.
Knowing these topics is enough to start writing object-oriented software, however, these are only the fundamentals of object-oriented programming.
Here is a list of resources for advanced Python object-oriented programming topics.
So far the coding exercises have been in Jupyter notebooks. Jupyter notebooks are especially useful for data science applications because you can wrangle data, analyze data and share a report all in one document; however, they're not ideal for writing modular programs, which require separating code into different files.
A Python module is a single Python file containing a collection of functions, classes and/or global variables. They are called module, because they are modular, you can reuse them in different applications. In this section the Distribution and Gaussian code is refactored into individual modules.
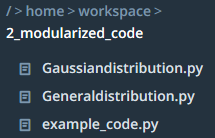
In the 2_modularized_code folder, you can see three files:
The Generaldistribution.py file contains the Distribution class which is the parent class of Gaussian class.
Generaldistribution.py
class Distribution:
def __init__(self, mu=0, sigma=1):
""" Generic distribution class for calculating and visualizing a probability distribution.
Attributes:
mean (float) representing the mean value of the distribution
stdev (float) representing the standard deviation of the distribution
"""
self.mean = mu
self.stdev = sigma
def __repr__(self):
"""Function to output the characteristics of the Gaussian instance
Args:
None
Returns:
string: characteristics of the Gaussian
"""
return f"mean {self.mean}, standard deviation {self.stdev}"
...
The Gaussiandistribution.py file imports the Distribution class from the Generaldistribution.py file and uses as parent class to define the Gaussian class. The from ... import ... essentially pastes the Distribution class’s code to the top of the Gaussiandistribution file when the code runs.
Gaussiandistribution.py
from Generaldistribution import Distribution
class Gaussian(Distribution):
def __init__(self, mu = 0, sigma = 1):
Distribution.__init__(self, mu, sigma)
def calculate(self, data, sample=True):
if data:
...
The example_code.py file then imports the Gaussian distribution class and makes use of it:
example_code.py
from Gaussiandistribution import Gaussian
gaussian_one = Gaussian(22, 2)
print(gaussian_one.mean)
OUTPUT
22
For the rest of the lesson, you'll work with modularized code rather than a Jupyter notebook. Go through the code in the modularized_code folder and understand how everything is organized.
A package is a collection of modules placed into a directory plus some additional files.
In this next section, we convert the Distributions code into a Python package. Although the previous code might already seem like it was a Python package because it contained multiple files, a Python package also needs an __init__.py file. In this section, you'll learn how to create this __init__.py file and then pip install the package into your local Python installation.
Pip is a Python package manager that helps with installing and uninstalling Python packages. You might have used pip to install packages using the command line: pip install numpy. When you execute a command like that, pip will download the package from a Python package repository called PyPi. However, for this next exercise, you'll use pip to install a Python package from a local folder on your computer. The last part of the lesson will focus on uploading packages to PyPi so that you can share your package with the world.
If you want to develop a package locally on your computer, you should consider setting up a virtual environment. That way if you install your package on your computer, the package won't install into your main Python installation. Before starting the next exercise, the next part of the lesson will discuss what virtual environments are and how to use them.
setup.py
from setuptools import setup
setup(name = '<packagename>',
version = '<version>',
description = '<Package Description>',
packages = ['<packagename>'],
author = 'Author Name',
author_email = 'authorname@domain.com',
zip_safe = False) # package can’t be run directly from the ZIP file
<parent module file name>.py
class <ParentClass>:
...
<child module file name>.py
from .<parent module file name> import <ParentClass>
class <ChildClass>(<ParentClass>):
...
__init__.py
from .<child module file name> import <ChildClass>
Once everything is set up, open a new terminal window in the workspace. Then type:
cd <package_folder>
pip install .
If everything is set up correctly, pip will install the <packagename> package into the workspace. You can then start the python interpreter from the terminal typing:
python
Then within the Python interpreter, you can use the <packagename> package:
from <packagename> import <ChildClass>
var = <ChildClass>()
...
In other words, you can import and use the <ChildClass> class because the <packagename> package is now officially installed as part of your Python installation.
If you leave the __init__.py file empty, the application has to use the <ChildClass> more indirectly:
from <packagename>.<child module file name> import <ChildClass>
If you want to install the Python package locally to your computer, you might want to set up a virtual environment first.
start python, import <package> and print attribute <package>.__file__:
root@213aff37070c:/home/workspace# python
Python 3.6.3 | packaged by conda-forge | (default, Nov 4 2017, 10:10:56)
[GCC 4.8.2 20140120 (Red Hat 4.8.2-15)] on linux
Type "help", "copyright", "credits" or "license" for more information.
>>> import <packagename>
>>> <packagename>.__file__
'/home/workspace/3b_answer_python_package/distributions/__init__.py'
>>>
A Python package does not need to use object-oriented programming. You could simply have a Python module with a set of functions. However, most if not all of the popular Python packages take advantage of object-oriented programming for a few reasons:
A virtual environment is a silo-ed Python installation apart from your main Python installation. That way you can install packages or delete the virtual environment without affecting your main Python installation
Let's talk about two different Python environment managers: venv and conda. You can create virtual environments with either one. Below you'll read about each of these environment managers including some advantages and disadvantages.
Here are instructions about how to set up virtual environments on a macOS, Linux, or Windows machine using the terminal: instructions link.
Note that if you install packages on the workspace and run into issues, you can always reset the workspace; however, you will lose all of your work. So be sure to download any files you want to keep before resetting a workspace.
Pip is a package manager and can manage only Python packages.
venv is an environment manager that comes pre-installed with Python 3. Creating a virtual environment actually creates a new folder containing a Python installation. Deleting this folder will remove the virtual environment.
To use venv and pip, the commands look something like this:
python3 -m venv <environmentname>
source <environmentname>/bin/activate
pip install <packagename>
You'll notice that the command line now shows (<environmentname>) at the beginning of the line to indicate you are using the <environmentname> virtual environment
Conda is a language agnostic package and environment manager. Conda was invented because pip could not handle data science packages that depended on libraries outside of Python. If you look at the history of conda, you'll find that the software engineers behind conda needed a way to manage data science packages (NumPy, Matplotlib, etc.) that relied on libraries outside of Python.
As a package manager, conda makes it easy to install Python packages especially for data science. For instance, typing conda install numpy will install the numpy package.
As an environment manager, conda allows you to create silo-ed Python installations.
The commands look something like this:
conda create --name <environmentname>
source activate <environmentname>
conda install <packagename>
If you create a conda environment, activate the environment, and then pip install the distributions package, you'll find that the system installs your package globally rather than in your local conda environment. However, if you create the conda environment and install pip simultaneously, you'll find that pip behaves as expected installing packages into your local environment:
conda create --name <environmentname> pip
Whether you choose to create environments with venv or conda will depend on your use case.
Conda is very helpful for data science projects, but conda can make generic Python software development a bit more confusing; that's the case for this project.
On the other hand, using pip with venv works as expected. Pip and venv tend to be used for generic software development projects including web development.
root@213aff37070c:/home/workspace# conda update python
Collecting package metadata: done
Solving environment: done
root@213aff37070c:/home/workspace# mkdir package_distributions
root@213aff37070c:/home/workspace# cd package_distributions/
root@213aff37070c:/home/workspace/package_distributions# mkdir distributions
root@213aff37070c:/home/workspace/package_distributions# touch setup.py
root@213aff37070c:/home/workspace/package_distributions# cp /home/workspace/2_modularized_code/G*.py ./distributions/
root@213aff37070c:/home/workspace/package_distributions# touch ./distributions/__init__.py
root@213aff37070c:/home/workspace/package_distributions# ls ./distributions/
Gaussiandistribution.py Generaldistribution.py __init__.py
root@213aff37070c:/home/workspace/package_distributions# ls
distributions setup.py
root@213aff37070c:/home/workspace# cd ..
root@213aff37070c:/home/workspace# python -m venv VEnvDist
root@213aff37070c:/home/workspace# source VEnvDist/bin/activate
(VEnvDist) root@213aff37070c:/home/workspace# cd package_distributions/
(VEnvDist) root@213aff37070c:/home/workspace/package_distributions# pip install .
Processing /home/workspace/package_distributions
Installing collected packages: distributions
Running setup.py install for distributions … done
Successfully installed distributions-0.1
(VEnvDist) root@213aff37070c:/home/workspace/package_distributions#
Binomialdistribution.py
from Generaldistribution import Distribution
class Binomial(Distribution):
def __init__(self, prob=.5, size=20):
self.p = prob
self.n = size
Distribution.__init__(self, self.calculate_mean(), self.calculate_stdev())
def calculate_mean(self):
self.mean = self.p * self.n
return self.mean
def calculate_stdev(self):
self.stdev = math.sqrt(self.n * self.p * (1 - self.p))
return self.stdev
...
Any changes to the distributions library should be reinstalled with
pip install --upgrade .
For running unit tests, use
/usr/bin/python -m unittest test
Here are a few links about how to contribute to a github project:
Note that pypi.org and test.pypy.org are two different websites. You'll need to register separately at each website. If you only register at pypi.org, you will not be able to upload to the test.pypy.org repository.
Also, remember that your package name must be unique. If you use a package name that is already taken, you will get an error when trying to upload the package.
You'll need to create a setup.cfg file, README.md file, and license.txt file.
<package_folder>/<package_name>/setup.cfg
[metadata]
description-file=README.md
<package_folder>/README.md
# distributions package
Summary of the package
# Files
Explanation of the files in the package
# Installation
...
<package_folder>/<package_name>/license.txt # obtained from https://opensource.org/licenses
Copyright 2020 Author Name
...
You'll also need to create accounts for the pypi test repository and pypi repository. Don't forget to keep your passwords; you'll need to type them into the command line.
Once you have all the files set up correctly, you can use the following commands on the command line (note that you need to make the name of the package unique, so change the name of the package from distributions to something else. That means changing the information in setup.py and the folder name):
root@ed83649e2ab0:/home/workspace# cd 5_exercise_upload_to_pypi/
root@ed83649e2ab0:/home/workspace/5_exercise_upload_to_pypi# python setup.py sdist
running sdist
running egg_info
creating distributions.egg-info
writing distributions.egg-info/PKG-INFO
writing dependency_links to distributions.egg-info/dependency_links.txt
writing top-level names to distributions.egg-info/top_level.txt
writing manifest file 'distributions.egg-info/SOURCES.txt'
reading manifest file 'distributions.egg-info/SOURCES.txt'
writing manifest file 'distributions.egg-info/SOURCES.txt'
running check
warning: check: missing required meta-data: url
creating distributions-0.1
creating distributions-0.1/distributions
creating distributions-0.1/distributions.egg-info
copying files to distributions-0.1...
copying README.md -> distributions-0.1
copying setup.py -> distributions-0.1
copying distributions/Binomialdistribution.py -> distributions-0.1/distributions
copying distributions/Gaussiandistribution.py -> distributions-0.1/distributions
copying distributions/Generaldistribution.py -> distributions-0.1/distributions
copying distributions/__init__.py -> distributions-0.1/distributions
copying distributions.egg-info/PKG-INFO -> distributions-0.1/distributions.egg-info
copying distributions.egg-info/SOURCES.txt -> distributions-0.1/distributions.egg-info
copying distributions.egg-info/dependency_links.txt -> distributions-0.1/distributions.egg-info
copying distributions.egg-info/not-zip-safe -> distributions-0.1/distributions.egg-info
copying distributions.egg-info/top_level.txt -> distributions-0.1/distributions.egg-info
Writing distributions-0.1/setup.cfg
creating dist
Creating tar archive
removing 'distributions-0.1' (and everything under it)
The last command created new dist folder in the <package_folder> directory,
inside created new file <package name>-<version>.tar.gz
also created new <package name>.egg-info folder in the <package_folder> directory,
inside new files: PKG-INFO, SOURCES.txt, dependency-links.txt, not-zip-safe, top_level.txt
root@ed83649e2ab0:/home/workspace/5_exercise_upload_to_pypi# pip install twine
Collecting twine
...
Successfully installed ... twine-3.1.1 ...
# command to upload to the pypi test repository
twine upload --repository-url https://test.pypi.org/legacy/ dist/*
# command to install package from the pypi test repository
pip install --index-url https://test.pypi.org/simple/ distributions
# command to upload to the pypi repository
twine upload dist/*
# command to install package from the pypi repository
pip install distributions
This link has a good tutorial on distributing Python packages including more configuration options for your setup.py file: tutorial on distributing packages. You'll notice that the python command to run the setup.py is slightly different with
python3 setup.py sdist bdist_wheel
This command will still output a folder called dist. The difference is that you will get both a .tar.gz file and a .whl file. The .tar.gz file is called a source archive whereas the .whl file is a built distribution. The .whl file is a newer type of installation file for Python packages. When you pip install a package, pip will first look for a whl file (wheel file) and if there isn't one, will then look for the tar.gz file.
A tar.gz file, i.e. an sdist, contains the files needed to compile and install a Python package. A whl file, i.e. a built distribution, only needs to be copied to the proper place for installation. Behind the scenes, pip installing a whl file has fewer steps than a tar.gz file.
Other than this command, the rest of the steps for uploading to PyPi are the same.
If you'd like to learn more about PyPi, here are a couple of resources: